Tabby Tabard Pattern from Tabards, designs by Carole Rutter, Leisure Arts, Leaflet 94, 1977
Tabards were originally cloths worn by medieval knights over their armour, in a desperate attempt to differentiate one chainmail-encased man from another.
This knight’s tabard is giving him the bravery to fight on despite being cut off at the knees. Methinks he’s a relative of the Black Knight.
In any case, modern tabards are almost exclusively worn by professional cleaning staff.
Don’t be deceived by her mild mannered appearance. She could easily take out that stubby-legged knight. Just look at her smile. She’ll mop the floor with him!
However, between our distant, somewhat height-challenged past, and our terrifyingly clean dystopian present, there were the Sixties and Seventies. When, for one brief moment, we dared dream of a bright, shining future when absolutely everyone would wear tabards.
Even for the manliest of villains, tabards are the perfect sparkly accessory for the annual tribble hunt!
To make your own sexy, warrior tabard:
This woman and child are either space colonists or members of an oppressive cult. Or both!
TABBY
Size: See General Instructions
Note that this particular space cult allowed its members to use “personal preference” in placement of the ties. That’s why it didn’t survive past the Seventies. Allow cultists to make any decisions for themselves, and it’s only a matter of time before they decide to place the ties around the Supreme Alien Leader’s neck.
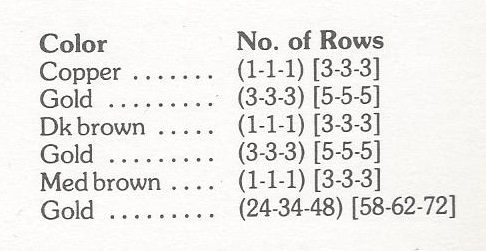
Materials: Worsted wt yarn, (6-8-10) [14-16-18] oz gold, (1-1-1) [2-2-2] oz each copper, dk brown and med brown heather; aluminum crochet hook sizes E and J (Canadian sizes 9 and 3) or sizes needed for gauge.
Gauge: With larger hook, in patt, 10 sts = 3’’; 7 rows = 2’’
Pattern Stitch Row 1: Sc in first sc, * ch 1, sk next st, sc in next st; rep from * across; ch 1, turn. Row 2: Sc in first sc, * dc in skipped st 2 rows below, sc in next st; rep from * across; ch 1, turn. Rep Rows 1 and 2 for patt.
INSTRUCTIONS Back : With larger hook and gold, ch (30-38-42) [48-54-62]. Foundation Row: Sc in 2nd ch from hook, * ch 1, sk next ch, sc in next ch; rep from * across; ch 1, turn. Next Row: (Mark this side as right side of work.) Sc in first sc, * dc in skipped ch of foundation ch, sc in next sc; rep from * across; ch 1, turn. Now work Patt Rows 1 and 2 until you have completed (3-5-5) [9-9-9] rows in gold, ending by working Row 1. Now work established patt in the following color sequence:
However, if you’re fortunate enough to escape the clutch of space cults obsessed with earth tones, this tabard will still be useful if you accidentally become Lost in Space.
Sure, you’ll have to put up with your annoyingly nice parents, your obnoxious siblings, an anxiety-ridden robot and a drippy old dude trying to take over the world. But at least you’ll be able to moon over the handsome Space Corps Major while rocking your groovy geometric tabard!
And let’s face facts, when it comes to the future, there’s a lot worse things that can happen to you than having to wear a tabard.
You have worked a total of (36-48-62) [86-90-100] rows. Neck and Shoulder Shaping: Continuing in patt with gold, work across (3-5-5-) [7-9-11] sts for 2 more rows; finish off. Skip center (23-27-31) [33-35-39] sts for neck opening. Join gold with a sl st in next st; beg in same st as joining and work in patt across rem sts for 2 rows; finish off. Front: Work same as back until you have completed a total of (34-44-58) [80-84-94] rows. Neck and Shoulder Shaping: Continuing in patt with gold, work across (3-5-5) [7-9-11] sts for (4-6-6) [8-8-8] rows; finish off. Skip center (23-27-31) [33-35-39] sts for neck opening. Join gold with a sl st in next st; beg in same st as joining and work in patt across rem sts for (4-6-6) [8-8-8] rows; finish off.
Finishing: Sew shoulder seams. Edging: With right side facing and smaller hook, join gold with a sl st in any st at outside edge of tabard, ch 1, work 1 rnd in sc around entire edge, working 3 sc in each of 4 corners, join with a sl st in beg ch-1; finish off. With right side facing and larger hook, join gold with a sl st in any st at neck edge, ch 1, work 1 rnd of sc loosely around neck edge, join with a sl st in beg ch-1; finish off.
Worse things like having your home planets destroyed by terrifying automatons, then being forced to join a rag-tag fleet, fleeing oppression and poor ratings across the stars. But you can happily survive it all so long as you’re wearing a stylish tabard.
Ties: With smaller hook, make 2 ties with copper and 2 ties with med brown heather; see General Instructions.
So crochet yourself a Tabby Tabard, and this simple medieval garb will ensure you’ll be gleefully fashionable wherever or whenever you travel in space and time.
Sherbet Sweater Pattern (Lea 067) from Laine Dor Yarns, Montreal, c. 1985
On Thursday, February 9th, the World Wildlife Fund is asking everyone in northern climes to turn down the heat and wear a sweater to slow global warming and save the Earth. According to their Sweater Day website: “If every Canadian lowered the heat a few degrees this winter, it'd be like taking 300,000 vehicles off the road!”
True, wearing a sweater one day of the year isn’t likely to slow down the coming weather apocalypse. Still, it’s a nice idea, so in honour of this year’s Sweater Day, I give you a pattern straight from the sweater-iest decade of the last century – the 1980s!
Also known as the sweatiest decade.
For the complete pattern (and more snark!):
The first thing I noticed upon opening the pattern leaflet was that the directions inside were for a sweater with vertical stripes. Before I could panic, as the sweater pictured clearly had horizontal stripes, a scrap of paper floated out of the booklet.
***************************************************
THIS IS THE CORRECT PATTERN. THE PATTERN PREPRINTED IN THIS LEAFLET BELONGS TO LEA062.
WE APOLOGIZE FOR ANY INCONVENIENCE THIS MAY HAVE CAUSED.
Excuse me, but vertical instead of horizontal stripes are far more than just an inconvenience! My mother warned me that vertical stripes will make me look taller, and that men are intimidated by tall women.
An All-Caps Apology certainly isn’t going to make up for the fact that they’ve just tricked me into buying the striped sweater of spinsterhood!
LEA 067 SWEATER WITH HORIZONTAL STRIPES
No, that’s not intended to be a link. The pattern designer was very fond of the underline key on her manual typewriter.
Spinsters have to make their own fun somehow.
Instructions: For all sizes
Materials: 450 grams (16oz) col A and 50 grams (2oz) of col B & C. In Laine Dor Sherbert
Yes, you read that right. It’s Sherbert, not Sherbet which is French for … well, Sherbert. However, in a move calculated to make pure laine francophones everywhere weep, the company’s called Laine Dor, not d’Or.
Still, you can’t deny they made pretty wool, even if it’s not actually spun “of gold” (d’Or). It’s a shame the company doesn’t appear to have survived the eighties.
Needles: Susan Nates size 7.00 (Am size 10 ½) – or size required to obtain gauge and size 5.00 (Am size 8)
Gauge: 15 sts and 18 rows 10 cm (4’’)
I wonder if leaving the equals sign out of their gauge had something to do with Laine Dor’s demise.
To save time: Take time to check gauge.
Front & Back: (Worked form one cuff to the other)
Or substituting “form” for “from”.
With No. 5.00 needles, and col A, cast on 31 sts and work 2 ½’’ in k1 P1 ribbing.
Randomly capitalizing letters couldn’t have helped their stock market standing.
Change to size 7.00 needles and cont in st st inc 17 sts evenly spaced across 1st row. Work 18 sts A, 6 sts col B in rev st st and 24 sts col A. Inc 1 st at ea edge every 2nd row until work meas 22’’.
Normally, I leave all the typos in, because they’re hilarious. In this case, however, “Inc 1st at ea edge” seemed unnecessarily confusing so I added the all important st so it was clear you were increasing stitches.
Feel free to thank me by going back in time and buying me stock in MTV.
At the same time, when work meas 8 ½’’, position second stripe of 6 sts in col C, rev st st, 10 sts from 1st stripe.
This is why you should always read the entire pattern. Otherwise, you’ll find yourself picking a sweater apart from 22’’ back down to 8 ½''.
Is that weeping I hear? Women in the eighties did not weep!
When work meas 14 ½’’, position 3rd stripe of 6 sts in col C, rev st st, 12 sts from 2nd stripe. When work meas 20 ½’’ position 4th stripe of 6 sts in col C, rev st st, 14 sts from 3rd stripe. Cont in this pattern. When work meas 22’’, inc 18 sts at ea edge. Work even until work meas 26 ½’’. To shape neck, divide work in half (back and front). For the back, work even for 10’’. For the front, at neck edge, every 2nd row, dec 1 st 3 times. End 1st stripe. Work even for 7 ½’’, then, every 2nd row at neck edge, inc 1 st 3 times. Join back and front and work even for 4 ½’’. Dec 18 sts at ea edge. To shape sleeve, every 2nd row, dec 1 st at ea edge until work measures 24’’ join.
Just when I’ve gotten comfortable with “meas” for “measures”, they hit me with the whole word.
Good patterns like to keep you off balance like that. Every sentence is a new adventure, a new mystery.
For instance, what exactly does “dec 1 st at ea edge until work measures 24’’ join” mean? 24’’ from what? Join to what? It’s all so exciting!
At the same time, when work meas 6 ½’’ from neck, end 2nd stripe, when work meas 12 ½’’ from neck end 3rd stripe, when work meas 18 ½’’ from neck end 4th stripe, when work measures 24’’ from join…
Ah, they meant 24’’ from join. Those little prepositions are so important.
… sec 17 sts evenly spaced across next row. Change to size 5.00 needles and work 2 ½’’ in k1 P1 ribbing. Bind off.
No, that’s not “secure 17 sts”, although that’s how I first read it, too. It’s just “dec 17 sts” with an s substituted for d to keep things lively.
Finishing: Join sleeve and sid seams.
Abbreviations can be taken too far, however. Would it really have been so hard to write “side”?
With size 5.00 circular needles…
It's so considerate of the pattern designers not to mention circular needles in the materials list. For good health, you need to break up knitting sessions with exercise like running unexpected errands or tearing your hair out.
…and col A, pick up approx 72 sts around bottom border and work 3’’ in ks P2 ribbing. Bind off. With size 5.00 circular needles and col A pick up approx 36 sts around neck edge at work 1’’ in garter st. (k all rows). Bind off.
Pick up approx 36 sts around neck edge at… At what? What??
Oh well, at least the handy ABBREVIATIONS key will be helpful in figuring out all the “ea”s and “col”s and “meas”s.
ABBREVIATIONS: no. – numéro, pt – point, env – envers, endr – endroit, rep – répéter, m – mailles, rg (s) – rang (s), trav – travailler, term – terminer, aug – augmenter, ch – chaque, proch – prochain, comm – commencer, gl – glisser, rab – rabattre, cont – continuer, rel – relever, aig – aiguille, dim – diminuer.
Unless, for no apparent reason, the ABBREVIATIONS are provided in French.
NOTE: Be sure to buy sufficient yarn of each colour in the same dye lot number to complete the article.
The directions in this leaflet are carefully checked and rechecked to assure accuracy.
Yes, that’s assure accuracy. Because Laine Dor definitely didn’t check to ensure accuracy.
We cannot, however, be responsible for typographical errors or misinterpretations of instructions.
If by some chance our many typographical errors lead to a misinterpretation of the instructions, it’s your fault, not ours.
With this dedication to customer service, it’s shocking that Laine Dor’s still not around. Oh well, at least I’ll always have this misshapen, incorrectly striped sweater to remember them by.
Ladies’ Ski Mask from “Easy to Make Fashions for the North, South, East, West”, c. 1960
So, clearly it’s time to fight back by frightening the heck out of Jack Frost.
Those who remember the 1960s speak fondly of the Summer of Love, but they never mention the Winter of Rabid Hate. But now I understand why so many hippies fled to San Francisco in 1967 and overindulged in free love and inexpensive marijuana. How else could they block out childhood memories of their mothers wearing this terrifying mask as she hunted them down like so many snowshoe bunnies? Yes, thousands of baby boom youngsters huddled behind snow banks in their urine-soaked snowsuits praying that this terrifying visage wouldn’t find them and make them come indoors to massage Mommy’s hammer toe.
Don’t believe me? Then explain this: George R.R. Martin, the infamous fantasy author, was but a tender twelve years old in 1960, and he believes to this day the most ominous phrase for all of humankind is...
I rest my case.
For the complete pattern (and more snark!):
Ski Masks
Materials Required:
AMERICAN THREAD COMPANY “DAWN” KNITTING WORSTED
I do believe this calls for another sign...
4 ounces Buff Heather
1/3 ounce each Red, Tangerine and Black
Red sequins, Red and Black felt, 2 large bone rings for Ladies’ Mask
1 pr. knitting needles No. 8
Aluminum crochet hook size F
I’ve complained in the past about the creepiness of so-called skintoned ski masks, but Buff Heather will make you look even less like a ski bunny and more like a bog body that’s been dug up at the 2014 Winter Olympics’ site.
Now, even though dead Soviets have turned up in bogs, I want to make it very clear I’m not accusing the Russians of anything. Especially Vladimir Putin.
LADIES’ MASK: Work Basic Mask.
BASIC MASK:
Cast on 82 stitches (sts) and work in Knit (K) 2, Purl (P) 2 ribbing for 2 inches ending last row with P 2.
NEXT ROW: K 2, P 2 for 28 sts, K 26, P 2, K 2 for 28 sts (Right side).
NEXT ROW: P 2, K 2 for 28 sts, P 26, K 2, P 2. Repeat last two rows for 1 inch ending with K 2, P 2.
NEXT ROW: K 2, P 2 for 28 sts, K 12, increase (inc) 1 st in each of the next 2 sts, K 12, P 2, K 2 for 28 sts.
NEXT ROW: K 2, P 2 for 28 sts, P 12, inc in next st, P 2, inc in next st, P 12, K 2, P 2 for 28 sts.
NEXT ROW: K 2, P 2 for 28 sts, K 12, inc in next st, K 4, inc in next st, K 12, P 2, K 2 for 28 sts.
NEXT ROW: P2, K 2 for 28 sts, P 12, inc in next st, P 6, inc in next st, P 12, K 2, P 2 for 28 sts. Continue in same manner until there are 12 sts between increasing points (94 sts).
The helpful definitions of common short forms, along with the pedantically spelled out instructions and the enthusiastically shouted NEXT ROWS, all imply that this basic ski mask is an ideal first project for a beginner.
Of course, it’ll be your first and last knitting venture after your family sees the finished hat and locks you away as a danger to yourself and others.
NEXT ROW: K 2, P 2 for 28 sts, K 38, P 2, K 2 for 28 sts.
NEXT ROW: P 2, K 2 for 28 sts, P 38, K 2, P 2 for 28 sts. Repeat last 2 rows 4 more times ending with K 2, P 2.
NEXT ROW: K 2, P 2 for 28 sts, K 11, bind off 16 sts for Mouth, K 10, P 2, K 2 to end of row.
NEXT ROW: P 2, K 2 for 28 sts, P 11, drop yarn. Attach new skein of yarn on the other side of Mouth, P 11, K 2, P 2 for 28 sts.
NEXT ROW: K 2, P 2 for 28 sts, K 11, drop yarn, pick up 1st skein of yarn, K 11, P 2 K 2 for 28 sts.
NEXT ROW: P 2, K 2 for 28 sts, P 11, cast on 18 sts, P 11 on other side of Mouth, K 2, P 2 for 28 sts, cut yarn of 2nd skein.
It’s not clear at this point how the Ski Mask will end up looking like a Sock Monkey who died of lock jaw.
NEXT ROW: K 2, P 2 for 28 sts, K 40, P 2, K 2 for 28 sts.
NEXT ROW: P 2, K 2 for 28 sts, P40, K 2, P 2 for 28 sts. Repeat last 2 rows twice.
NEXT ROW: K 2, P 2 for 28 sts, K 16, bind off 8 sts for Nose, K 15 P 2, K 2 for 28 sts.
NEXT ROW: P 2, K 2 for 28 sts, P 16, cast on 17 sts, P 16, K 2, P 2 for 28 sts.
NEXT ROW: K 2, P 2 for 28 sts, K 16, P 8, K 1, P 8, turn. Working across Nose sts only, K 8, P 1, K 8, turn, P 8, K 1, P 8, K 16, P 2, K 2 for 28 sts.
NEXT ROW: P 2, K 2 for 28 sts, P 16, K 2 together (tog), K 6, P 1, K 6, K 2 tog, P 16, K2, P 2 for 28 sts.
NEXT ROW: K 2, P 2 for 28 sts, K 16, P 2 tog, P 5, K 1, P 5, P 2 tog, K 16, P 2, K 2 for 28 sts.
NEXT ROW: P 2, K 2 for 28 sts, P 16, K 2 tog, K 4, P 1, K 4, K 2 tog, P 16, K 2, P 2 for 28 sts.
NEXT ROW: K 2, P 2 for 28 sts, K 16, P 2 tog, P 3, K 1, P 3, P 2 tog, K 16, P 2, K 2 for 28 sts.
NEXT ROW: P 2, K 2 for 28 sts, P 16, K 4, P 1, K 4, P 16, K 2, P 2 for 28 sts.
NEXT ROW: K 2, P 2 for 28 sts, K 17, P 3, K 1, P 3, K 17, P 2, K 2 for 28 sts.
NEXT ROW: P 2, K 2 for 28 sts, P 18, K 2, P 1, K 2, P 18, K 2, P 2 for 28 sts.
NEXT ROW: K 2, P 2 for 28 sts, K 19, P 1, K 1, P 1, K 19, P 2, K 2 for 28 sts.
Normally, I don’t recommend nose jobs for ski masks, but a knitted schnoz really shouldn’t look like it was on the losing end of an argument with a garden hoe.
NEXT ROW: P 2, K 2 for 28 sts, P 7, bind off 12 sts for Eye, P 2, bind off 12 sts for other Eye, P 6, K 2, P 2 for 28 sts.
NEXT ROW: K 2, P 2 for 28 sts, K 7, drop yarn, attach about 1 yd. of yarn at Nose and K 3, drop yarn, attach another skein of yarn at other side of other Eye and K 7, P 2, K 2 for 28 sts.
NEXT ROW: P 2, K 2 for 28 sts, P 7, drop yarn, pick up other yarn, P 3, drop yarn, pick up other yarn at other side of Eye, P 7, K 2, P 2 for 28 sts.
NEXT ROW: K 2, P 2 for 28 sts, K 7, drop yarn, pick up other yarn, K 3, drop yarn, pick up other yarn at other side of Eye, K 7, P 2, K 2 for 28 sts.
NEXT ROW: P 2, K 2 for 28 sts, P 7, cast on 12 sts, P 3, cast on 12 sts, P 7, K 2, P 2 for 28 sts.
NEXT ROW: K 2, P 2 for 28 sts, K 41, P 2, K 2 for 28 sts.
Unkind people might comment that the eyes look a tad close together...
...and they’d be right. However, keep in mind that the field of Ski Mask Physiognomy has been debunked, so we cannot conclude that only the criminal class would be caught dead or alive in this mask.
Although, it’s true that the last lady wearing this mask was seen in the company of this fellow ski enthusiast.
NEXT ROW: P 2, K 2 for 28 sts, P 41, K 2, P2 for 28 sts. Repeat last 2 rows once, then P 1 row, K 3 rows.
Work next 35 rows in stockinette stitch (K 1 row, P 1 row), decreasing 4 sts evenly spaced every other row but do not work decreases directly over decreases of previous row until 25 sts remain, cut yarn leaving an end. Thread yarn into needle and draw sts tog, sew seam.
Cut a section of Red felt for lower Lip and stitch in place. Cut a section Red felt for upper lip and stitch in place taking care to keep corners of Mouth neat. Cut two sections of Black felt for Eyes and stitch in place. Outline Eyes with red sequins and also stitch a few sequins on each Cheek.
Only a few sequins on those cheeks, mind you! Whether bog ladies were sacrificial victims or young misses with a poor sense of direction, they did NOT make themselves up to look like whores.
Of course, if you use too few, you risk creating sparkly duelling scars.
Embroider Nostrils in red. Cover 2 bone rings with single Crochet using Tangerine yarn and stitch in place for Earrings.
Go big or go home.
HAIR: Starting at ridge as illustrated and with Tangerine, join yarn over a K st. Working toward top of Mask, * skip 1 K st, wind yarn around index finger to form a 1 inch loop, insert hook through both loops of next K st and complete sc. Repeat from * in same row of K sts to top of mask, skip 1 row of K sts and repeat from 1st * until top of Mask is covered with loops.
Why Tangerine hair? Because you won’t win first prize at the Bog Body Costume Party if you forget that the acids in peat bogs eventually turn everyone into gingers. (Warning: only click the link if you’re a fan of graphic forensic content!)
Of course, the red sequins on your mask may disqualify you anyway, as no bog body has been discovered in sparkly disco wear.
Perfect for the holidays! The black sport weight yarn creates skyscrapers against a sparkling sky of metallic yarn.
Ah, the eighties! When the smoggy sky literally sparkled with volatile organic compounds. Every New Year was greeted with the festive sound of Grandpa’s emphysema acting up as he tried to sing Auld Lang Syne with the family. After Grandpa’s oxygen treatment, everyone would run outside to dance gaily in the acid rain until the hairspray in Mom’s hair caught fire.
Yes, hearken back to that halcyon yesteryear with an elegant sweater depicting a pollution-blackened cityscape.
For the complete pattern (and more snark!):
Directions are given for small (finished bust measurement: 36 inches) with changes for medium (38 inches) and large (40 inches) in parentheses. You will need 3 (4,5) ounces sport yarn, 3 ounces metallic yarn and a size G crochet hook (or size required for gauge). Use double strand of metallic throughout.
Shoulder pads are highly recommended, unless you’re into having your shoulders rubbed raw by metallic thread. Yes, looking like a linebacker really did have a practical purpose in that synthetic era.
Gauge: 9 sts equal 2 inches
5 rows equal 2 inches
Five rows of sport weight yarn every two inches? If you want to complete this project before the December 2012 apocalypse, you’d best start now. Don’t you want a sweater that will match the burning ruins of your hometown?
TO SAVE TIME, TAKE TIME TO CHECK GAUGE.
Ooh… catchy phrasing! So much better than the usual all-caps gauge warnings. This needs to be part of a poster campaign.
Note: Sweater is worked sideways. Rows are worked back and forth from waist to neckline.
FRONT: With black, ch 81 (87, 93).
Row 1: Dc in 4th ch from hook and in each of next 35 (41, 47) ch, join metallic, dc in next 42 ch, ch 3, turn – 78 (84, 90) sts.
Sweater is worked entirely in dc, with no shaping. Directions will be for number of sts and color only. Diagram will further clarify. Ch 3 and turn at end of each row. Ch 3 at end of row always counts as first dc of next row.
Hopefully you haven’t sunk too far into a haze of “Vun, two, tree, ha-ha-ha!” because there’s a mistake in the forty-fifth row. Do you see it? Here’s a hint… all the other rows add up to 78 (84, 90) sts across. You’ll be fine if you’re crocheting a small size sweater, but you’re going to run into trouble if you’re trying to make a medium or large size.
I suspect it’s not a mistake, but instead a diabolical plot to make us all regret overindulging this holiday season. Only small sized people and muppets get a pass as they can’t hold their eggnog anyway.
Fasten off for small size. For medium, repeat rows 1 through 4. For large, repeat rows 1 through 8. Back is worked exactly the same as front. Sew 3 ½ inch shoulder seams. Sew side seams leaving 7 (7 ½, 8) inch opening for arms. Work 2 rnds dc around sleeve openings, join, fasten off. At waist, beginning at side seams, work 4 rnds dc, join, fasten off.
And tah-dah! You are now the proud owner of an authentic Eighties sweater. Add a bottle of hairspray and some legwarmers, and you’ll be all set to party hardy until the Police show up.
Sweet and Low Perfectly dee-vine dancing partner. Rings the Belle every time and keeps ‘em coming back for more.
Rings the BELLE?
My goodness, is that code for naughty1940s nookie? It sure was by 1979!
Glamour-minded rugcutters please note the definitely P.M. neck-line, low and square; the come hitherish black velvet ribbons here, there and everywhere.
Come hither to my waist, collar and sleeves, but no higher and most definitely no lower! A proper young lady reserves all belle and bell ringing to the third date.
Make it in cherry and whee, what a flutter you raise at your next party.
“Golly gee whiz, Dick. I don’t know why no one else showed up. I guess you’re my only guest. Let’s put a record on!”
“Donna, I really want to go home.”
“Don’t be silly! I’ve dead bolted all the doors, cut the phone lines and dynamited the only bridge off this property. So, do you like my sweater? I knitted it myself!”
For the complete pattern (and more snark!):
Hey, it looks like some other young ladies have launched a rescue mission to save poor Dick! Unfortunately, instead of arming themselves with the traditional torches and pitchforks, they’ve chosen bulrushes. Donna will make short work of them with just one Benny Goodman record.
Incidently, ringing your bell is also British slang for bashing someone’s brains in.
No. 2054
Materials: CHADWICK’S RED HEART WOOL FLOSS (2 ply), 5 balls (1 oz. balls) for Size 12; 6 balls for Size 14; 7 balls for Size 16.
Bone Knitting Pins, 1 pair No. 3.
Because nothing knits the crazy into a garment like real BONE needles.
Donna hand-carved them herself after a night of particularly unsatisfying bell ringing.
8 yards of narrow velvet ribbon for each size.
Buttons – see Directions of Right Back.
Wait, why can’t you just tell us now? Why all the suspense? It’s a knitting pattern, for heaven’s sake, not a murder mystery.
Not yet, anyway.
Snap fasteners.
BLOCKING MEASUREMENTS:
SIZES: 12 (14, 16)
Bust: 31 (33, 35)’’
Width across front at armholes: 16 (17, 18)’’
Width across front between armholes: 12 (12 ½, 13)’’
Pay attention! The AT armholes measurement is four to five inches wider than the BETWEEN armholes measurement.
An extra four to five inches is essential to successful bell ringing.
Length from top of shoulder: 18 (18 ½, 19)’’
Length of side seam: 10 (10 ½, 10 ½)’’
Width across each back at armhole: 7 ¾ (8 ¼, 8 ¾)’’
Width across each back above armhole shaping: 6 ½ (6 ¾, 7)’’
Width of sleeve at upper arm: 12 (12, 13)’’
I have no idea why we’re doing all this measuring. After all, this sweater hangs off Donna like a potato sack giving her all the sex appeal of a mashed potato.
If only she’d used a different pattern, Donna wouldn’t have needed to lock Dick up in her LP love den.
GAUGE: 7 sts make 1 inch; 10 rows make 1 inch.
SIZES: 12 (14, 16)
FRONT . . . Starting at waistband, cast on 95 (100, 105) sts. 1st and 2nd rows: P across. 3rd row: *K 3, k 2 tog, 0. Repeat from * across, ending with K 5. 4th row: P across. Repeat these 4 rows 2 more times (3 rows of eyelets made). Now work in stockinette st (k 1 row, p 1 row), increasing 1 st at both ends of next row and on 1 row every inch thereafter until there are on needle 111 (118, 125) sts. Work straight until piece measures in all 10 (10 ½, 10 ½)’’. To Shape Armholes: Bind off 4 sts at beginning of each of the next 2 rows and 2 sts at beginning of following 6 rows. Dec 1 st at end of each row until there remain on needle 85 (90, 95) sts. With right side facing, repeat 1st to 4th rows incl of waistband 3 times (3 rows of eyelets made). Work in stockinette st and continue. Next row: Work across 28 (30, 32) sts. Bind off (purling the sts) for front of neck, the next 29 (30, 31) sts. Work across remaining 28 (30, 32) sts. Work straight over this last set of sts only until piece measures from 1st row of armhole shaping 7 (7, 7 ½)’’. To Shape Shoulder: Starting at armhole edge, bind off 6 sts on every other row until there remain 4 (6, 8) sts. Starting at same edge, bind off. Attach arm at opposite side of neck edge and work other side to correspond.
Now for the pièce de résistance... this sweater buttons down the back. How fantastically “come-hitherish”! After all, Donna can’t get out of her own sweater by herself.
Come to think of it, she can’t put it on by her lonesome either. She must have a man-servant chained in the basement for such troublesome tasks.
LEFT BACK . . . Starting at waistband, cast on 45 (50, 55) sts. Work same as Front until the 12 rows of waistband are complete. Next row: K across. Following row: P across to last 6 sts, k 6 (center back band). Continue in stockinette st, keeping the 6 sts of back band in garter st (k each row), increasing 1 st at side edge on next row and every 9th row thereafter until there are on needle 54 (58, 62) sts. Work straight until piece measures in all 10 (10 ½, 10 ½)’’. To Shape Armholes: Starting at side edge, bind off 5 sts once. Then dec 1 st at armhole edge on every other row until there remain 45 (47, 49) sts. Work straight until piece measures from 1st row of armhole shaping 7 (7, 7 ½)’’. To Shape Shoulder: Starting at armhole edge bind off 6 sts on every other row 4 times. Starting at same edge, bind off 4 (6, 8) sts. Starting at same edge, bind off remaining 17 sts for back of neck.
Hurray! We’ve finally arrived at the Right Back, and the top secret number of buttons we need will be revealed...
RIGHT BACK . . . Work to correspond with Left Back, making a buttonhole 2 sts in from back edge when piece measures from last row of waistband 1 ( ½, 1)’’ and, measuring from 1st buttonhole, every inch thereafter until there are 16 (17, 17) buttonholes in all – to make a buttonhole, on one row bind off 2 sts and on next row cast on 2 sts to replace those bound off.
Well, that was a let down. Why on earth couldn’t they have just said in the materials list: 16 to 17 buttons? Why make us search through the pattern to learn that?
Although... buttons have also been used as slang for, ahem, a lady’s bell. Perhaps, this was a successful attempt to thwart the knitting pattern censors.
SLEEVES . . . Starting at lower edge, cast on 85 (85, 90) sts. Work first 4 rows same as Front (1 row of eyelets made). Now work in stockinette st until piece measures in all 2 ½ (2 ½, 3)’’. To Shape Top: Bind off 4 sts at beginning of each of the next 2 rows. Dec 1 st at both ends of every 3rd row until 69 sts remain.
Heh. They said 69!
Dec 1 st at end of each row until 55 sts remain. Bind off 3 sts at beginning of each row until 19 sts remain. Bind off.
Press pieces through damp cloth. Sew underarm and shoulder seams. Sew sleeve seams and sew sleeves in. Cut two 23-inch pieces of ribbon and run through eyelets of sleeve. Tie ends in bows. Cut three 27-inch pieces of ribbon. Tack one end of each piece to wrong side of Right Back at beginning of each row of eyelets at waist. Run these pieces of ribbon in and out of eyelets to desired position on left side of Front. Cut three 20-inch pieces of ribbon. Tack one end of each piece to wrong side of Left Back at beginning of each row of eyelets at waist. Run ribbon through eyelets to meet previous ribbons. Tie ends in bows. Cut three 20-inch pieces of ribbon. Tack ends at armhole edge on wrong side of Right Front eyelets. Run ribbon through eyelets to position above waist bows. Cut three 12-inch pieces of ribbon. Tack on wrong side of Left Front eyelets. Run ribbon through eyelets to meet previous ribbons. Tie ends in bows. Sew on buttons to correspond with buttonholes. Sew snap fasteners to close waistband at back. Work a row of sc along entire neck edge.
If you’re wondering how Donna intends this evening to draw to a close, just take a look at the page facing the Sweet and Low Sweater pattern.
By the way, S is the first initial of Dick’s last name, not Donna’s.
“See, Dick? We absolutely, positively must get married! I’ve already monogrammed everything in the house!”
In desperation, Dick threw himself out the window and made a run for it. He might have made it too, if it hadn’t been for the monogrammed land mines.
Not the Happy Ending Donna had in mind for her Dick. But on the bright side, she did get enough material for a brand new set of bone needles.
The Ripple Granny Jacket and Hat from Crochet with Squares, 1974
With apologies to Right Said Fred… whaddaya mean, who’s Right Said Fred?!
I’m too sexy for my followers, too sexy for my followers
Please, followers don’t leave me!
I’m too sexy for my jacket, too sexy for my jacket
So sexy I can’t hack it
I’m too sexy for the ski lodge, too sexy for the ski lodge
Bates Motel or Econo Lodge
And I’m too sexy for this post
Too sexy for this post
No way I’m ceasing and desisting!
I’m a granny square model, you know what I mean
I’d give my eye teeth to do a turn on the catwalk
Yeah on the catwalk, on the catwalk
I’d kill my grandma to shake my tush on the catwalk
I’m too sexy for my hat, too sexy for my hat
There’s no denying that
And I'm too sexy to crochet, too sexy to crochet
I’d rather wear a toupee!
Cos I’m a granny square model, with grannies I’m seen
As I model in Wallmart instead of a catwalk
Oh, in Wallmart, in Wallmart
I got arrested for shaking my little tush in Wallmart.
I’m too sexy for Blogger, too sexy for Blogger
Twitter, Facebook and Blogher
I’m too sexy for my followers, too sexy for my followers
My followers are all going to leave me!
I’m too sexy for this blog.
For the complete too sexy pattern (and more too sexy snark):
THE RIPPLE GRANNY
I suppose those are ripples of granny squares, if by ripples you mean jagged clumps of potholders.
Sorry, I meant sexy, jagged clumps of sexy potholders.
SIZES: 10-12; 14-16 Directions are given for size 10-12. Changes for 14-16 are given in parentheses (for Jacket). Directions for hat in one size, it adjusts to fit.
MATERIALS NEEDED:
4 ply Synthetic yarn or Knitting Worsted (4 oz. skeins)
6 (7) skeins Color 1 (Royal Blue)
2 (3) skeins Color 2 (Green)
1 (2) skeins Color 3 (White)
1 (1) skeins each Color 4 (Yellow) and Color 5 (Red) or any 5 color combination may be substituted.
G (G) Aluminum or #6 (6) Plastic Crochet Hook for Squares and
F (F) Aluminum or #5 (5) Plastic Crochet Hook for Collar and Bands.
I hope I don’t have to warn you of the dire consequences should you attempt this pattern with a non-synthetic, organic yarn and a bamboo hook.
Remember this pattern booklet is called Crochet with Squares, not Crochet with Hippy-Dippy Tree Huggers.
JACKET (Size 10-12)
GAUGE: Each square measures 3½”.
SQUARE #1: Make 59 RND 1: With Color 1 (Royal Blue) and large hook ch 4, sl st in 4th st from hook to form a ring, ch 3, 2 dc in ring, * ch 3, 3 dc in ring, rep from * twice, ch 3, sl st in top of ch 3 to join. RND 2: Ch 3, * (3 dc, ch 3, 3 dc) in next ch 3 loop (corner shell), rep from * twice, (3 dc, ch 3, 2 dc) in last ch 3 loop, sl st in top of ch 3 to join (ch 3 at beg of row counts as 1 dc). RND 3: Ch 3, 2 dc in space between ch 3 and next 3 dc group, * (3 dc, ch 3, 3 dc) in next ch 3 loop, 3 dc in next space between 3 dc loop, sl st in top of ch 3 to join, break off.
Perhaps a better name for this pattern booklet would be Crochet with Brackets, or Crochet with 3 dc. Crochet Yourself into a Coma would be cruel, but fair.
SQUARE #2: Make 34 RND 1: With Color 5 (Red) same as RND 1 of SQUARE #1, break off. RND 2: Join Color 4 (Yellow) with sl st in 1st ch 3 loop, ch 3, (2 dc, ch 3, 3 dc) in same loop with sl st, * (3 dc, ch 3, 3 dc) in next ch 3 loop, rep from * around, sl st in top of ch 3 to join, break off. RND 3: Join Color 2 (Green) with sl st in 1st ch 3 loop, ch 3, (2 dc, ch 3, 3 dc) in same loop as sl st, * 3 dc in space between next two 3 dc groups, (3 dc, ch 3, 3 dc) in next ch 3 loop, rep from * around, end with 3 dc in space between last two 3 dc groups, sl st in top of ch 3 to join, break off.
SQUARE #3: Make 29 RND 1: Same as RND 1 of SQUARE #2. RND 2: Use Color 2 (Green), work same as RND 2 of SQUARE #2. RND 3: Use Color 3 (White), work same as RND 3 of SQUARE #2.
Thou shalt not make this pattern more interesting by altering the order of these holy SQUARES! First, thou shalt create all 56 of SQUARE #1. Thou shalt not crochet 29 of SQUARE #3, excepting that you have already completed 34 of SQUARE #2.
Making up your own SQUARE #5 is right out.
TRIANGLE #1: Make 24 ROW 1: With Color 1 (Blue) ch 4, sl st in 4th st from hook to form ring, ch 4, (3 dc, ch 3, 3 dc) in ring, work 1 tr in ring. ROW 2: Ch 4, turn, 2 dc in first tr, (3 dc, ch 3, 3 dc) in next ch 3 loop, skip next 3 dc, work 2 dc and 1 tr in top of turning ch 4. ROW 3: Ch 4, turn, 2 dc in first tr, skip next 2 dc and next 3 dc group, (3 dc, ch 3, 3 dc) in ch 3 loop, skip 3 dc, 3 dc in space before last 2 dc, 2 dc and 1 tr in top of turning ch 4, break off.
TRIANGLE #1? But this is Crochet with Squares! Using TRIANGLES to fabricate a Ripple Granny Jacket is CHEATING!
TRIANGLE #2: Make 2. ROW 1: With Color 5 (Red) same as Row 1 of TRIANGLE #1, break off. ROW 2: Turn, join Color 4 (Yellow) with sl st in 1st tr, ch 4 complete same as ROW 2, TRIANGLE #1, break off. ROW 3: Turn, join Color 2 (Green) with sl st in 1st tr, ch 4, complete same as Row 3, TRIANGLE #1, break off.
UNDERARM MOTIF: (5 corners). Make 2.
Why yes, my underarm is pentagon-shaped. Isn’t yours?
RND 1: With Color 5 (Red), ch 4, sl st in 4th st. from hook to form ring, ch 3, 2 dc in ring, * ch 3, 3 dc in ring, rep from * 3 times, ch 3, join with sl st in top of ch 3, break off. RNDS 2 and 3: Work in same manner as Square #2, but having 5 corners, break off.
BLOCKING: Block all motifs to size. See page 49.
Turn to page 49, class.
Apparently, blocking is the application of an iron-on patch onto a side of beef pinned to a candy stripers uniform.
That’s candy stripers not candy strippers! Get your minds out of the gutters, people.
BLOCKING: Place crocheted square right side down on well padded surface. Pin each square or article to size given with each design. Cover with damp cloth, steam (do not press). When two pieces have the same measurements, pine one piece down and block. Place reverse piece on top (right side up), and block. All pieces to dry completely before removing pins.
That procedure may work for the first couple of squares, but once you have a pile of 122 of the same sized squares, you’re going to need a bigger iron. And a super-sized side of beef.
Now everyone turn back to page 40 of the text book.
JOINING: Weave Squares together following directions on page 49.
Page 49 AGAIN!
All right, if I must.
Let me guess. Either your joining will create a legion of synthetic yarn ridges inside the jacket to rub against your skin until you’re driven mad (option A) or the outside of the jacket will look like Dr. Frankenstein embroidered it (option B).
Decisions, decisions.
JOINING SQUARES:
A With tapestry needle and same yarn as last rnd overcast edges of both squares from one ch 3 loop to next, or from one corner sc to next corner sc. B Butt 2 motifs together, bring needle up through center of corner st of 1st motif, down through corner st of 2nd motif, * up through next st of same motif, down through same st of 1st motif and up through next st of same motif, down through same st of 2nd motif, rep from * until joining is completed.
Class, stop sniggering just because they said Butt! Now everyone back to page 40.
Join Jacket in 3 sections as shown on charts.
After having crocheted and ironed 122 squares, 26 triangles and 2 underarm motifs, feel free to delegate the stitching together of all 150 pieces to the kids.
If they complain, remind them that this isn’t illegal child labour as you’re not going to be paying them. No, this is family game night.
Follow chart for color arrangement of motifs 1, 2, and 3. Join shoulders matching P’s and Q’s. Use different colors of yarn for markers for letters I through O placing where indicated on chart (on sleeves and armhole openings). Join sleeve seams matching letters A through H. Matching yarn colors place sleeve in position and weave in place.
COLLAR AND BORDER:
(For both sizes) (Collar and bands are worked in one piece and all sc’s are worked in back loop of stitches only) Row 1: (Starting at center back) With Color 1 and small size crochet hook, ch 5, 1 sc in 2nd st from hook, I sc in each of next 3 ch sts, (4 sc in row). Row 2: Ch 1, turn, 1 dc in each sc across. Repeat last row until 164 (180) rows are completed.
C’mon, it’s only 180 rows! I’ve said it before, I’ll say it again, people. There is NO crying in crochet!
There is, however, repetitive stress injury in crochet.
START COLLAR SHAPING: Row 1: (Inc. Row) ch 1, turn, 1 sc in each sc, 2 sc in last sc. Row 2: Ch 1, turn, 1 sc in each sc across. Repeat last 2 rows until there are 14 sc in row. Row 21: Repeat row 1 of Collar shaping. Row 22: Ch 1, turn, 2 sc in first sc, 1 sc in each rem sc. Rows 23 and 24: Repeat Rows 1 and 2 of Collar shaping. Repeat last 4 rows until there are 35 sc in row. Work without increasing over 35 sc until there are 262 (274) rows in all, break off.
This is ½ of Collar and Border measuring from center back of lower edge of neck. Make other half in same manner. Join the 2 sections at center back of border and collar.
If you incur repetitive stress injury from making the second half of the Collar and Border, write to Graphic Enterprises Inc, the holder of this pattern’s copyright back in 1974. Unfortunately, they didn’t provide an address, but I’m certain that one of the 33,800,000 hits their company’s name got from Google will be the correct place.
Good luck!
CUFFS: Make 2. Ch 21, work same as Row 1 and 2 of collar (20 sc in row) until there are 60 (63) rows, break off. Join 2 short ends to form tube.
BELT: Ch 9, work back and forth in single crochet same as cuff until there are 218 (230) rows or until belt is desired length, break off.
Such a prosaic belt just won’t do justice to the patchwork masterpiece your family made together.
This vintage belt, on the other hand, will add a certain je ne sais quoi.
No, je ne sais quoi is not French for WTF.
FINISHING: With right sides together, place and stitch collar and border to outside edge of jacket, matching center back of collar to center of neck, center back of border to center back of lower edge of jacket, making sure increased edge of collar is attached to jacket edge.
JACKET (Size 14-16)
There is NO crying in pattern transcription.
*wimper*
GAUGE: Each square measures 4”.
Jacket is made same as Size 10-12—But do not break yarn at end of last RND or ROW of Motifs.
SQUARES: RND 4: Ch 1, 1 sc in same st with sl st, work (1 sc in each dc, 5 sc in each corner ch 3 loop) around, join with sl st, break off.
TRIANGLES: ROW 4: Ch 1, turn, 1 sc in first tr, 1 sc in each dc up to ch 3 corner loop, 5 sc in ch 3 loop, 1 sc in each rem dc, 1 sc in top of turning ch 4, break off.
BLOCKING, JOINING, FINISHING:
Work same as Size 10-12.
DIRECTIONS For Collar and Border are given in parenthesis with directions for Size 10-12.
That wasn’t so bad. So we’re finally done now, right?
HAT
AUUUUUGGGGHHHH!
Work 8 Squares #2 and 4 Triangles #1 same as Size 10-12 jacket.
BLOCKING: Same as Size 10-12 jacket.
JOINING: Weave squares together same as jacket joining 4 squares together for crown. Matching letters, join the 4 squares #2 to center Squares, then fit Triangles between Squares. Stitch Triangles in place. See chart.
That’s a hat? It looks like a crocheted pinwheel.
So, instead of stitching it together to form an ugly hat, you could create your own low tech wind farm!
BRIM: Using large crochet hook, join Color 1 (Blue) with an sc in end st of a dc row, work 2 more sc over same end st, work (3 sc over end sts of each dc row, skipping all joinings and ch 4 rings at beg of each triangle) around, join, (72 sc).
NOTE: The entire brim is worked in back loop of each sc.
MORE IMPORTANT SAFETY NOTE: Do not wear completed granny square hat in the kitchen. Someone may try using your head to get a roast out of the oven.
RND 2: (Inc) Ch 1, turn, * 1 sc in each of next 5 sc, 2 sc in next sc, rep from * around, join in 1st sc (84 sc). RND 3: (Inc) Ch 1, turn, * I sc in each of the next 6 sc, 2 sc in next sc, rep from * around, join (96 sc). RNDS 4 and 5: Ch 1, turn, I sc in in each sc all around, join each round. RND 6: (Inc) Ch 1, turn, * 1 sc in each of the next 7 sc, 2 sc in next sc, 2 sc in next sc, rep from * all around join (108 sc). RNDS 7 and 8: Same as RNDS 4 and 5. RND 9: (Inc) Ch 1, turn, *1 sc in each of the next 8 sc, 2 sc in next sc, rep from * around, join (120 sc). RNDS 10 through 13: Work RNDS 4 and 5 twice, break off.
At last, you’re ready to shake your granny-squared tush on the catwalk!
All Heart Skimp from “The Great Little Crochet Skimps”, c. 1975
It’s almost Valentine’s Day and you’re no doubt thinking about knitting something special for the man you love. Don’t do it! You may believe that only sweaters will curse a relationship, but even knitting a fifteen foot scarf for your boyfriend is a one way ticket to Lonely-Town!
Still, you’re desperate to prove you love him, so what’s a girl to do?
Clearly, you need to ditch the whole subtle approach and expose your supersized heart for everyone to see. That way, he can’t claim he doesn’t know just how incredibly super awesomely much you love him. Why every time he looks at your chest your Valentine message will be right there in his face. “I Loooove You this MUCH!”
In fact, this could be the beginning of a whole new way of communicating with your boyfriend. Anything you really want to say to him, just crochet or knit it onto your chest.
“Honey, you’re a slob, and I don’t approve of your friends.”
For the complete pattern (and more snark!):
All Heart
These directions are for small size (8-10) and medium size (12-14).
Evidently large size ladies don’t wear “skimps”. Skimp being another word for vest, sleeveless pullover and the rather suggestively named potholder. (Hopefully, your pots come in pairs!)
In the seventies, fashion designers weren’t all heart when it came to plus size gals. However, skimps for skinny girls were far from their worst offence.
MATERIALS
BERNAT BERELLA GERMANTOWN (2 oz. balls)
- 2 Main Color (M C)
- 1 Color A
- 1 Color B
Yes, this is what “chubby” looked like in the heroin chic, starving seventies.
Poor Tracy. This pink pleated perky nightmare has been cruelly designed to make her look perfectly cylindrical, utterly waist-less, and neck-less too. No wonder she doesn’t care if chubby fashions are hard to find – she probably prays nightly that the local Sears will burn to the ground.
FOR SMALL SIZE
1 BERNAT-Aero crochet hook Size 1 (Canadian Wool Crochet Hook No. 5:50 mm)
FOR MEDIUM SIZE
1 BERNAT-Aero crochet hook Size J (Canadian Wool Crochet Hook No. 6:00 mm)
I was briefly excited to see the word Canadian in the pattern, but then I noticed that Bernat believes Canadians sort their Crochet Hooks according to a 24 hour clock. And also make them out of wool.
Yes, I live in a magical, if very cold, land.
OR ANY SIZE HOOK THAT WILL GIVE THE STITCH GAUGE GIVEN BELOW
GAUGE
3 sts = 1 inch on Size I hook
7 sts = 2 inches on Size J hook
NOTE 1: Both sizes are made on the same number of stitches, using the hook suggested for the correct GAUGE.
Note 2: Always count turning chain as 1 d c.
Granted, these notes may be useful for the beginning crocheter, but why do pattern editors always feel the need to shout at noobs? Are they really afraid they’ll use the hook suggested for the correct gouge instead of gauge?
Mind you, with this particular pattern the ability to correctly gouge with a crochet hook would be welcome. So maybe those all-caps are not a bully’s shout, but a terrified scream.
“It’s gauge, GAUGE! Please don’t gouge holes in me just because I wrote an incomprehensible pattern riddled with errors!”
HEART: Make 2. Using M C, ch 4. Row 1: 2 d c in first st of ch, ch 3, turn – 3 d c. Row 2: 1 d c in space of turning ch (inc), 1 dc in next space, 2 d c in last d c (inc) ch 3, turn – 5 d c. Row 3: 1 d c in space of turning ch (inc), 1 dc in next 3 d c, 2 d c in last d c (inc) ch 3, turn – 7 d c. Continue to inc one st at beg and end of every row until there are 36 d c, ch 3, turn. TO DIVIDE FIRST HALF: Row 1: 1 d c in each of the next 16 d c, ch 3, turn – 17 d c. Rows 2 and 3: 1 d c in each of the next 16 d c, ch 3, turn. Row 4: 1 d c in each of the next 13 d c, y o hook, draw up a loop in next st, y o, draw through 2 loops on hook, y o, draw up a loop in next st, y o, draw through 2 loops on hook, y o, draw through 3 loops on hook (dec), 1 d c in tuning chain, ch 3, turn – 16 d c. Row 5: 1 dec st in next st. 1 d c in each of the next 10 d c, 1 dec st in next st, 1 d c in turning ch, ch 3, turn – 2 sts dec. Continue to dec 1 st at beg and end of EVERY row until 6 sts remain. Fasten off. SECOND HALF: Starting at center of heart, skip 1 d c, join yarn in next d c and work to correspond to first half, working first dec at beginning of Row 4. Fasten off. EDGING: Join Color A in lower tip of heart and work 2 s c in edge of each row around side of heart. Fasten off. Join yarn at neck edge of heart...
Did you know your neck circumference is actually linked to your risk of heart disease? The bigger it is, the higher your chances of having a heart attack.
Feel free to share this fun fact with your date this Valentine’s Day! Men love it when you lecture them about their health.
... and work 2 s c in edge of each row to other side of neck edge. Fasten off. Join yarn at outside edge of remaining side of heart and work to correspond to other side, join with sl st to first st at tip of heart. Fasten off. SHOULDER STRAPS: Row 1: With right side facing you and working at top of heart, join Color A in first st, ch 3, 1 s c in each of the next 5 d c across row, ch 3, turn – 6 d c. Row 2: 1 d c in each s c, ch 3, turn – 6 d c. Repeat Row 2 six times more. Fasten off. Work other shoulder straps in same manner. SIDE LACING: Join Color A to st at tip of heart...
Do not confuse the tip of the heart with the top, or your skimp will not be tip-top.
Ba-dum-cha!
Men also find ba-dum-chas veeerrry sexy.
... and ch 20 sts loosely, turn. Row 1: 1 d c in 4th st of ch, * skip 1 st, ch 1, 1 d c in next st, repeat from * 7 times more (10 d c), ch 1, skip 2 s c at edge of heart, 1 s c in each of the next 3 s c at same edge, ch 1, turn. Row 2: Skip first d c, * 1 d c in next d c, ch 1, repeat from * 7 times more, ending 1 d c in top of turning chain, ch 4, turn – 9 d c. Row 3: * 1 d c in next d c, ch 1, repeat from * 7 times more, ending skip 2 s c, 1 s c in each of the next 3 s c at edge of heart, ch 1, turn – 9 d c, Row 4: Skip first d c, * 1 d c in next d c, chain 1, repeat from * 6 times more, ending 1 d c in turning ch, ch 4, turn – 8 d c. Continue to work in this manner having 1 d c less at heart edge every other row until 16 rows have been completed, ending last row with 1 d c, ch 1, 1 d c in top of turning ch. Fasten off. Join Color A at tip of heart and work other side to correspond. Work same side lacings on other heart. Sew shoulder seams. SIDE EDGING: Using Color B and with right side facing you, join Color B in corner st of side lacing, ch 3, 1 d c in same space, * 2 d c in next space (V), repeat from * 13 times more, ending 5 d c in next space (corner), 2 d c in next space, 1 s c in each s c to shoulder strap, 2 s c in each d c across shoulder straps, 1 s c in each s c of second heart, 2 d c in next space, 5 d c in corner space, 2 d c in each of the next 15 spaces. Fasten off. Work same edging around other side. NECK EDGING: Join Color B in s c at divide for heart and work 1 s c in each s c around to shoulder strap, work 2 s c in each space around shoulder strap. Work same edging around remaining neck edging and other shoulder strap, join with a sl st. Fasten off. TO JOIN SIDE LACINGS OF FRONT AND BACK: With wrong sides of heart touching...
That’s right, when it comes to your heart(s), two wrongs DO make a right!
So, if you’re still a spinster, it’s because you’ve let yourself be guided by outmoded concepts like fair play and the rule of law. Fortunately, this pattern has now provided you with a far more practical philosophy for your dating relationships.
... join M C in space at lower edge of front, * ch 3, 1 s c in first space of back, ch 3, 1 s c in space between 2 d c of next V of front, repeat from * to armhole edges, ending skip 2 d c of corner, 1 s c in next space, ch 3, skip 2 d c of corner of other armhole, 1 s c in same space. Fasten off. Join other side lacings in same manner. BAND AT LOWER EDGE: With right side facing you, join Color B at side lacing, ch 3, 1 d c in same space, 2 d c (V) in each space around entire lower edge, join with sl st. Fasten off Color B. Join M C in space of V, ch 3, 1 d c in same space, * 2 d c in space of V, repeat from * around, join with sl st. Fasten off M C. Join Color B in space of V, ch 3, 1 d c in same space, 2 d c in space of V, repeat from * around, join with sl st. Fasten off Color B. Steam lightly.
Now slip on your brand new All Heart skimp and pick out just the right Valentine’s Day card for your beloved.
Why yes, darling. I will stab you through the heart with my giant steel needles if you break my big, crocheted heart. But don’t worry, I KNOW you love me best of all.
Seriously, that shaggy stuff drooping from her knitwear doesn’t look remotely real. However, it’s a timely reminder that you should always take off your mitts before eating cotton candy.
You can bundle up in cold weather and still look pretty as a picture with fur-trimmed accessories like these. The head covering and mittens have a knitted-in diamond pattern. Ribbing around the neck, face and mitten cuff proves a snug, warm fit. Strips of real fur are sewed on for a unique touch.
Wait, what? That’s REAL fur actually peeled off a REAL animal?
C’mon, what kind of creature has fur like that?
Holy Spaceballs, first a Wookie, and now a Wampa! Although, to be fair, hunting Wampas wasn’t made illegal until a full decade after this pattern was published.
What? Doesn’t everyone know that one of the first acts of the successful Rebels was to protect the gentle, misunderstood Wampa from maniacs with lightsabers?
You must at least be aware of the shameful black market trade in Wampa-skin rugs. Rumour has it that Princess Leia is now wanted for shooting several endangered Wampas from her Space Helicopter.
She’s such a maverick.
For the complete pattern (and more snowman skinning horror):
FUR TRIMMED HELMET/MITTENS
SIZES: One Size Fits All.
Yep, one size fits all, in exactly the same way that the ribbing around the helmet can be described as a “snug, warm fit”.
MATERIALS: Reynolds Lopi: 4 skeins MC, 1 each colors A and B, 1 package Lopi Fur Trim.
Hurray, the helmet and mitts aren’t trimmed with real fur after all! Lopi is yarn that comes from the fleece of Icelandic sheep, which means the trim is made from hanks of unspun wool. So, you can make this pattern with a clear conscience.
Susan Bates knitting needles Nos. 9, 10 ½ and 11 or size to give gauge. Circular needle No. 9. Steel crochet hook Size 0. 1 set large bobbins.
GAUGE: 3 sts =1’’; 4 rows = 1’’.
NOTES: Use bobbins for color changes. Change colors on wrong side, lock strands by picking up new color from under dropped color to prevent holes. Cut and join colors as needed. Run in ends on wrong side. To Follow Chart: Odd Rows (right side): K from right to left on Chart. Even Rows: P from left to right on Chart.
Yes, there’s a couple of charts. Let me assure you,
no animals, real or imaginary, have ever been harmed in the production of charts.
No, really, they’re all fine. A little psychotic, perhaps, but still fine.
MITTENS
RIGHT MITTEN: With MC and No. 10 ½ needles, cast on 40 sts. Work in St st (p 1 row, k 1 row), beg with a p row, for 5 rows. Next Row (right side): K 3, * k 2 tog, k 6, repeat from * across, ending k 2 tog, k 3. Working on 35 sts, work even for 5 rows. Next Row (right side): K 3, * k 2 tog, k 5, repeat from * across, ending k 2 tog, k 2. Working on 30 sts, work even for 5 rows. Next Row (right side): K 3, * k 2 tog, k 4, repeat from * across, ending k 2 tog, k 2. End of Cuff. Change to No. 9 needles. Next Row (wrong side): Working on 25 sts p 1, * k 1, p 1, repeat from * across. Next Row: K 1, * p 1, k 1, repeat from * across. Repeat these 2 rows for 2’’, ending on wrong side. Change to No. 10 ½ needles. NOTE: Follow Chart A for color pat to top of Chart, beg and ending as indicated on Chart. When Chart is completed, work with MC only. Work in St st for 4 rows.
Ta-dah, it’s the first chart! Though, you’ll probably want this part, too...
Otherwise, you might reverse the colours A and B which will lead to all sorts of ecological trouble. Birds will fly off course, bees will try to pollinate you... it’ll be complete anarchy!
Thumb (right side): K 12 sts, inc 1 st in next st, k 12 sts. Working on 26 sts, p across. Next Row: K 12 sts, inc 1 st in next 2 sts, k 12 sts. Working on 28 sts, p across. Next Row: K 12 sts, inc 1 st in next st, k 2 sts, inc 1 st in next st, k 12 sts. Working on 30 sts, p across. Next Row: K 12 sts, inc 1 st in next st, k 4, inc 1 st in next st, k 12 sts. Working on 32 sts, p across. Next Row: K 12 sts, inc 1 st in next st, k 6, inc 1 st in next st, k 12 sts. Working on 34 sts, p across. Next Row: K 12 sts, and sl them on first st holder, k next 9 sts for thumb, sl remaining 13 sts on 2nd holder, turn work and cast on 1 st (this cast-on st will be before 9 sts knitted on last row). Working on 10 sts, work in St st until piece measures 4’’ or desired length for thumb, ending with a p row. K 2 tog across next row (5 sts). P 2 tog twice (3 sts). Leaving a 10’’ strand, cut yarn. Run end through remaining sts; draw sts tog. Using same piece of yarn, sew sides of thumb tog. Join yarn at base of thumb where sts were put on 2nd holder; k across 13 sts on holder. Next Row: P across 13 sts, and with same strand of yarn p across sts from first holder. Working on 25 sts, work in St st following chart until piece measures 4 ½’’ from joining or desired length to top of little finger, ending with a p row. SHAPE TOP – Dec Row 1: K 1, sl 1 as to k, k 1, psso, work to within last 3 sts, k 2 tog, k 1. Next Row: Purl. Next Row: Bind off center st, place marker between 2 center sts. Repeat Dec Row 1, 3 times; and at same time k 2 tog before center marker, sl 1 as to k, k 1, psso after center marker 3 times (10 sts). Weave top tog. Work Left Mitten the same, beg Chart for diamond motifs with B instead of A.
As an alternative to Lopi “fur”, which tragically appears to have gone extinct, I recommend using faux fur.
FINISHING: Steam press pieces. Sew side seams tog. With MC work 1 row sc along lower edge of Cuff. Fasten off. Fur Trim: Holding Mitten with Cuff away from you, using MC, work sc in each st around bottom of ribbing for ridge. Sew fur under ridge so that fur will lay against Cuff.
However, always ensure that your faux fur comes from an ethical supplier.
This woman is presently serving jail time for disemboweling these teddies in front of several (now permanently traumatized) children.
HELMET
Beg at bottom edge with MC and No. 11 needles, cast on 104 sts. P next row. Next Row (right side): Following Chart, beg with Pat Row 1 of Chart B-1. Work from U to V on Chart B-1, * k 1, k 2 tog, k 1, work from W to X on Chart B-2, k 1, k 2 tog, k 1, work from Y to V on Chart B-1, repeat from * twice, k 1, k 2 tog, k 1, work from W to X once, k 1, k 2 tog, k 1, work from Y to Z (1 st dec in each MC section).
The second eco-friendly chart – guaranteed to be 100% organic and vegan-friendly.
Next Row: Working on 96 sts, p across following chart for motifs; and at the same time, dec 1 st in center of each MC section every other row 3 times, ending with Row 8. Rows 9 and 10: Work in pat on 72 sts. Next Row: Dec 1 st in center of each MC section every other row 3 times. Ribbing. Change to No. 9 needles. Working on 48 sts, work in k 1, p 1 ribbing for 3’’, ending on the right side. Next Row (wrong side): With MC, * p 4 sts, inc 1 st in next st, repeat from * twice, p 3, drop yarn, join another ball of MC, work next 12 sts in ribbing as established and sl them on a holder for face opening, with same strand of MC, p 3 sts, * inc 1 st in next st, p 4 sts, repeat from * twice. Left Half – Next Row: Working on 21 sts, work from WW to X on Chart B-2, then from Y to V on Chart B-1, then from W to WW, then with MC work last 3 sts (face edge). This establishes diamond design. Following Charts B-1 and B-2 for diamond motifs, work 3 sts at face edge in MC, work in pat until piece measures 8’’ above ribbing or desired length to top of back of head, ending with a wrong side row on Chart; and at the same time repeat pat rows reversing Colors when charts are completed. Keeping continuity of pat throughout, on next row bind off 7 sts. Work in pat on 14 sts for 3 rows. On next row bind off first 7 sts. Work in pat for 3 rows. Bind off last 7 sts. Right Half: Join MC at right front neck edge and k first 2 sts; work from WW to X on chart, then from Y to V, then from W to WW. This establishes diamond design. Work to correspond to Left Half, ending 1 row less than Left Half before bind-off. Work same as for Left Half.
If you’re too busy saving the world to wade through this long, indigestible chunk of text, you can always skip the knitting and just use the faux fur.
FINISHING: Steam-press lightly. Sew back and top seam, matching diamonds. Face Ribbing: With right side facing, No. 9 circular needle and MC, beg at neck edge on right half, pick up and k 1 in 3 out of every 4 rows or sts around entire face edge, making sure to have an even number of sts; then work 12 sts from holder on front ribbing as established. Join and work in ribbing for 5 rnds. Bind off loosely in ribbing. With MC work 2 rows of sc along lower edge of hood. Fasten off. Fur Trim: With right side facing, using MC, work 1 row sc around base of ribbing along row from which sts were picked up for ridge. Beg at neck on Right Half and end at neck on Left Half; do not work across 12 sts of ribbing on front. Sew fur under ridge so that fur will lay against helmet.
Because nothing says “I love all of nature’s children” like wearing the skinned carcass of a stuffed animal you killed all by yourself.
This blog is the result of a near OCD compulsion to transcribe - and mock! - vintage patterns, ads, and other odds and sods. And you, dear reader, are the fortunate beneficiary.
Every month you will discover new patterns from the past century. These are the vintage gems that generations of women have inflicted upon husbands, children and themselves.
You are cordially invited to recreate these products of subconscious hostility and not-so-passive aggression. Send photos of the results to victoriadunnwrites (at) hotmail (dot) com, and I will be delighted to mock them for you.