Showing posts with label socks and stockings. Show all posts

Friday, December 16, 2011

DIY – Ripple Socks for Superheros!

While I’ve been neglecting this blog (but for very good reason, which I promise I’ll reveal with great fanfare soon), faithful reader Jenny has been busily crocheting up a storm. She’s even made the famous Ripple Socks!


Jenny writes: “Pay no mind to the fact that these socks are worn through...”

Keep reading for her hilarious explanation of the sad state of her ripple socks.
I wear my socks hard. No, really! Sometimes, on my long treks to the store (literally: a mile.5 to get to the shopping center, who knows how much walking in & between stores, then the mile.5 back carrying, for example, 10 pounds of flour, 5 pounds of sugar, a can of coffee, some yarn perhaps, 4 pounds of dry beans, a 2 liter of soda water...), I take my shoes off because my feet have been warmly squeezed into my shoes for so long, I just gotta relieve the pressure. [edit, my feet are only squeezed in when wearing thick socks such as these] [edit 2: i only wear the socks when it's cold out] Walking on the concrete sidewalks, and sometimes in the rain, has led to the demise of these poor socks. Most of the time, though, they are house socks--worn over my sock socks.
I’m sure our gentle reader can’t help but notice that Jenny is a superhero. And clearly these socks were not designed to stand up to the rigors of a life battling crime while toting 25 lbs of groceries around. I would suggest Jenny knit her next pair out of unstable molecules (yarn available for purchase at the Baxter Building, at the corner of 42nd and Madison in NYC).


Also, you will notice that I have demonstrated in the second photo that the socks do not stay put--as exampled by the left sock. The picture with the pattern had me all excited about big tall socks that would stay up--obviously the photo is either doctored or carefully setup then quickly shot because the slightest ant fart brings them down. Not to worry though--they're just socks, after all...and they're worn through anyway. When they first started showing signs of hole making, I thought to myself, I can just seam that back together with my handy dandy, uh, fixing things skills. More time passed and there were more long treks to the store with more concrete walkin' in my stockin's, and the holes just blew out irrationally.
I suspect supervillains were involved.
Don't know if I'll ever fix them, but boy do I enjoy wearing them! I made them! They're the first I've made in the sock-genre, so I'm sure there will be others.

One thing I will say as a note to others who may wish to produce these fine foot clothings is that the pattern only leads you up to the ankle. They say to repeat the last round until 18 somethings have been made or to desired length. Once again, the picture to accompany is misleading, and I think that's filthy. Not as filthy as making people believe the socks will stay up though. No hard feelings, honest. I did have a little, "whaaat?" about the heel, but I was new at crochet in general, and obviously I got through it :)
Jenny also included this important disclaimer.
p.s. there have not been any recorded incidents of seizures induced by my wearing of these socks.......for the record.
That would be for the official record, I’m sure. Those in the know are well aware zigzags (AKA ripples) were standard issue for super heroines in the sixties.


This “Vintage Super Hero Dress” will go beautifully with Jenny’s Ripple Socks, sending villains into helpless convulsions for miles around!


Read more!

Thursday, March 3, 2011

Snow Bound Bunnies!

Rabbit Slippers from Beehive for Bairns, 1980, original pattern c. 1950

It may be March, but the groundhog lied! Spring is still a long way away for most of Canada and the United States. Of course, we can’t really blame Canada’s own Wiarton Willie, as he was forced to make his Groundhog Day prediction indoors, due to a blizzard raging outside. And regardless of whether the Yankee Punxsutawney Phil or the Southern General Beauregard Lee deliberately led us astray, the fact remains that it’s still cold outside, and your baby needs toasty toes!

So, I recommend knitting up a pair of dead groundhogs for her feet. Sure, the pattern book calls these “Rabbit” slippers, but with just a few minor alterations, you can provide warm footsies for your child AND have your revenge on weather prognosticating rodents everywhere.


For the complete pattern (and more snark!):

Rabbit Slippers
A perfect little shower gift, reprinted from Beehive Book # 41.
Perfect if you want to show up at a shower with a gift that cost you a dollar fifty in leftover yarn scraps and thirty whole minutes of your time.

When you give these slipshod slippers to the new mum-to-be, don’t forget to announce, “I love you THIS much!”
MATERIALS: Beehive Baby Yarn (50 g): 1 ball main colour B. Small quantity of contrasting colour A. Two 2 ¼ mm (U.S. 1) knitting needles or whichever needles you require to produce the tension given below. One 3.50 mm (U.S. E or 4) crochet hook for ties. Stuffing.

TENSION: 9 ½ sts and 13 rows = 1 inch (2.5 cm) in stocking st.

MEASUREMENT: Length 3 ½ ins (9 cm).

COMPLETE SATISFACTION AND PERFECT RESULTS ARE ONLY GUARANTEED WHEN YOU WORK TO EXACT TENSION WITH THE SPECIFIED YARN.
Fortunately for the perfectionists among us, Beehive Baby Yarn is still available in a variety of sickeningly sweet pastel shades such as Precious Pink and Sleepy Sea. Unfortunately, that also makes knitting up miniature dead groundhogs more difficult, as those varmints don’t usually come in all the colours of a six year old girl’s rainbow unicorn obsession.

I recommend buying a ball of the Rose Bud red and telling everyone the groundhog was done in by an eighteen wheeler.
SOLE: With B cast on 22 sts and knit 1 row.
Continue in garter st (plain knitting every row) increasing 1 st beginning every row to 32 sts on needle. Knit 3 rows even.

Continue in garter st, decreasing 1 st beginning every row to 22 sts on needle. Cast off.

UPPER SECTION: With B, cast on 6 sts and work 2 rows garter st.
3rd row: K1. Inc 1 st in next st. Knit to last 2 sts. Inc 1 st in next st. K1.
4th row: Knit.
Repeat 3rd and 4th rows to 26 sts on needle.
Work 19 rows even in garter st.

Next row: K13. Turn.
Working on these 13 sts, work 35 rows garter st. Cast off.

Join yarn to remaining 13 sts and work 36 rows garter st. Cast off. Sew cast-off edges together.
Also, your bloody slippers will not only keep a baby’s feet warm, they’re even educational!

When baby starts walking, you can tie these slippers onto her feet and tell the tyke, “Don’t wander into the road, sweetie pie. Or you’ll end up smashed flat into the concrete with a tire tread down the middle of your back. Then someone will come along to scrape up your bloody remains and turn you into slippers.”
RABBIT HEAD: With A, cast on 3 sts and knit 1 row.
2nd row: Inc 1 st in each of 1st 2 sts. K1.
3rd row: Knit.
4th row: K1. Inc 1 st in next st. Knit to last 2 sts. Inc 1 st in next st. K1.
Repeat 3rd and 4th rows to 13 sts on needle.
Work 8 rows even in garter st.

Next row: K6. Turn.
Working on these 6 sts work 10 rows garter st.
Continue in garter st, decreasing 1 st each end of needle every row to 2 sts on needle. K2tog. fasten off.

Join yarn to remaining sts. K2tog. K5.
Work exactly as given for other ear.
Make another slipper the same.
Or if you prefer to maintain the magic of childhood, feel free to tell your toddlers that their groundhog slippers were made by pastel-coloured unicorns.

It’s never too early to instill fear of vengeance seeking unicorns.
TO MAKE UP: Placing one point of sole at back seam, sew evenly to upper, easing in fullness around shaped end of sole at front. With B, embroider eyes and nose on head as illustrated. Sew head in position, lightly stuffing nose and leaving the ears free. With 2 strands of B together, make a chain 12 ins (31 cm) long. Make 2 tassels and sew to each end of chain. Sew middle of chain to back of slipper.
Or of vengeance seeking groundhogs.


Click here for the printable pattern.

Read more!

Friday, April 9, 2010

Something’s afoot, but it’s not fashion!

Stop and Go Shoe Socks and Hair Do’s from “Socks and Mittens for the Family”, 1941

Mother made her children stand in a line at the end of the kitchen, all of them wearing their new Stop and Go shoe-socks. “We’re going to play a game,” she announced cheerfully to her girls. “When I say ‘go’ you begin sliding your feet around on the floors until I call ‘stop’. It’ll be grand fun!”

The younger girls happily agreed, but the eldest, Petunia, was suspicious.

“Now, wait just one moment while I get the floor wax,” Mother added. “It’ll make you slide faster.”

“Hey!” exclaimed Petunia, suddenly realizing Mother’s diabolical plan. “This isn’t a game. This is Spring Cleaning!”

“Nonsense, Petunia,” said Mother, handing her eldest a pair of fluffy ‘Hair-Do’s’. “But if you’re not going to play our game, you have to wear these. Now, go stand in that cobwebby corner and shake your head at us. Vigorously. ”

For the complete pattern (and more snark!):


STOP AND GO SOCKS

Sizes 8 ½ to 11

See Size Chart on Page 23

I’m not claiming that the very first time I tried to encode tables I crashed Blogger’s main server. I’m sure that was a coincidence. Nevertheless, it’s only prudent to put the Medium and Large sizes in brackets, rather than try to recreate the original formatting of this pattern.
Sizes: Small (Medium, Large)

With White, cast on loosely on No. 14 needles (dividing sts on 3 needles) 56 sts (60 sts, 64 sts).

Join, being careful not to twist. Work around in ribbing of k 1, p 1 for 2’’. Change to No. 11 needles and knit 1 rnd, decreasing 8 sts evenly around. Work in stockinette stitch (k each round) over these 48 sts (52 sts, 56 sts) until piece measures, in all 6 ½’’ (7’’, 7 ½’’).

With spare needle, knit from 1st needle 12 sts (13 sts, 14 sts).

Slip from 3rd needle onto other end of spare needle (for heel) 12 sts (13 sts, 14 sts).
Once upon a time, the only way to scrub a floor was on your knees, with a squalling infant tucked under one arm.


Divide between 2nd and 3rd needles (for instep) the remaining 24 sts (26 sts, 28 sts).

Turn and work over the heel sts only in stockinette stitch (p 1 row, k 1 row) for 2 ½’’. Bind off. Using only 1 needle, pick up along edge of heel 14 sts (15 sts, 16 sts). Place marker. Knit across instep sts; place another marker and pick up along other side of heel 14 sts (15 sts, 16 sts).

Dec. for instep as follows: 1st row: Purl back. 2nd row Knit to last 3 sts from 1st marker, then k 2 tog., k 1. Knit across instep to 2nd marker, then k 1, sl 1, k 1, p.s.s.o., knit to end. Repeat these 2 rows alternately until there remain 22 sts (24 sts, 26 sts).

Work straight until piece measures, from where sts were picked up at side of heel, 6 ½’’ (7 ½’’, 8 ½’’). Bind off loosely.
Then in 1941, came the technological breakthrough of Stop and Go Shoe Socks. Finally, harried housekeepers had a quick and easy way of buffing their floors to a brilliant shine.

Unfortunately, their popularity was short lived. In 1945, Astrid Lindgren published Pippi Longstocking, and by the end of the year everyone was strapping scrub brushes to their feet.


SOLE . . . With Scarlet and No. 11 needles cast on 20 sts (22 sts, 24 sts).

Measuring from last st on needle, mark off 5’’ of yarn. Double the yarn at this point and knot the doubled end, making a loop 1 ½’’ long. Measure off 5’’ from knot and make another loop the same way (knots will be about 3’’ apart). Continue to make knots and loops in the same way until about 20 loops are made. Cut through loops and work as follows: 1st row: Knit across, having all ends on one side of work. 2nd row: Knit until you reach a knot; then p 1 st, thus making the ends fall on the same side as previous ends. Repeat these 2 rows alternately, always making loops as before and working until piece measures, in all 8 ½’’ (9 ½’’, 10 ½’’). Bind off.

With Green, make corresponding sole.

Draw the word “STOP” on tissue paper, baste to sock and embroider with double strand of Scarlet in chain stitch. On other sick, place the word “GO” and embroider in Green. Sew sock to sole on all sides, having the Scarlet sole on “STOP” sock and the Green sole on “GO” sock.
Nowadays, all the cool kids are experimenting with Swiffering.

But can a Swiffer teach your children how to read while keeping your floors dust free? Does a Swiffer use clever embroidery to ensure your child knows that green means go and red means stop?

No! Swiffer wants your children to be illiterate, and get run over by a bus! So, it’s high time to STOP mocking this pattern, and GO make a pair of these practical, educational and fashionable shoe-socks.


HAIR ORNAMENTS:
Okay, so the Stop and Go shoe socks aren’t exactly stylish. Clearly, the solution is matching hair ornaments.
With Scarlet and No. 11 needles, cast on 20 sts. Work in loop stitch as for sole of sock for 3’’. Bind off. Make corresponding ornament with Green. Sew corners together on wrong side and fasten to hair with bobby pins.
That’s right, these aren’t wilted pompons or dead Tribbles. They’re Hair Ornaments. In fact, they’re called Hair Do’s, so you can be confident that these loopy dust catchers are a Fashion Do not a Fashion Don’t.

Although, they really didn’t catch on until the 1980s.


Click here for the printable pattern.


Read more!

Sunday, February 28, 2010

Wow - Army Strong knits!

If anyone is still under the illusion that knitting is only for little old ladies, Staff Sergeant John Sorich is here to prove that they’re sadly mistaken.

Just look at all these rough and tough American soldiers knitting in Baghdad, Iraq!

Sergeant Sorich is on the far right, closest to the camera. Last February 18th, he wrote to me: “There ended up being ten of us that knit in our group. Our group was also given a very masculine and Army name... ‘Knit Shit.’ Sorry for the language but the name stuck. Ha ha.”

Who cares about the language? I think it’s awesome! Especially as these knitters not only kick butt, they’re doing it with vintage patterns!

To find out how all this coolness came about (plus WWII patterns!):

According to Sergeant Sorich, “It all began with me throwing some knitting supplies in a footlocker before heading to Iraq in January 2009. I had also thrown my favorite knit hat in with it (the Knit for Defense Cap). For months and months, I had no time (or desire) to knit. The regular 120+ degree heat and daily work were enough to drive a person insane.”

“Around last October, a fellow Sergeant in my Platoon saw my knit watch cap and asked about it. "I made it." was my response. He couldn't believe it (seeing how the pattern of the hat is such a tight knit). "Could you teach me?" is where it started. As word spread and my cap was shown around, I didn't expect the kind of enthusiasm it would bring.”


“Among the most interested were the Platoon's male Sergeants and Staff Sergeants (key leaders). So we were able to get knitting supplies sent to us and we began to knit together outside as the weather improved. Around November, our group was in full scale production making scarves and hats. Many made items for their kids or their spouse in time for Christmas.”
I think that’s the perfect way to show your family that they’re still in your thoughts, even though you’re far away.
“At first, our Platoon Sergeant (our boss), and many Soldiers in our Company thought it was a little strange.”

Here’s a picture of their Platoon Sergeant looking very bemused, indeed.
“However, after seeing the items that were being knit, everyone was supportive and wanted to see our completed items. Knitting wasn't just a productive thing for us to do, it gave everyone involved a totally different skill to be proud of. As people finished their project, they proudly brought it around to other knitters and non-knitters and showed off their work. It has done more than you think, it has been a great stress reliever!”

“Today is our last day in Iraq! So I am writing this while packing my last bit of stuff. My most precious items I am bringing home are my knit caps I made for my friends (ten of them). Total stitches of all ten hats is about 62,000 sts.”
Sergeant Sorich is a member of the 401st Bridge Engineer Company, US Army Reserve. Not that I’m implying Engineers are obsessed with numbers.

Hey, let’s look at some more pictures!


“Though frustrated, Sergeant Voigt is able to laugh at himself getting tangled in his own yarn while he is still learning to knit the cap.”


“Another practical reason for learning to knit. I knit together parachute cord (550 cord) to make a M4 magazine pouch. (This I got many compliments on and people wanting me to make them one).”


“A closer look at the pouch. It was difficult to knit with the paracord because it was so thick...I ended up using pencils to get the stitches to looks and feel right. I knitted a flat square, then stretched it around a 30 round magazine and sewed up the sides. I attached a button on a single loop release to hold in the mag.”
This very practical magazine cozy can also be unraveled into a single long rope, which is useful if you get lost in the desert.

As opposed to this whole-rifle cozy, which I stumbled over while randomly clicking around on the Internet:

At least, I think there’s a rifle under there somewhere.

Let’s return to the Sergeant Sorich’s far more pragmatic and well made knits:


“As you can see I have knit from the same color of yarn for all the WWII items. I am also a part of the Historical Reenactment Society in Minnesota at historic Fort Snelling. I picked up knitting as a way to make period correct garments. I now have a great deal of respect and pride in the mothers, grandmothers, children, and men that knit during the wars for the fighting military men. It is amazing to think of an entire nation of knitters all striving to outfit the millions of troops in the US armed forces during such dire times.”


“I matched this color of yarn off an original US WWII glove that was knit by the Red Cross. The yarn is great to work with; it's Cascade Yarns 220 Heathers color #9459. It is the best and closest color I have found to work with and I think it is about the same size and weight of what was used in the 40s. The pictures don't give the exact color correctly, it's a mix of greenish, olive, brown, something??”


“Like I said, the cap is what has been the most popular thing to make, wear and give away here. It is not Army regulations anymore but it is nice to wear in your civilian life...or if you are a WWII re-enactor ;) I didn't see that pattern up on your site, I'm sure your readers would find that to be a fun and sharp looking item to make.”

Sincerely,
Staff Sergeant John Sorich IV
401st Bridge Engineer Company
US Army Reserve
He’s right! But these patterns are much too cool to mock, so I’ll just include a link to printable patterns for the hat and socks at the end of this post.

Go! Knit!

But before you do, there’s one quick request from Sergeant Sorich:
“I am also looking for help! I am currently trying to find WWII British Military patterns and pictures of knit items. I know very little about the ‘Knit for Britain’ program that was launched during WWII to outfit British troops. I'd like to find some patterns and info on that....if you know of any it would be very appreciated!”
Unfortunately, I wasn’t able to help him. But if anyone here knows anything, please e-mail me and I’ll forward your letter to Sergeant Sorich.

After all, soldiers love getting mail from knitters!

Most of the time!


Click here for the printable Cap pattern.

Click here for the printable Spiral Sock pattern.


Read more!

Monday, February 22, 2010

Watch out for falling clothes!

Knee socks from Spinnerin Knit & Crochet, c. 1975

You might be wondering what could possibly be wrong with these socks. Other than the fact that they’re “designed to be worn with knickers”, and they’re long enough to swallow a small child. Your confusion is understandable because you don’t yet realize that the man in this photo is perched on the side of a mountain, pulling on said socks.

Yes, the sock model is getting dressed, and that means at some point he was undressed. In short, I believe he’s an enthusiast of naked mountain climbing, just like famed British explorer George Mallory (1886 – 1924)!


By the way, if you happen to be an admirer of Mr. Mallory’s considerable (and well rounded!) accomplishments, a print of this picture can be purchased from the Royal Geographical Society in London.

For the complete pattern (and more snark!):

SOCKS

materials

Knitting Worsted Weight yarn in natural color. Double pointed needles no. 5.

pattern stitch

Olives worked on 1 st. Row 1: Work 5 times into 1 st (K once, P once, K once, P once, K once). Rows 2, 4, 6 and 8: Purl. Rows 3, 5, 7 and 9: Knit. Row 10: P these 5 sts, yo, then pass the 5 sts over the yo.

Bobbles: Worked on 1 st. * Insert the right hand needle knitwise in 1 st, draw a loop, slip this loop on the left hand needle and K 1 st in this loop. Repeat from * (twice), always inserting needle in the same stitch, you thus have 3 sts on right hand needle, then drop the initial stitch from left hand needle. On next row: P these 3 sts, yo and pass the 3 sts over yo.

I know what you’re thinking. Surely, Mallory was just getting naked in order to cross a river without soaking his clothes. But then, how do you explain this photo?

Face it, Mallory was a mountain climbing nudist. And he’s not the only one!
With no. 5 double pointed needles, cast on 48 (52) sts evenly distributed, and work on 2/2 ribbing for 3’’. Continue in reverse stockinette st. On the 5th row, begin the motifs on each side of leg. At both sides of back of leg 27 (29) sts, work on 1 st alternating pattern as follows: * 1 olive, 4 rounds in reverse stockinette st, 1 bobble, 4 rounds in reverse stockinette st * (3 times).
All over the world, from New Zealand to Germany, men are joyfully flinging off their clothes and scaling boundless heights!

The Dangerous Book For Middle-Aged Men recommends naked mountain climbing as “dangerous fun at its best”. The author, David Quantick adds, “If the Yeti can do it, and Sherpas can almost do it, then surely you can, leaping from ledge to ledge and enjoying your freedom.”

Sadly, some people are determined to ruin everyone’s fun by outlawing this healthy, manly activity. Which is why the owner of these socks had to quickly pull on his knickers and socks. The fashion police were on their way!
At same time, on the 25th row, on center 5 sts at back of leg, work decreases as follows: P 2 together, P 1, P 2 together. Repeat these decreases, one above the other, every 10 rounds (3 more times). Continue in pattern as established on remaining 40 (44) sts and after the last 4 rounds in reverse stockinette st.
And after the last 4 rounds, what? I don’t think that last sentence is finished. Hmm, I must give this some deep thought.

After careful contemplation on the slopes of Mount Yarn Stash, I’ve decided that the period was just the end of “st.” and we’re meant to keep reading.
Shape heel:
I believe we’re also meant to ignore that capital “S”. In other words, “...after the last 4 rounds in reverse stockinette st, shape heel.”
Leave 20 (22) instep sts on two needles and work on remaining 20 (22) sts as follows: work in stockinette st (K 1 row, P 1 row) for 2 1/2 (2 3/4)’’, ending on a P row, then K 11 (12), K 2 sts together, turn: next row: slip 1 st, P 2, P 2 together, turn; next row: slip 1 st, K 3, K 2 tog, turn; slip 1 st, P 4, P 2 together, turn; continue in this way until all sts are worked on both sides, ending on a purl row. (12 sts remain) 20 (22) sts left on needles for instep, pick up and K 9 (11) sts along right side of heel, distribute these 50 (56) sts evenly on 3 needles and work in rounds, keeping instep 20 (22) sts in reverse stockinette st and sole sts in stockinette st and decreasing as follows: K 2 sts together, P 20 (22) sts for instep, SKPO (slip 1 st, K next st, pass slip st over), K 26 (30) sts. Repeat these decreases in same positions on every other round 5 more times 38 (44) sts remain. When foot measures 3 1/2 (4)’’ from heel, continue in stockinette st on all sts until foot measures 4 3/4 (5)’’ from heel or longer if desired.
And pay no attention to the inconsistent punctuation and run on sentences.

Conventional rules of grammar are nothing but chains to be thrown off. We will not be bound by convention! Or clothes! Or common sense!

Here’s our knicker-clad mountaineer making his getaway – on a pair of giant knitting needles! Just think, when he gets to the bottom of the slope he can quickly knit himself up a disguise.
Shape toe: Work decreases as follows: K 9 (12), K 2 together, K 6, SKPO. Continue to decrease thus, on every other round at both sides of the 6 sts at each side of foot 7 (8) times more. 6 (8) sts remain. Join together by weaving, the 3 (4) sts of top of foot with the 3 (4) sts of bottom of foot.
I’m still undecided on the relative merits of wearing knickers versus nudity while mountain climbing. And the situation gets more complicated when you consider that in the U.K. “knickers” doesn’t mean short pants, it’s actually another word for underwear.

Which means this mountainy man is also wearing knickers!

As well as socks, boots, some climbing equipment, and one very unhappy small dog.

Okay, I’ve made up my mind. Partial or whole nudity while mountaineering is wrong – for dogs. Someone get this poor puppy a coat!

Click here for the printable pattern.

Read more!

Wednesday, February 10, 2010

Now Heaven Knows, Anything Goes!

Button Trim Spats from Sweaters and Things Knitted and Crocheted, c. 1965)

That’s right, Spats! Haven’t these turtlenecks for the Achilles tendon always been the height of fashion?

Okay, so spats haven’t been a “fashion must-have” since the 1920s, and even then, ankle apparel was mostly for men. But crazy, cross-dressing, Great-Aunt Clara loved her spats, and she did her darndest to revive these ankle accessories in the mid-1960s. Unfortunately, her only success was the young woman photographed above, who five minutes later was committed to the Young Ladies Correctional Home for the Terminally Tacky.

However, now that the media has reminded us to fixate on our fat ankles, Clara’s ankle burqas don’t seem so old-fashioned anymore. In fact, swanky spats are positively fashionable again.

Alas, many of us can’t afford to dandify our deltoid ligaments, and liposuction surgery for our appalling ankles may be going a tad too far. But thanks to Great-Aunt Clara’s clairvoyance, you can now knit up your very own set of cankle cozies.

After all, you can’t always count on your underwear to conveniently fall at just the right moment!


For the complete pattern (and more snark!):

Button Trim Spats

Materials Required:
AMERICAN THREAD COMPANY “DAWN” KNITTING WORSTED
4 ounces Scarlet
Scarlet! Why you... you... hussy!
1 Pr. Knitting Needles No. 11 OR ANY SIZE NEEDLES WHICH WILL RESULT IN THE STITCH GAUGE BELOW
You see? People don’t talk respectfully to Scarlet Women!

Although that may change soon.
Aluminum Crochet Hook Size J
1/3 yd. 3/4 inch elastic
8 Jet Buttons, graduated sizes
Jet is a petrified wood used for jewelry that Queen Victoria popularized as a symbol of mourning.

That’s right, these are your mourning spats. So don’t embarrass yourself by wearing them to a happy occasion.
GAUGE: 7 sts = 2 inches

NOTE: Work with double strand of yarn throughout. Either wind yarn into 2 equal balls or remove wrapper and work with strand from each end.
Feel like you’re being talked down to right now? It’ll only get worse when you start showing off your scarlet strumpet ankles!


Cast on 25 sts.

1st Row: Work in P 1, K 1 ribbing.

2nd ROW: Work K 1, P 1 ribbing. Continue in ribbing as established for 3 inches ending with K1.
Don’t bother measuring your ankles, one size of spats fits all floozies.
NEXT ROW: Work in ribbing across 11 sts, inc twice in next st (to inc: K in front, back, and front of st), P 1, inc twice in next st, work in ribbing across row. Work 2 more inches even in ribbing ending with K 1.

NEXT ROW: Work in ribbing across 13 sts, inc twice in next st, P 1, inc twice in next st, work in ribbing across row. Work even in ribbing for 2 more inches (33 sts).

Bind off 4 sts at beg of next 2 rows.

Bind off 2 sts at beg of next 2 rows.

Bind off 1 st at beg of next 16 rows, bind off remaining 5 sts.

Weave back seam. Work a row of s c around lower edge. Sew buttons on side. Cut elastic in half. Sew elastic in position on each side of spat.
And now you’re ready to perform the Trollop Fox Trot!


Click here for the printable pattern.


Read more!

Tuesday, October 13, 2009

Beware the Devil Bunny!

Brer Rabbit Outfit from Beehive for Bairns, Vol. 3, Abridged, c. 1945

Not many people know this, but Rosemary’s Baby, the 1968 movie about Satan’s son, was actually a remake of the 1945 horror classic Brer Rabbit’s Baby. Unfortunately, all of the prints of the original film have been lost. All that remains is this photo of the Devil Baby’s costume test.

Don’t believe me?

Would you believe the 2001 cult hit Donny Darko was nothing more than a remake of the 1945 underground film Bonny Brer Rabbito? Here we see little Frankie telling Bonny Rabbito that the world will end in 28 days, while just off screen Ginger Rogers proves her dedication to Sparkle Motion.

No?

Then you definitely won’t believe me when I tell you that this is an adorable bunny outfit for your baby. No really, look at the cute little horns – I mean ears. Why, in this ensemble your baby will be instantly recognized as a long lost sibling of Flopsy, Mopsy, Cotton-tail and Satan.

Mr. McGregor couldn’t agree more.

For the complete pattern (and more snark!):

GIRL’S COAT
Also included in today’s post are “Girl’s Bonnet”, “Girl’s or Boy’s Mitts”, and “Girl’s or Boy’s Leggings”. My latent OCD kicked in and I just had to include the complete set. After all, it would be wrong if your little devil – I mean, bunny had to hop around half-naked.
MATERIALS:
PATWIN 4 ply PATONIZED KNITTING WOOL WITH NYLON.
4 ozs. 3 Buttons.
I’m going to assume the 4 ozs. refers to the amount of wool (with nylon!) required for this pattern, though putting it on a separate line was an odd layout choice. But feel free to buy three 4 ozs. buttons instead.
For Needles and Tension – see page 28.
For Washing Instructions – see page 29.

Because I’m a sucker for punishment, I’ve included page 28. But I didn’t bother reading it as I’m not a masochist. Whatever you choose to do, I won’t judge.

As for washing – and I’m sure you don’t need me to tell you this – just do whatever it says on the yarn label. After all, I’m not going to trust the pattern book’s instructions – they want my baby to worship Satan! Or bunnies. It’s not entirely clear which one at this point.
I love my scanner!
¶ Beginning at neck edge cast on 32 sts.

1st row: Inc. 1 st in each of 1st. 2 sts. K4. Inc. 1. st. in each of next 2 sts. K5. Inc. 1. st. in each of next 5 sts. K5. Inc. 1. st. in each of next 2 sts. K4. Inc. 1. st. in each of next 2 sts. K1.
2nd, 4th and 6th rows: K1. Purl to last st. K1.
3rd row: Inc. 1. st. in each of 1st. 3 sts. K6. Inc. 1. st. in each of next 2 sts. K22. Inc. 1. st. in each of next 2 sts. K6. Inc. 1. st. in each of next 3 sts. K1.
5th row: Inc. 1. st. in 1st. st. K2. Inc. 1. st. in each of next 2 sts. K8. Inc. 1. st. in each of next 2 sts. K24. Inc. 1. st. in each of next 2 sts. K8. Inc. 1. st. in each of next 2 sts. K2. Inc. 1. st. in next st. K1.
7th row: Inc. 1. st. in 1st. st. K4. Inc. 1. st. in each of next 2 sts. K10. Inc. 1. st. in each of next 2 sts. K26. Inc. 1. st. in each of next 2 sts. K10. Inc. 1. st. in each of next 2 sts. K4. Inc. 1. st. in next st. K1. 
At the beginning of this pattern book there’s a note informing us that “Due to increased printing costs, ‘Beehive for Bairns, Volume 3’ Series No. 50, has been divided into two books, in order that each can be made available at so popular a price.”

So you’d think that the editor would have saved some ink and used a lighter hand with the periods! True, the “¶”s are kind of cool looking, but wartime rationing should have been observed.
8th row: Cast on 10 sts. K6. Purl to last st. K1. Cast on 10 sts.
9th row: (1st. buttonhole). K17. (Left Front). Inc. 1. st. in each of next 2 sts. (Seam sts.). K12. (Left Sleeve). Inc. 1. st. in each of next 2 sts. (Seam sts.). K28. (Back). Inc. 1. st. in each of next 2 sts. (Seam sts.). K12. (Right Sleeve). Inc. 1. st. in each of next 2 sts. (Seam sts.). K14. W1.fwd. K2tog. K2. (Right Front).
Uh oh, did I just mention the war?
10th row: K6. Purl to last 6 sts. K6.
11th row: K18. Inc. 1. st. in each of next 2 sts. K14. Inc. 1. st. in each of next 2 sts. K30. Inc. 1. st. in each of next 2 sts. K14. Inc. 1. st. in each of next 2 sts. K19. (111 sts. on needle).
Keeping a border of 6 sts. in Garter st. at each end of work, continue increasing in this manner, that is 1. st. more for each Front and 2 sts. more for Back and Sleeves every knit row to 175 sts. on needle ending with purl row.
Now, what’s so special about the number one, that it is constantly saddled with a period (as in, 1. st.)? The two, you'll notice, gets to run around completely naked (2 sts.).
Next row: (2nd buttonhole). K27. Inc. 1. st. in each of next 2 sts. K32. Inc. 1. st. in each of next 2 sts. K48. Inc. 1. st. in each of next 2 sts. K32. Inc. 1. st. in each of next 2 sts. K24. W1.fwd. K2tog. K2.
Still keeping Garter st. borders, continue increasing as before to 231 sts. on needle ending with purl row.
Next row: K36. Leave these sts. on spare needle for Left Front. Knit across next 47 sts. and leave remaining sts. on spare needle. Working on these 47 sts. proceed:–
Perhaps the editor was trying to send a subliminal message to his or her unmarried offspring. Singles must be fastened down with iron ball shackles, while couples are free to skip hand-in-hand through the letter-scape.
To make Left Sleeve: Beginning with purl row, work 9 rows, (6 mos.–11 rows) (9 mos.–13 rows) even in Stocking st. Continue in Stocking st. dec. 1. st. each end of needle on next and every following 6th row to 35 sts. on needle. Continue even until sleeve from underarm measures 4 1/4 ins. (6 mos.–4 3/4 ins.) (9 mos.–5 3/4 ins. ) ending with purl row.
Next row: K2. ★ K2tog. K3. Repeat from ★ to last 3 sts. K2tog. K1. (28 sts. on needle).
Knit 11 rows Garter st. Cast off.
Leaving next 65 sts. on spare needle for Back, with right side of work facing join wool to next 47 sts. and work Right Sleeve to correspond to Left Sleeve.
Of course, coupling up does raise the risk of accidentally spawning Satanic offspring, but life is a series of trade-offs.
To make Left Front, Back and Right Front: With right side of work facing slip the 36 sts. left for Left Front onto needle. Join wool and knit across the 65 sts. of Back and the 36 sts. of Right Front. (137 sts. on needle). Proceed:–
1st row: K6. Purl to last 6 sts. K6.
2nd row: K7. ★ K2tog. K1. Repeat from ★ to last 7 sts. K7. (96 sts. on needle).
3rd, 4th and 5th rows: Knit.
6th row: (3rd buttonhole). Knit to last 4 sts. W1.fwd. K2tog. K2.
7th, 8th and 9th rows: Knit.
10th row: K6. ★ Knit into front and back of next st. Knit into front, back and front of following st. Repeat from ★ to last 8 sts. Knit into front and back of next st. K7. (220 sts. on needle).
11th row: K6. Purl to last 6 sts. K6.
12th row: Knit. Repeat 11th and 12th rows for 5 3/4 ins. ending with 12th row. Knit 9 rows Garter st. Cast off.
And anyway, that’s a baby in a bunny suit, right? And everyone knows there’s nothing evil about bunnies.
 
Aaaah! He’s set the woods on fire and now he’s coming after us with a hammer!

Sure, Wikipedia claims this is “Br'er Rabbit's dream, from Uncle Remus, His Songs and His Sayings: The Folk-Lore of the Old Plantation, 1881”. But thanks to Br’er Fox’s tell all book, we now know the truth.
COLLAR: Cast on 15 sts. Knit 9 rows Garter st.
★ ★ 10th row: K12. Turn. 11th row: K12.
12th, 13th, 14th and 15th rows: Knit across row. ★ ★
Repeat from ★ ★ to ★ ★ 15 times, then 10th and 11th rows once. Knit 10 rows Garter st. Cast off.

TO MAKE UP: Press pieces carefully. Sew sleeve seams. Sew collar in position placing ends 3 sts. from each front edge. Sew buttons to correspond to buttonholes.
That bunnies are evil!
GIRL’S BONNET

MATERIALS:
PATWIN 4 ply PATONIZED KNITTING WOOL WITH NYLON.
1 oz. One Medium Crochet Hook.

For Needles and Tension – see page 28.
For Washing Instructions – see page 29.

For Needles and Tension – see the scanned chart above. For Washing Instructions – see the label on your wool. For my sanity. . . if you see it, please let me know.


Cast on 65 sts. Knit 9 rows Garter st.
10th row: ★ K2. Inc. 1. st. in next st. Repeat from ★ to last 5 sts. K5. (85 sts. on needle).
11th row: K1. Purl to last st. K1.
12th row: Knit. Repeat 11th and 12th rows 4 times, then 11th row once.
22nd row: K29. Inc. 1. st. in each of next 2 sts. K22. Inc. 1. st. in each of next 2 sts. K30.
23rd and alternate rows: K1. Purl to last st. K1.
24th row: K30. Inc. 1. st. in each of next 2 sts. K24. Inc. 1. st. in each of next 2 sts. K31.
26th row: K31. Inc. 1. st. in each of next 2 sts. K26. Inc. 1. st. in each of next 2 sts. K32.
Continue increasing in this manner being careful to have the increases directly above those of previous row to 125 sts. on needle ending with purl row.
Next row: Cast off 52 sts. Knit to end of row.
Next row: Cast off 52 sts. purlways. Purl to last st. K1. Working on these 21 sts. continue in Stocking st. dec. 1. st. each end of needle on 7th and every following 6th row to 11 sts. on needle.
Work 5 rows even ending with purl row. Break wool.
With right side of work facing join wool at lower edge of bonnet. Pick up and knit 21 sts. along remaining part of lower edge. (54 sts on needle). Next row: Knit.
Next row: (eyelets). K2tog. ★ W1.fwd. K2tog. Repeat from ★ to end of row. Next row: Knit. Cast off.

TO MAKE UP: Press lightly. Sew up back seams. With double wool crochet a cord and thread through eyelets at neck. Make and sew a small tassel to each end. For making tassels see page 16.
I have serious reservations about the wisdom of putting tassels on any piece of infant clothing. Sure, when they’re newborn they aren’t very dexterous, but within a month they’re grabbing everything in sight. And eating it.

So, unless you’re making this for the Infant Antichrist, I’d suggest leaving the tassels off. But I’ve included the instructions, just in case the Apocalypse is imminent.


GIRL’S OR BOY’S MITTS

MATERIALS:
PATWIN 4 ply PATONIZED KNITTING WOOL WITH NYLON.
1 oz. One Medium Crochet Hook.

For Needles and Tension – see page 28.
For Washing Instructions – see page 29.

I don’t need to go through all this again, do I?

I thought not.
Cast on 32 sts. 1st row: K2. ★ P1. K1. Repeat from ★ to end of row. Repeat 1st. row 17 times. 19th row: (eyelets). ★ K2. W1.fwd. K2tog. Repeat from ★ to end of row. 20th row: K1. Purl to last st. K1. 21st row: Knit. Repeat last 2 rows 9 times. Proceed:–

1st row: K1. Purl to last 2 sts. K2tog. 2nd row: ★ K3. K2tog. Repeat from ★ to last st. K1. 3rd and alternate rows: K1. Purl to last st. K1. 4th row: ★ K2. K2tog. Repeat from ★ to last st. K1. 6th row: ★ K1. K2tog. Repeat from ★ to last st. K1. 8th row: ★ K2tog. Repeat from ★ to last st. K1. Break wool and thread end through remaining sts. Draw up and fasten securely. Sew up seam. With double wool crochet a cord. Thread through eyelets. Make and sew a small tassel to each end. Make another mitt to correspond. For making tassels see page 16.
Or just glance a few inches up this screen.
GIRL’S OR BOY’S LEGGINGS

MATERIALS:
PATWIN 4 ply PATONIZED KNITTING WOOL WITH NYLON.
3 ozs. One Stitch Holder. One Medium Crochet Hook.

For Needles and Tension – see page 28.
For Washing Instructions – see page 29.


Yay! This is the last pattern! With the addition of these leggings your child will be clothed head to toe in devil... er, bunny wear.
Cast on 144. 1st row: K2. ★ P1. K1. Repeat from ★ to end of row. Repeat 1st. row 3 times. 5th row: (eyelets) K2. ★ W1.fwd. K2tog. (P1. K1) twice. Repeat from ★ to last 4 sts. W1.fwd. K2tog. P1. K1. Repeat 1st. row 5 times. Proceed:–

To shape back: 1st row: K78. Turn. 2nd row: P12. Turn. 3rd row: K18. Turn. 4th row: P24. Turn.
Continue in this manner, that is working over 6 more sts. in every row until 18 sts. remain unworked at each end of needle. Proceed:–
1st row: Knit. 2nd row: K1. Purl to last st. K1. 3rd row: Knit.
Repeat 2nd and 3rd rows until work measures 7 ins. (6 mos.–7 1/2 ins.) (9 mos.–8 ins.) from beginning, measured at short side of work, ending with purl row.
Next row: K72 sts. Turn. Leave remaining 72 sts. on st. holder. Working on these 72 sts. continue in Stocking st. dec. 1. st. each end of needle every alternate row to 32 sts. on needle. Work 10 rows even, ending with knit row.
I suspect our grandchild-less pattern editor was getting a bit giddy by this point. Either that or this was an especially important “knit”, which had to be bolded to prevent the Apocalypse.
To make foot: 1st row: K2. ★ P1. K1. Repeat from ★ to end of row. Repeat 1st. row 7 times.
9th row: K19. P10. Turn. 10th row: K10. Turn. 11th row: K1. P8. K1. Turn. Repeat 10th and 11th rows 8 times.
28th row: K1. K2tog. K4. K2tog. K1. 29th row: K1. P6. K1. 30th row: K1. K2tog. K2. K2tog. K1. 31st row: K1. P4. K1. Break wool. Joining the wool where the 3 sts. were left, K3.
Next row: K3. Pick up and knit 14 sts. along side of foot. Knit the 6 sts. across the toe. Pick up and knit 14 sts. along other side of foot. Knit the 19 sts. which were left. (56 sts. on needle). Knit 9 rows Garter st. Proceed:–
1st row: K19. (K2tog.) twice. K24. (K2tog.) twice. K5.
2nd row: Knit. 3rd row: K18. (K2tog.) twice. K22. (K2tog.) twice. K4. Knit 2 rows Garter st. Cast off.
“Girl’s or Boy’s Leggings”, huh? This may be your only opportunity to dress your boy in leggings. In another year, your dear little Antichrist will be wearing saggy-baggy jeans, and you’ll never see his dimpled knees again.
With right side of work facing join wool to remaining 72 sts, and continue to correspond to other leg until ribbing has been completed at ankle. With wrong side of work facing proceed:–
1st row: K3. P10. Turn. 2nd row: K10. Turn. 3rd row: K1. P8. K1. Turn. Repeat 2nd and 3rd rows 8 times.
20th row: K1. K2tog. K4. K2tog. K1. 21st row: K1. P6. K1. 22nd row: K1. K2tog. K2. K2tog. K1. 23rd row: K1. P4. K1. Break wool. Joining the wool where the 19 sts. were left, K19.
Next row: K19. Pick up and knit 14 sts. along side of foot. Knit the 6 sts. across the toe. Pick up and knit 14 sts. along other side of foot. Knit the 3 sts. which were left. (56 sts. on needle). Knit 9 rows Garter st. Proceed:–
1st row: K5. (K2tog.) twice. K24. (K2tog.) twice. K19.
2nd row: Knit. 3rd row: K4. (K2tog.) twice. K22. (K2tog.) twice. K18. Knit 2 rows Garter st. Cast off.

TO MAKE UP: Press carefully. Sew all seams. With double wool crochet a cord. Thread through eyelets at waist. Make and sew a tassel to each end.
Of course, the whole “devil or bunny” debate may be moot. Just take a look at this sewing pattern advertised in the 1952 McCall’s Annual labeled “Bunny with Sly Wink”.

 
Devil Bunny!

Click here for the printable pattern.

Read more!

Sunday, October 4, 2009

Knit or Crochet, Ripple Socks Make Their Own Fun!

Ripple Sock Patterns from “Ripples, Knitted & Crocheted” c. 1965

Now, these sock patterns do come with suggested colours: Black and Cocoa for the knitted pair, Black and Scarlet for the crocheted ones. But the colourless photo is a clear invitation to go wild and pick any colour combination your heart desires.

So why not Yellow and Brown for Thanksgiving? Orange and Black for Halloween? Or Green and Red for Christmas? Make them extra long, and hey presto, you’ve got seasonal – and sexy! - stockings.

Just be careful where you flaunt them. There’s an urban legend that walking or dancing too vigorously in ultra-rippled socks will trigger seizures in anyone watching you.

For the complete pattern (and more snark!):

ANOTHER KNIT OR CROCHET RIPPLE

Model illustrated is crocheted

That’s right, knitters! There’s no picture to guide you. You’ll be knitting blind!
Knitted Ripple Socks

Materials Required:

AMERICAN THREAD COMPANY “DAWN” KNITTING WORSTED


Dawn Knitting Worsted – now “permanently mothproofed”. Don’t trust your precious ripple socks to those temporarily mothproofed brands!
4 oz each Black and Cocoa
Or Black and Silver for New Year’s, Pink and Red for Valentine’s Day, or Red and White for Canada Day!
1 Pr. Knitting Needles No. 9 or ANY SIZE NEEDLES WHICH WILL RESULT IN STITCH GAUGE BELOW

GAUGE: 9 sts = 2 inches
With all of those ALL CAPS shouting at me, it’s anticlimactic to read “sts” and “inches” in lowercase. I expected to see “9 STS = 2 INCHES!!!1!1! KN1TZ!”
NOTE: Socks are worked in alternate stripes of 2 rows Black, 2 rows Cocoa.

With black cast on 85 sts work same as mittens on page 24 for 9 1/2 inches.
I love being sent on scavenger hunts. Especially when the relevant instructions are located further along in the book than the pattern I’m currently working on.
The Relevant Part of the Mitten Pattern:

With Black case on 85 sts. 1st ROW: K 2 tog, K 5, inc in next st, (to inc: K in front, K in back, K in front of st) K 5, * K 3 tog, K 5, inc, K 5, repeat from * across ending K 2 tog. 2nd ROW: K 2 tog, K 5, inc, K 5, * K 3 tog, K 5, inc, K 5, repeat from * across ending K 2 tog. Repeat these last 2 rows 9 times, alternating colors.
That’s right, this sock is knitted flat, not in the round. If you’re fussy about seams in your socks, this is not the pattern for you.
NEXT ROW: K 2 tog, K 11, * K 3 tog, K 11, repeat from * across ending K 2 tog. NEXT ROW: K 2 tog, K 4, inc, K 4, * K 3 tog, K 4, inc, K 4, repeat from * across ending K 2 tog. Repeat last row for 5 inches ending with Cocoa. With Black bind off 6 sts at beg of next 2 rows.
Of course, if people are rude enough to check your socks for seams, just walk away from them briskly and they’ll be distracted by ripple-induced seizures.
HEEL: With Black work in stockinette st (K 1 row, P 1 row) over 10 sts for 10 rows. Place remaining sts on st holder. Turn 1st half of heel as follows: K 2, sl 1, K 1, p.s.s.o., K 1, turn; P 4, turn; K 3, sl 1, K 1, p.s.s.o., K 1, turn; P 5, turn; K 4, sl 1, p.s.s.o., K 1, turn; P 6, turn; K 5, sl 1, K 1, p.s.s.o., pick up 6 sts on side of heel; place these sts on st holder. Turn 2nd half of heel as follows: attach Black at opposite side, P across 10 sts. Work in stockinette st over the 10 sts for 9 more rows, then P 2, P 2 tog, P 1, turn; K 4 turn; P 3, P 2 tog, P 1, turn; K 5, turn; P 4, P 2 tog, P 1, turn; K 6, turn; P 5, P 2 tog, pick up 6 sts on side of heel. Slip all sts from holders onto needle. NEXT ROW: With right side of work toward you attach Cocoa, inc 1 st in 1st st, then K 4, K 3 tog, K 4, * inc 2 sts in next st, K 4, K 3 tog, K4, repeat from * across inc 1 st in last st. Repeat this row until sole section is 2 inches less than desired length. NEXT ROW: K 5, K 3 tog, * K 9, K 3 tog, repeat from * across ending K 5. NEXT ROW: Inc 1 st in 1st st, K 3, K 3 tog, K 3, * inc 2 sts in next st, K 3, K 3 tog, K 3, repeat from * across inc 1 st in last st. NEXT ROW: K 4, K 3 tog, * K 7, K 3 tog, repeat from * across ending with K 4. NEXT ROW: Inc 1 st in 1st st, K 2, K 3 tog, K 2, * inc 2 sts in next st, K 2, K 3 tog, K 2, repeat from * across inc 1 st in last st. NEXT ROW: K 3, K 3 tog, * K 5, K 3 tog, repeat from * across ending with K 3. NEXT ROW: Inc 1 st in 1st st, K 1, K 3 tog, K 1, * inc 2 sts in next st, K 1, K 3 tog, K 1, repeat from * across inc 1 st in last st. NEXT ROW: K 2, K 3 tog, * K 3, K 3 tog, repeat from * across, ending with K 2. NEXT ROW: K 2 tog, * K 3 tog, repeat from * across ending with K 2 tog. Cut yarn, leaving a 12 inch length. Thread through blunt needle, pull through remaining sts and draw tog.
Whew! After awhile all of the NEXT ROWs begin to blur together. I think I counted them up correctly, but if the toes of your socks come out deformed, don’t blame me. It was the sadistic editor who couldn’t be bothered to type “TOE: Row 1:”, and instead inflicted this indigestible mass of instructions upon us.
FINISHING: Block. Steam lightly and sew seam.
I bet even the professional knitter ended up with deformed toes, and that’s why they only provided a picture of the crocheted socks.
Crocheted Ripple Socks

Materials Required:

AMERICAN THREAD COMPANY “DAWN” KNITTING WORSTED

4 ounces Black

3 ounces Scarlet
Aw, heck! Why limit yourself to just two colours? You can celebrate Easter with Yellow, Pink and Green stripes. If you’re American, you can show your patriotism on the 4th of July with Red, White and Blue stockings. Or you can go all out and make your stockings Red, Orange, Yellow, Green, Blue and Purple, and wear them during Gay Pride Week. And if you pair your rainbow ripple stockings with a black micro skirt and rainbow pasties, you’re guaranteed to get your picture in the paper!
Plastic Crochet Hook Size J OR ANY SIZE WHICH WILL RESULT IN STITCH GAUGE BELOW.

GAUGE: 3 sts = 1 inch
But make sure you bring enough money to pay bail. The Fashion Police will rarely let you go with just a warning.
NOTE: Work entire sock in back loop of sts. Work in alternate rounds of Black and Scarlet. When changing colors work 1st half of st with color being used, complete st with new color. 1st ROUND: With Black ch 4, join to form ring, ch 3, work 11 d c in ring, join in top of ch 3. 2nd ROUND: Skip 1 s c 5 s c in next s c, repeat from beg all around. 3rd and 4th ROUNDS: Skip 2 s c, 1 s c in next st, 3 s c in next st, 1 s c in next st, repeat from beg all around. 5th ROUND: Skip 2 s c, 1 s c in next st, 5 s c in next st, 1 s c in next st, repeat from beg all around. 6th and 7th ROUNDS: Skip 2 s c, 1 s c in each of the next 2 sts, 3 s c in next st, 1 s c in each of the next 2 sts, repeat from beg all around. Repeat 6th and 7th rounds until there are 11 Black stripes, skip 2 s c, sl st in next st, with Black ch 12 loosely for heel section, skip 3 points, join ch, cut yarn. 21st ROUND: Skip 1 st, * 1 s c in each of next 2 sts of ch, 5 s c in next ch, 1 s c in each of next 2 sts, skip 2 sts, repeat from * all around (5 points). 22nd ROUND: * 1 s c in each of next 3 sc, 3 sc in next st, 1 s c in each of next 3 s c, skip 2 s c, repeat from * all around. Repeat last round alternating colors for 18 stripes or desired length.
See how much nicer it is when the rounds/rows are actually numbered? Sure it’s still a honking big block o’ text, but at least your eyes won’t be crossing from the endless repetitions of “NEXT ROW”.
HEEL: Attach Black at start of ch, work 1 s c in each st of ch. Place a marker, work 12 s c on other side of heel, place a marker, work 1 round even. NEXT ROUND: Work a dec each side of marker (4 dec in round). Repeat last 2 rounds once. NEXT ROUND: Work 2 s c tog all around, cut yarn leaving a length. Thread into blunt needle and draw sts tog.
The pattern editor tossed those “NEXT ROUNDS” in there just to taunt me, didn’t he? That’s okay, one day I’ll track him down and begin walking briskly in front of him in my ultra-ripple seizure-inducing socks. That’ll learn him.

Click here for the printable pattern.

Read more!

Tuesday, September 22, 2009

Shake a Leg!


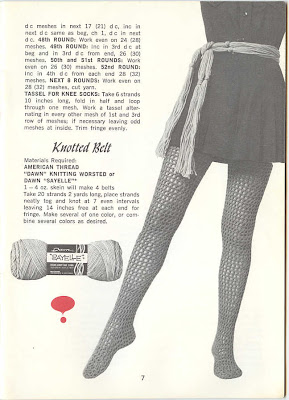
Mesh Crochet Socks and Stockings from "Knitted and Crocheted Boutique", c. 1975

Hemlines are climbing again in the Western world, suggesting that teenage girls are optimistic about our economic future, even if no one else is.

So what are we Canadians to do? We want to show off our great swaths of exposed leg to help boost the economy, but the Canadian winter looms on the horizon.

Why we can crochet up some stockings, of course!

For the complete pattern (and more snark!):

“Why is there blood spattered on that page?” asked my 11yo son.

“It's an exclamation mark,” I told him. “A big, red exclamation mark! Celebrating short skirts and economic prosperity!”

I don't think he believed me.

Mesh Crochet Socks and Stockings

SIZES: Small to medium; medium to large size

Materials Required:

AMERICAN THREAD

“DAWN” KNITTING WORSTED or

DAWN “SAYELLE”

3 – 4 oz. skeins for long stocking

2 – 4 oz. skeins for knee socks

Plastic Crochet Hook Size H OR ANY SIZE HOOK WHICH WILL RESULT IN STITCH GAUGE BELOW
Then again, best guess would place this book in the mid-1970s, which was hardly a time of economic prosperity.
GAUGE: 2 meshes = 1 inch, 2 rows = 1 inch

Directions are given for small to medium size. Changes for medium to large in parentheses.

Staring at toe, ch 4, join to form ring, ch 4, dc in ring, * ch 1, dc in ring, repeat form * 7 times, ch 1, join in 3rd st of ch, ch 4 to turn all rounds; (ch 4 at beg of each round counts as ch 1 and 1 dc).
Oil shortages, rising crime, violent social unrest and rampant inflation... Maybe blood spatter on the pattern is appropriate.
2nd ROUND: DC in joining, * ch 1, dc in next dc, ch 1, dc in next dc, ch 1, dc in same dc, repeat from * all around ending ch 1, dc in next dc, ch 1, join in 3rd st of ch, ch 4, turn; (15 dc).

3rd ROUND: Dc in next dc, * ch 1, dc in next dc, repeat from * all around, join.

4th ROUND: Dc in same space, * ch 1, dc in next dc, repeat from * twice, ch 1 repeat from beg all around ending to correspond; (20 dc).

5th, 6th, 7th, 8th, (9th, 10th) ROUNDS: Work even in meshes.
Wow, who knew mesh stockings could be such a downer?
9th, (11th) ROUND: Dc in next dc, * ch 1, dc in next dc, repeat from * 12 times, ch 4, turn. (This leaves 5 dc free for instep.)

10th-16th (12th through 18th) ROUNDS: Work even on 15 dc.

17th, 18th, (19th, 20th) ROUNDS: Work in meshes working 3 center dc tog, fold heel section tog in last round and join in 3rd st of ch.

19th , (21st) ROUND: Working all around top, dc in next row, * ch 1, dc in next row, repeat from * 7 (9) times, * ch 1, dc in next dc of instep, repeat form last * 4 times, ch 1, dc in same space with turning ch, ch 1, dc in next row, finish opposite side to correspond, ch 1, join in 3rd st of ch, 26 (30) meshes.
I think I'll just focus on the sexiness of mesh stockings instead.
20th, (22nd) ROUND: Dc in next dc, * ch 1, dc in next dc, repeat from * 6 (8) times, work 3 dc tog, * ch 1, dc in next dc, repeat from last * twice, work 3 dc tog, * ch 1, dc in next dc, repeat from last * 7 (9) times, ch 1, join.

KNEE SOCKS ONLY: Work even in meshes for 14 inches or desired length allowing for cuff, cut yarn.

LONG STOCKINGS: Next 24 ROUNDS: Work even.
And I'll also focus on figuring out where in my neighbourhood I can go shopping for a garter belt to hold these sexy, sexy stockings up.
47th ROUND: Dc in next dc, ch 1, dc in next dc, ch 1, dc in same dc, work ch 1, dc meshes in next 17 (21) dc, inc in next dc same as beg, ch 1, dc in next sc.

48th ROUND: Work even on 24 (28) meshes.

49th ROUND: Inc in 3rd dc at beg and in 3rd dc from end, 26 (30) meshes.

50th and 51st ROUNDS: Work even on 26 (30) meshes.

52nd ROUND: Inc in 4th dc from each end 28 (32) meshes.

NEXT 8 ROUNDS: Work even on 28 (32) meshes, cut yarn.

TASSEL FOR KNEE SOCKS: Take 6 strands 10 inches long, fold in half and loop through one mesh. Work a tassel alternating in every other mesh of 1st and 3rd row of meshes; if necessary leaving odd meshes at inside. Trim fringe evenly.
Hmmm... the bridal shop or the sex shop for garters? Eeny, meeny, miny, moe. Oh heck, I know which one I'd rather visit!
Click here for the printable pattern.

Read more!