Tabby Tabard Pattern from Tabards, designs by Carole Rutter, Leisure Arts, Leaflet 94, 1977
Tabards were originally cloths worn by medieval knights over their armour, in a desperate attempt to differentiate one chainmail-encased man from another.
This knight’s tabard is giving him the bravery to fight on despite being cut off at the knees. Methinks he’s a relative of the Black Knight.
In any case, modern tabards are almost exclusively worn by professional cleaning staff.
Don’t be deceived by her mild mannered appearance. She could easily take out that stubby-legged knight. Just look at her smile. She’ll mop the floor with him!
However, between our distant, somewhat height-challenged past, and our terrifyingly clean dystopian present, there were the Sixties and Seventies. When, for one brief moment, we dared dream of a bright, shining future when absolutely everyone would wear tabards.
Even for the manliest of villains, tabards are the perfect sparkly accessory for the annual tribble hunt!
To make your own sexy, warrior tabard:
This woman and child are either space colonists or members of an oppressive cult. Or both!
TABBY
Size: See General Instructions
Note that this particular space cult allowed its members to use “personal preference” in placement of the ties. That’s why it didn’t survive past the Seventies. Allow cultists to make any decisions for themselves, and it’s only a matter of time before they decide to place the ties around the Supreme Alien Leader’s neck.
Materials: Worsted wt yarn, (6-8-10) [14-16-18] oz gold, (1-1-1) [2-2-2] oz each copper, dk brown and med brown heather; aluminum crochet hook sizes E and J (Canadian sizes 9 and 3) or sizes needed for gauge.
Gauge: With larger hook, in patt, 10 sts = 3’’; 7 rows = 2’’
Pattern Stitch Row 1: Sc in first sc, * ch 1, sk next st, sc in next st; rep from * across; ch 1, turn. Row 2: Sc in first sc, * dc in skipped st 2 rows below, sc in next st; rep from * across; ch 1, turn. Rep Rows 1 and 2 for patt.
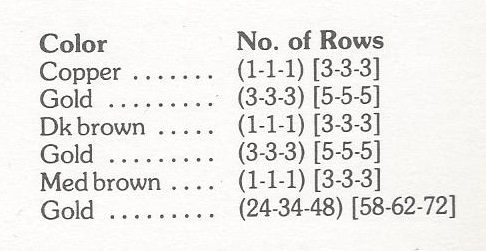
INSTRUCTIONS Back : With larger hook and gold, ch (30-38-42) [48-54-62]. Foundation Row: Sc in 2nd ch from hook, * ch 1, sk next ch, sc in next ch; rep from * across; ch 1, turn. Next Row: (Mark this side as right side of work.) Sc in first sc, * dc in skipped ch of foundation ch, sc in next sc; rep from * across; ch 1, turn. Now work Patt Rows 1 and 2 until you have completed (3-5-5) [9-9-9] rows in gold, ending by working Row 1. Now work established patt in the following color sequence:
However, if you’re fortunate enough to escape the clutch of space cults obsessed with earth tones, this tabard will still be useful if you accidentally become Lost in Space.
Sure, you’ll have to put up with your annoyingly nice parents, your obnoxious siblings, an anxiety-ridden robot and a drippy old dude trying to take over the world. But at least you’ll be able to moon over the handsome Space Corps Major while rocking your groovy geometric tabard!
And let’s face facts, when it comes to the future, there’s a lot worse things that can happen to you than having to wear a tabard.
You have worked a total of (36-48-62) [86-90-100] rows. Neck and Shoulder Shaping: Continuing in patt with gold, work across (3-5-5-) [7-9-11] sts for 2 more rows; finish off. Skip center (23-27-31) [33-35-39] sts for neck opening. Join gold with a sl st in next st; beg in same st as joining and work in patt across rem sts for 2 rows; finish off. Front: Work same as back until you have completed a total of (34-44-58) [80-84-94] rows. Neck and Shoulder Shaping: Continuing in patt with gold, work across (3-5-5) [7-9-11] sts for (4-6-6) [8-8-8] rows; finish off. Skip center (23-27-31) [33-35-39] sts for neck opening. Join gold with a sl st in next st; beg in same st as joining and work in patt across rem sts for (4-6-6) [8-8-8] rows; finish off.
Finishing: Sew shoulder seams. Edging: With right side facing and smaller hook, join gold with a sl st in any st at outside edge of tabard, ch 1, work 1 rnd in sc around entire edge, working 3 sc in each of 4 corners, join with a sl st in beg ch-1; finish off. With right side facing and larger hook, join gold with a sl st in any st at neck edge, ch 1, work 1 rnd of sc loosely around neck edge, join with a sl st in beg ch-1; finish off.
Worse things like having your home planets destroyed by terrifying automatons, then being forced to join a rag-tag fleet, fleeing oppression and poor ratings across the stars. But you can happily survive it all so long as you’re wearing a stylish tabard.
Ties: With smaller hook, make 2 ties with copper and 2 ties with med brown heather; see General Instructions.
So crochet yourself a Tabby Tabard, and this simple medieval garb will ensure you’ll be gleefully fashionable wherever or whenever you travel in space and time.
But you don’t need just any old kitchen. You need a seventies kitchen. Bright, modern, spacious... Wait, what’s that ominous figure in the corner of the room?
Aaaugh, aliens!
Your new seventies kitchen will also help you welcome our new alien overlords.
For more seventies scullery snark:
Despite the cheery cover on this home remodeling book, the seventies were not really about modernity or spaciousness. They were about Authenticity. Rip off that drywall! Expose those beams and brickwork! And if you can’t, then at least cover everything in sight with wood paneling. Lies will not be tolerated. It’s about Keeping it Real.
It was also about keeping Mom in her place.
Seventies kitchen designers loved “pass-throughs”. These handy-dandy holes in the wall allowed Mom to stay in the kitchen and pass food out to her family on the other side, like a short-order cook or a prison cafeteria.
The one above is particularly well designed as the family can use the sliding door to seal Mom off from sight, when they get tired of her showing off her prison tats.
Whereas in this kitchen, dinner orders can be conveniently shouted at Mom from above. If Mom attempts to ignore him, Dad can always tip a fern over on her head.
Yes, the war of the sexes was alive and well in the seventies. And really, keeping Mom segregated from the rest of the family was probably for the best.
Any moment now this woman is going to turn around and bury a butcher knife in her husband’s chest. “Don’t tell ME how to cook, you micro-managing S.O.B.!”
One the plus side, no one will mess with her in the prison cafeteria.
Only in the seventies could hanging your antique kitchen tools from a row of flimsy screw-in hooks seem like a terrific idea.
Many an unfortunate seventies-era housewife was brained by falling mallets and skewered by BBQ forks as she cooked up hot dog casseroles for the family. But concussions and kitchen lobotomies were a small price to pay for the convenience (and authenticity!) of having all her kitchen implements ready at hand.
Of course, some kitchen implements are just a little too pointy to dangle directly overhead. A Mom needs to be able to reach out, grab a knife and stab it into... dinner, of course. And that’s what the handy-dandy magnetic strip is for!
These days, not only can you use that magnetic strip to hold your assorted implements of culinary death, you can also use it to wipe your credit cards. Unfortunately, demagnetizing the stripe on your Visa card will not erase the debt on it.
In the seventies, however, a kitchen knife was not as dangerous as a tin of Campbell’s Soup.
Yes, Junior is about to learn a valuable lesson that gravity is a heartless kitchen witch.
Seventies Do It Yourself Furniture! The perfect way for a seventies guy to demonstrate his commitment to recycling. After all, getting back to the Earth is far more important than any petty concerns about his wife wasting hours of her life cleaning encrusted food and grime off chicken wire.
Rumour has it that the above photo was Exhibit A in the infamous Seventies divorce case Kramer vs. Kramer.
How convenient, you have to stand on the table to water your plants! And if your guests complain about baby spider plants landing in their food, just assure them they’re extra roughage. After all, spider plants are non-toxic, not like that English Ivy... Yeah, you might not want to put your chair right under that one.
Still, despite the risk of poisonous plants in my food, knives dangling overhead and the sheer impossibility of ever adequately cleaning exposed brickwork and stucco, I can’t help but want a seventies kitchen of my very own.
By the He Sea and Ripple Poncho patterns from Aunt Lydia’s Rug Yarn Collection, c. 1970
You won’t find the “He Sea” on any map, but Aunt Lydia assures me that you’ll find these handsome beach bums right by it. And who am I to doubt Aunt Lydia? Sure, she wants to cover up our menfolk in heavy rug yarn for the summer, but that doesn’t mean she’s completely delusional.
I think this He Sea is totally worth checking out. The photo above proves that it’s packed with hot (especially in that poncho), sweaty (very sweaty in polyester beachwear), clean cut gentlemen who are on the lookout for lady friends.
Why else would they book a vacation at the He Sea? They took one look at the name and knew it would be the perfect place to play beach volleyball and just hang out with other macho men in sexy rippled ponchos… er, before picking up bikini-clad babes.
Just like the Lords South Beach Hotel in Miami Beach, another resort with a manly name, I bet the He Sea also attracts the ladies men with stay-naked dining service and bonfire disco parties.
Aunt Lydia assures me that they’re discussing their new girlfriends.
For the complete patterns – yes, all three of them (and three times the snark!):
SLIP OVER
Wow, I had no idea that spray tanning was popular in 1970.
SIZES: Small, Medium, Large
Materials Required: AMERICAN THREAD “AUNT LYDIA’S” HEAVY RUG YARN
4 (5, 5) – 70 Yd. skeins Spice
Because he’s spicy!
5 (6, 6) – 70 Yd. skeins White
1 Pr. Knitting Needles No. 10 ½ OR ANY SIZE NEEDLES WHICH WILL RESULT IN STITCH GAUGE BELOW
GAUGE: 3 sts = 1 inch
Directions are given for Small size. Changes for Medium and Large sizes are given in parentheses.
MEASUREMENTS: Width across front or back at underarm 21’’, 22 ½’’, 23 ½’’.
BACK: With Spice, cast on 42 (45, 48) sts. (Work in stripes of 6 rows Spice and 4 rows White.) Starting with a P row work in stockinette st (P 1 row, K 1 row) inc 2 sts at the beg and end of every K row 5 times, 62 (65, 68) sts. Work even until there are 9 complete White stripes. Work 1 row Spice.
His skin tone certainly resembles my Aunt’s Pumpkin Spice Cake.
SHAPE ARMHOLES: Bind off 4 sts at beg of next 2 rows. Dec 1 st at beg of next 3 rows (this completes Spice stripe), cut Spice. NEXT ROW: Attach White and use for entire yoke. Dec 1 st at beg of row. NEXT 2 ROWS: Dec 1 st at beg of each row. Work even until armholes measure 9 (9 ½, 10) inches. SHAPE SHOULDERS AND NECK: Bind off 7 (8, 8) sts, work across 9 (9, 10) sts and place on holder. Bind off next 16 (17, 18) sts for neck, work across remaining 16 (17, 18) sts. Working one shoulder at a time. Bind off 7 (8, 8) sts, work across row. NEXT ROW Dec 1 st at neck edge, work across. Bind off remaining 8 (8, 9) sts. Attach yarn at neck edge, dec 1 st, work across row. NEXT ROW: Bind off remaining sts.
FRONT: Work same as Back until armholes measure 5 ¼ (5 ½, 6) inches. SHAPE NECK: Work across 18 (19, 20) sts and place on holder, bind off next 12 (13, 14) sts for neck, work across remaining 18 (19, 20) sts. Working one shoulder at a time, dec 1 st at neck every other row twice; 16 (17, 18) sts. Work even until armhole measures same as back. SHAPE SHOULDER: Bind off 7 (8, 8) sts at armhole edge, work across. NEXT ROW: Dec 1 st at neck edge, work across. Bind off remaining stitches. Work other shoulder to correspond.
Viking helmet optional, but if you’re going to wear a mini and slather on the pumpkin spice bronzer, you might as well go full Boromir.
FINISHING: Steam and block sections. Weave 1 shoulder seam. With wrong side facing, attach White at neck opening, pick up and K 1 st in each st all around neck. K 1 row, bind off loosely. Weave other shoulder. With White and wrong side facing, work edge around each armhole same as neck. Weave 1 side seam. With White and wrong side facing, attach yarn at opening and complete lower edge same as neck. Weave other side seams. Turn all edges to right side and tack in place. Steam edges.
Tack and steam those edges all you want, they’re still going to roll up and expose your man’s tushie.
You’ll have to decide for yourself if that’s a bad thing.
LACED TANK TOP
Because the medieval page look suits middle-aged men so well.
SIZES: Small, Medium, Large
Materials Required: AMERICAN THREAD “AUNT LYDIA’S” HEAVY RUG YARN
4 (4, 5) – 70 yd. skeins Bongo – Color B
Hey, it’s our old friend Bongo again!In 1965, Aunt Lydia believed that the colour of African antelopes and Disney circus bears was best suited to placemats. By 1970, she was recommending it for beach attire. Granted, this top looks like a bunch of placemats stitched together, but still I suspect that Aunt Lydia was in the pay of Big Bongo.
3 (3, 3) – 70 yd. skeins Orange – Color C
2 (2, 3) – 70 yd. skeins Antique – Color A
1 Pr. Knitting Needles No. 10 ½ OR ANY SIZE NEEDLES WHICH WILL RESULT IN STITCH GAUGE BELOW
Plastic Crochet Hook Size H
GAUGE: 3 sts = 1 inch
MEASUREMENTS: Width across front or back at underarm: 20’’, 21’’, 22’’ (each section)
Directions are given for small size. Changes for medium and large sizes are given in parentheses.
Word of advice: Have safe search on before attempting to do internet research on Big Bongos.
NOTE: When changing colors always pick up yarn from under 1st color thus crossing yarn to prevent a hole.
BACK: With color A, cast on 40 (44, 48) sts. K 3 rows. NEXT ROW: With Color A K 4 (border), with color B, K 32 (36, 40) sts, attach another skein of color A (for other border), K 4. NEXT ROW: K 4 color A, P 32 (36, 40) color B, K 4 color A. NEXT ROW: K 4 color A, with color B inc 1 st in next st (to inc: K 1 in usual manner, then K in back of same K st), K to within last st of color B; inc as follows: K 1 st in row below, K last st (the inc on the right will slant to right, the inc on left will slant left), K 4 color A. Repeat last 2 rows until there are 56 (60, 64) color B sts.
Don’t overlook the instructions to make the stitches slant off in different directions. Otherwise, your stylish Bongo Babe Magnet top will end up resembling a piece of African Antelope poop.
NEXT 2 ROWS: K 2 border sts tog at each end before and after color B. Continue in established pattern having only 2 A border sts at each end until section measures 10 inches above lower border on wrong side, cut color B. NEXT 4 ROWS: With color A K across all sts. NEXT ROW: K 2 color A, attach color C and K to within 2 sts, K 2 color A. Continue in established border sts and stockinette st (P 1 row, K 1 row) for 10 inches, ending on wrong side, cut color C. NEXT 3 ROWS: With Color A K across all sts. ARMHOLE SHAPING: Bind off 4 sts at beg of next row, K across row. NEXT ROW: Bind off 4 sts, K 4 sts (border), attach color B, K 44 (48, 52) sts, attach color A, K 4 sts (border); 52 (56, 60) sts on needle. NEXT ROW: K 4 color A, P 44 (48, 52) sts color B, K 4 color A. NEXT ROW: (Dec): K 4, K 2 tog, K to within last 6 sts, K 2 tog, K 4; 50 (54, 58) sts. Repeat last 2 rows twice; 46 (50, 54) sts. Work even in established colors until armhole measures 9 (9 ½, 10) inches from 1st armhole bind off, ending on wrong side of work. SHAPE SHOULDER: Work across 12 (12, 12) sts, turn; work back. Repeat last 2 rows once. NEXT ROW: Bind off 6 sts in matching colors, cut A, K to end of row. NEXT ROW: P 6, bind off. NECK BAND: With right side facing, attach color A and K across row to within last 12 sts (all sizes), turn. NEXT 5 ROWS: K across these neck sts only, bind off, cut A. 2nd SHOULDER: Attach color B in 1st st of other shoulder and work to correspond, reversing shaping. With blunt needle, weave neck band at each side to shoulder edges.
Word of advice: Have safe search on before attempting to do internet research on African Antelope po—Actually, don’t. Just don’t research it.
FRONT: Work same as back to armhole shaping, ending with 3 rows of color A. ARMHOLE SHAPING: Bind off 4 sts at beg of next row, K to end of row. NEXT ROW: Bind off 4 sts, K 4 color A, K 20 (22, 24) color B, attach A and K 2 for center border. Leave remaining sts on needle to be worked later, turn. Working in established colors, dec 1 st at armhole edge every other row same as back; at the same time work 1st eyelet for front lacing on 5th row (eyelet: Work across row to within last 4 sts of center, K 2 tog, YO, K 2). Work 2 more eyelets in same manner every 2 inches. Work even until section measures 6 inches from 1st armhole bind off, ending on wrong side.
Besides the colour of this beach top more closely resembles Blue Whale poop. No, seriously.
Don’t ever say you haven’t learned anything from this blog.
NEXT ROW: K 4 color A, K 11 color B (all sizes), cut color A. At center, attach color A to color B and work remaining 8 (10, 12) sts of neck band and border, ending at front edge. NEXT ROW: K across 8 (10, 12) color A sts, with color B, P 2 tog, P across to border, K 4. Repeat last 2 rows twice; at the same time when there are 3 ridges at neck edge bind off 4 (6, 8) sts at neck edge. Then work 4 border sts at each end with color A and 8 center sts in color B. Work in established pattern until armhole measures same as back. SHAPE SHOULDERS: With matching colors, bind off 8 sts at beg of armhole edge, turn. Attach color A at center front and work other side to correspond reversing shaping and eyelets.
Clearly, the pattern editor is too grossed out by the Bongo/Whale Poop resemblance to instruct you on how to bind off the remaining stitches.
FINISHING: Block each section to size. Weave shoulder and side seams matching stripes. With color C make a chain about 30 inches long and lace through eyelets as illustrated.
Materials Required: AMERICAN THREAD “AUNT LYDIA’S” HEAVY RUG YARN
1 – 180 yd. skein each of any 5 colors or
3 – 70 yd. skeins each of any 5 colors
Aluminum Crochet Hook Size K OR ANY SIZE HOOK WHICH WILL RESULT IN STITCH GAUGE BELOW
All that shouting is just to distract you from the promise that you can use “any 5 colors”. Spoiler alert: It’s a lie.
GAUGE: 2 sts = 1 inch; 2 rows = 1 inch
1st ROW: With Rust ch 119, s c in 2nd st from hook, 1 s c in each of the next 5 sts, * 3 s c in next st, 1 s c in each of the next 6 sts, skip 2 sts, 1 s c in each of the next 6 sts, repeat from * 6 times, 3 s c in next st, 1 s c in remaining 6 sts, ch 1 to turn all rows.
See? I told you it was a filthy lie! You’re to begin with Rust, and only Rust!
2nd ROW: Working in back loop of all sts throughout skip 1 s c, 1 s c in each of the next 6 s c, * 3 s c in next s c, 1 s c in each of the next 6 s c, skip 2 s c, 1 s c in each of the next 6 s c, repeat from * 6 times, 3 s c in next s c, 1 s c in each of the next 5 s c, skip 1 s c, working in both loops of st, 1 s c in last s c, ch 1, turn. Repeat last row throughout working 2 rows each Rust, Brown, Bongo, Antique and Yellow, cutting all colors at end of each 2nd row. (When changing colors always complete last half of st with next color). Repeat last 10 rows once more (20 rows in all).
Long story short, you can use any five colours so long as they are Rust, Brown, Bongo, Antique and Yellow.
Although to be fair, these were the only five colours people were allowed to wear in 1970.
NECK OPENING: Work in established pattern and colors across 4 points only, ch 1, turn. Work across these 4 points for 20 rows. Attach yarn at center and work across the remaining 4 points in same manner until there are 20 rows; then work across all 8 points for 20 more rows in colors as established, cut yarn.
COLLAR: Attach Yellow at neck edge in last of short rows, work 1 s c in each row increasing 1 st every 4th row (50 s c) around neck, join and ch 1 to turn each row. Working in back loop of remaining sts work 2 rows Yellow, 2 rows Antique, 2 rows 2 Rows Bongo, and 2 rows Brown, join, cut yarn.
Now drape your criminal in this rug yarn poncho, so he’ll be too overheated to outrun the fuzz.
The Ripple Granny Jacket and Hat from Crochet with Squares, 1974
With apologies to Right Said Fred… whaddaya mean, who’s Right Said Fred?!
I’m too sexy for my followers, too sexy for my followers
Please, followers don’t leave me!
I’m too sexy for my jacket, too sexy for my jacket
So sexy I can’t hack it
I’m too sexy for the ski lodge, too sexy for the ski lodge
Bates Motel or Econo Lodge
And I’m too sexy for this post
Too sexy for this post
No way I’m ceasing and desisting!
I’m a granny square model, you know what I mean
I’d give my eye teeth to do a turn on the catwalk
Yeah on the catwalk, on the catwalk
I’d kill my grandma to shake my tush on the catwalk
I’m too sexy for my hat, too sexy for my hat
There’s no denying that
And I'm too sexy to crochet, too sexy to crochet
I’d rather wear a toupee!
Cos I’m a granny square model, with grannies I’m seen
As I model in Wallmart instead of a catwalk
Oh, in Wallmart, in Wallmart
I got arrested for shaking my little tush in Wallmart.
I’m too sexy for Blogger, too sexy for Blogger
Twitter, Facebook and Blogher
I’m too sexy for my followers, too sexy for my followers
My followers are all going to leave me!
I’m too sexy for this blog.
For the complete too sexy pattern (and more too sexy snark):
THE RIPPLE GRANNY
I suppose those are ripples of granny squares, if by ripples you mean jagged clumps of potholders.
Sorry, I meant sexy, jagged clumps of sexy potholders.
SIZES: 10-12; 14-16 Directions are given for size 10-12. Changes for 14-16 are given in parentheses (for Jacket). Directions for hat in one size, it adjusts to fit.
MATERIALS NEEDED:
4 ply Synthetic yarn or Knitting Worsted (4 oz. skeins)
6 (7) skeins Color 1 (Royal Blue)
2 (3) skeins Color 2 (Green)
1 (2) skeins Color 3 (White)
1 (1) skeins each Color 4 (Yellow) and Color 5 (Red) or any 5 color combination may be substituted.
G (G) Aluminum or #6 (6) Plastic Crochet Hook for Squares and
F (F) Aluminum or #5 (5) Plastic Crochet Hook for Collar and Bands.
I hope I don’t have to warn you of the dire consequences should you attempt this pattern with a non-synthetic, organic yarn and a bamboo hook.
Remember this pattern booklet is called Crochet with Squares, not Crochet with Hippy-Dippy Tree Huggers.
JACKET (Size 10-12)
GAUGE: Each square measures 3½”.
SQUARE #1: Make 59 RND 1: With Color 1 (Royal Blue) and large hook ch 4, sl st in 4th st from hook to form a ring, ch 3, 2 dc in ring, * ch 3, 3 dc in ring, rep from * twice, ch 3, sl st in top of ch 3 to join. RND 2: Ch 3, * (3 dc, ch 3, 3 dc) in next ch 3 loop (corner shell), rep from * twice, (3 dc, ch 3, 2 dc) in last ch 3 loop, sl st in top of ch 3 to join (ch 3 at beg of row counts as 1 dc). RND 3: Ch 3, 2 dc in space between ch 3 and next 3 dc group, * (3 dc, ch 3, 3 dc) in next ch 3 loop, 3 dc in next space between 3 dc loop, sl st in top of ch 3 to join, break off.
Perhaps a better name for this pattern booklet would be Crochet with Brackets, or Crochet with 3 dc. Crochet Yourself into a Coma would be cruel, but fair.
SQUARE #2: Make 34 RND 1: With Color 5 (Red) same as RND 1 of SQUARE #1, break off. RND 2: Join Color 4 (Yellow) with sl st in 1st ch 3 loop, ch 3, (2 dc, ch 3, 3 dc) in same loop with sl st, * (3 dc, ch 3, 3 dc) in next ch 3 loop, rep from * around, sl st in top of ch 3 to join, break off. RND 3: Join Color 2 (Green) with sl st in 1st ch 3 loop, ch 3, (2 dc, ch 3, 3 dc) in same loop as sl st, * 3 dc in space between next two 3 dc groups, (3 dc, ch 3, 3 dc) in next ch 3 loop, rep from * around, end with 3 dc in space between last two 3 dc groups, sl st in top of ch 3 to join, break off.
SQUARE #3: Make 29 RND 1: Same as RND 1 of SQUARE #2. RND 2: Use Color 2 (Green), work same as RND 2 of SQUARE #2. RND 3: Use Color 3 (White), work same as RND 3 of SQUARE #2.
Thou shalt not make this pattern more interesting by altering the order of these holy SQUARES! First, thou shalt create all 56 of SQUARE #1. Thou shalt not crochet 29 of SQUARE #3, excepting that you have already completed 34 of SQUARE #2.
Making up your own SQUARE #5 is right out.
TRIANGLE #1: Make 24 ROW 1: With Color 1 (Blue) ch 4, sl st in 4th st from hook to form ring, ch 4, (3 dc, ch 3, 3 dc) in ring, work 1 tr in ring. ROW 2: Ch 4, turn, 2 dc in first tr, (3 dc, ch 3, 3 dc) in next ch 3 loop, skip next 3 dc, work 2 dc and 1 tr in top of turning ch 4. ROW 3: Ch 4, turn, 2 dc in first tr, skip next 2 dc and next 3 dc group, (3 dc, ch 3, 3 dc) in ch 3 loop, skip 3 dc, 3 dc in space before last 2 dc, 2 dc and 1 tr in top of turning ch 4, break off.
TRIANGLE #1? But this is Crochet with Squares! Using TRIANGLES to fabricate a Ripple Granny Jacket is CHEATING!
TRIANGLE #2: Make 2. ROW 1: With Color 5 (Red) same as Row 1 of TRIANGLE #1, break off. ROW 2: Turn, join Color 4 (Yellow) with sl st in 1st tr, ch 4 complete same as ROW 2, TRIANGLE #1, break off. ROW 3: Turn, join Color 2 (Green) with sl st in 1st tr, ch 4, complete same as Row 3, TRIANGLE #1, break off.
UNDERARM MOTIF: (5 corners). Make 2.
Why yes, my underarm is pentagon-shaped. Isn’t yours?
RND 1: With Color 5 (Red), ch 4, sl st in 4th st. from hook to form ring, ch 3, 2 dc in ring, * ch 3, 3 dc in ring, rep from * 3 times, ch 3, join with sl st in top of ch 3, break off. RNDS 2 and 3: Work in same manner as Square #2, but having 5 corners, break off.
BLOCKING: Block all motifs to size. See page 49.
Turn to page 49, class.
Apparently, blocking is the application of an iron-on patch onto a side of beef pinned to a candy stripers uniform.
That’s candy stripers not candy strippers! Get your minds out of the gutters, people.
BLOCKING: Place crocheted square right side down on well padded surface. Pin each square or article to size given with each design. Cover with damp cloth, steam (do not press). When two pieces have the same measurements, pine one piece down and block. Place reverse piece on top (right side up), and block. All pieces to dry completely before removing pins.
That procedure may work for the first couple of squares, but once you have a pile of 122 of the same sized squares, you’re going to need a bigger iron. And a super-sized side of beef.
Now everyone turn back to page 40 of the text book.
JOINING: Weave Squares together following directions on page 49.
Page 49 AGAIN!
All right, if I must.
Let me guess. Either your joining will create a legion of synthetic yarn ridges inside the jacket to rub against your skin until you’re driven mad (option A) or the outside of the jacket will look like Dr. Frankenstein embroidered it (option B).
Decisions, decisions.
JOINING SQUARES:
A With tapestry needle and same yarn as last rnd overcast edges of both squares from one ch 3 loop to next, or from one corner sc to next corner sc. B Butt 2 motifs together, bring needle up through center of corner st of 1st motif, down through corner st of 2nd motif, * up through next st of same motif, down through same st of 1st motif and up through next st of same motif, down through same st of 2nd motif, rep from * until joining is completed.
Class, stop sniggering just because they said Butt! Now everyone back to page 40.
Join Jacket in 3 sections as shown on charts.
After having crocheted and ironed 122 squares, 26 triangles and 2 underarm motifs, feel free to delegate the stitching together of all 150 pieces to the kids.
If they complain, remind them that this isn’t illegal child labour as you’re not going to be paying them. No, this is family game night.
Follow chart for color arrangement of motifs 1, 2, and 3. Join shoulders matching P’s and Q’s. Use different colors of yarn for markers for letters I through O placing where indicated on chart (on sleeves and armhole openings). Join sleeve seams matching letters A through H. Matching yarn colors place sleeve in position and weave in place.
COLLAR AND BORDER:
(For both sizes) (Collar and bands are worked in one piece and all sc’s are worked in back loop of stitches only) Row 1: (Starting at center back) With Color 1 and small size crochet hook, ch 5, 1 sc in 2nd st from hook, I sc in each of next 3 ch sts, (4 sc in row). Row 2: Ch 1, turn, 1 dc in each sc across. Repeat last row until 164 (180) rows are completed.
C’mon, it’s only 180 rows! I’ve said it before, I’ll say it again, people. There is NO crying in crochet!
There is, however, repetitive stress injury in crochet.
START COLLAR SHAPING: Row 1: (Inc. Row) ch 1, turn, 1 sc in each sc, 2 sc in last sc. Row 2: Ch 1, turn, 1 sc in each sc across. Repeat last 2 rows until there are 14 sc in row. Row 21: Repeat row 1 of Collar shaping. Row 22: Ch 1, turn, 2 sc in first sc, 1 sc in each rem sc. Rows 23 and 24: Repeat Rows 1 and 2 of Collar shaping. Repeat last 4 rows until there are 35 sc in row. Work without increasing over 35 sc until there are 262 (274) rows in all, break off.
This is ½ of Collar and Border measuring from center back of lower edge of neck. Make other half in same manner. Join the 2 sections at center back of border and collar.
If you incur repetitive stress injury from making the second half of the Collar and Border, write to Graphic Enterprises Inc, the holder of this pattern’s copyright back in 1974. Unfortunately, they didn’t provide an address, but I’m certain that one of the 33,800,000 hits their company’s name got from Google will be the correct place.
Good luck!
CUFFS: Make 2. Ch 21, work same as Row 1 and 2 of collar (20 sc in row) until there are 60 (63) rows, break off. Join 2 short ends to form tube.
BELT: Ch 9, work back and forth in single crochet same as cuff until there are 218 (230) rows or until belt is desired length, break off.
Such a prosaic belt just won’t do justice to the patchwork masterpiece your family made together.
This vintage belt, on the other hand, will add a certain je ne sais quoi.
No, je ne sais quoi is not French for WTF.
FINISHING: With right sides together, place and stitch collar and border to outside edge of jacket, matching center back of collar to center of neck, center back of border to center back of lower edge of jacket, making sure increased edge of collar is attached to jacket edge.
JACKET (Size 14-16)
There is NO crying in pattern transcription.
*wimper*
GAUGE: Each square measures 4”.
Jacket is made same as Size 10-12—But do not break yarn at end of last RND or ROW of Motifs.
SQUARES: RND 4: Ch 1, 1 sc in same st with sl st, work (1 sc in each dc, 5 sc in each corner ch 3 loop) around, join with sl st, break off.
TRIANGLES: ROW 4: Ch 1, turn, 1 sc in first tr, 1 sc in each dc up to ch 3 corner loop, 5 sc in ch 3 loop, 1 sc in each rem dc, 1 sc in top of turning ch 4, break off.
BLOCKING, JOINING, FINISHING:
Work same as Size 10-12.
DIRECTIONS For Collar and Border are given in parenthesis with directions for Size 10-12.
That wasn’t so bad. So we’re finally done now, right?
HAT
AUUUUUGGGGHHHH!
Work 8 Squares #2 and 4 Triangles #1 same as Size 10-12 jacket.
BLOCKING: Same as Size 10-12 jacket.
JOINING: Weave squares together same as jacket joining 4 squares together for crown. Matching letters, join the 4 squares #2 to center Squares, then fit Triangles between Squares. Stitch Triangles in place. See chart.
That’s a hat? It looks like a crocheted pinwheel.
So, instead of stitching it together to form an ugly hat, you could create your own low tech wind farm!
BRIM: Using large crochet hook, join Color 1 (Blue) with an sc in end st of a dc row, work 2 more sc over same end st, work (3 sc over end sts of each dc row, skipping all joinings and ch 4 rings at beg of each triangle) around, join, (72 sc).
NOTE: The entire brim is worked in back loop of each sc.
MORE IMPORTANT SAFETY NOTE: Do not wear completed granny square hat in the kitchen. Someone may try using your head to get a roast out of the oven.
RND 2: (Inc) Ch 1, turn, * 1 sc in each of next 5 sc, 2 sc in next sc, rep from * around, join in 1st sc (84 sc). RND 3: (Inc) Ch 1, turn, * I sc in each of the next 6 sc, 2 sc in next sc, rep from * around, join (96 sc). RNDS 4 and 5: Ch 1, turn, I sc in in each sc all around, join each round. RND 6: (Inc) Ch 1, turn, * 1 sc in each of the next 7 sc, 2 sc in next sc, 2 sc in next sc, rep from * all around join (108 sc). RNDS 7 and 8: Same as RNDS 4 and 5. RND 9: (Inc) Ch 1, turn, *1 sc in each of the next 8 sc, 2 sc in next sc, rep from * around, join (120 sc). RNDS 10 through 13: Work RNDS 4 and 5 twice, break off.
At last, you’re ready to shake your granny-squared tush on the catwalk!
“Appolo” isn’t a spelling mistake. This pillow is made of Phentex, ergo it would be inappropriate to name it after Apollo, the Greek God of light and poetry. No, this interior decorator’s nightmare is named Appolo which in ancient Greek meant the destroyer. Given Appolo’s hatred of Apollo, I can only assume that little Bobby and Cindy accidentally triggered the Phentex Pillow’s feeding frenzy by turning on a sun lamp and reading out loud from the Jabberwocky.
Now, some would argue that Appolo’s attempt to destroy the Brady Bunch actually makes up for all the heartbreak Phentex has caused meall of us. But where else would I have learned that as the baby of the family I was a snooping little tattle-tale? I refuse to say whether or not I’m in curls on the grounds I might incriminate myself.
Besides, these child actors didn’t really deserve to be eaten by a Phentex Sandworm. Yes, I’m well aware they aren’t Mike Lookinland or Susan Olsen. However, the Brady Bunch went through early Cindys and Bobbys with the same ruthlessness they had for the little seen Brady dog Tiger. In fact, in the right hand corner you can see the original Tiger, portrayed by a red poodle named Plushie, moments before he was eaten along with the Brady wannabes.
When it comes to Phentex, even Poodlefest cannot save you.
For the complete pattern, and thankfully no more Brady Bunch references:
“Appolo” Pillow
Size:
54” wide—7’ long
It just occurred to me that this fake Appolo pillow might actually have been named after the fake Appolo moon landing.
Crochet:
No 7. American no 6.
Material:
Phentex 3 ply:
red 3 balls
navy 2 balls
black 1 ball
yellow 6 balls
dark orange 6 balls
orange 3 balls
white 2 balls
purple 2 balls
green 2 balls
brown 2 balls
Either Phentex only came in dull, dismal colours in 1972, or this pattern designer didn’t believe children deserved bright, pretty things.
Although, I suppose there’s no reason why both couldn’t be true.
Make a chain for a 54” wide, work in d.c. till 7’ long or at desired length, changing the colours—8 rows red, 2 rows black, 4 rows white, 6 rows yellow, 3 rows purple, 6 rows orange, 5 rows navy, 2 rows white, 4 rows green, 5 rows orange, 2 rows black, 4 rows yellow, 6 rows brown, 2 rows white, 3 rows navy, 8 rows red. (The red rows are in the center – work till the end of pillow, reversing colours.)
Wow, making this 7 foot long pillow (2.1336 metres for Canadian crocheters) would be more tedious than knitting a Doctor Who scarf.
Apparently, the 4th Doctor didn’t deserve bright, pretty things either.
2 Sides—1 yellow—1 orange—ch 6, close by a sl. st.
Row 1—Ch. 2,—11 d.c. in the opening.
Seriously, a comma and a dash? Pausing twice in the same row is a big risk in a pattern this boring.
Be sure your crochet buddy checks every two to three hours that you haven’t slipped into a coma.
Row 2—2 d.c. in each st.
Row 3—2 d.c. in same st. each 2 sts.
Row 4—2 d.c. in same st. each 3 sts.
Row 5—2 d.c. in same st. each 4 sts.
Row 6—1 d.c. in each d.c.
Row 7—2 d.c. in same st. each 5 sts.
That’s right, never crochet alone! Or thirty minutes after eating a big meal.
Work to row 12, spacing 1st each row between the 2 d.c. in the same st.
R. 13—1 d.c. in each d.c.
R. 14—2 d.c. in the same st. each 11 sts.
R. 15—2 d.c. in the same st. each 12 sts.
R. 16—1 d.c. in each d.c.
Now stuff the Phentex pillow with live children.
Of course, I’m not joking. The materials list never mentioned any other kind of stuffing. Come to think of it, there’s no mention of the big leather buttons either.
I guess you’re supposed to make them out of red poodles.
Work 1 row s.c. same colour of each side to sew the sides to pillow.
Despite being made out of deadly Phentex, dead poodles, and eventually dead children, the Appolo is not the deadliest pillow available on the interwebs. Nope, if you really want to win the next pillow fight, you’ll need to get yourself one of these.
All Heart Skimp from “The Great Little Crochet Skimps”, c. 1975
It’s almost Valentine’s Day and you’re no doubt thinking about knitting something special for the man you love. Don’t do it! You may believe that only sweaters will curse a relationship, but even knitting a fifteen foot scarf for your boyfriend is a one way ticket to Lonely-Town!
Still, you’re desperate to prove you love him, so what’s a girl to do?
Clearly, you need to ditch the whole subtle approach and expose your supersized heart for everyone to see. That way, he can’t claim he doesn’t know just how incredibly super awesomely much you love him. Why every time he looks at your chest your Valentine message will be right there in his face. “I Loooove You this MUCH!”
In fact, this could be the beginning of a whole new way of communicating with your boyfriend. Anything you really want to say to him, just crochet or knit it onto your chest.
“Honey, you’re a slob, and I don’t approve of your friends.”
For the complete pattern (and more snark!):
All Heart
These directions are for small size (8-10) and medium size (12-14).
Evidently large size ladies don’t wear “skimps”. Skimp being another word for vest, sleeveless pullover and the rather suggestively named potholder. (Hopefully, your pots come in pairs!)
In the seventies, fashion designers weren’t all heart when it came to plus size gals. However, skimps for skinny girls were far from their worst offence.
MATERIALS
BERNAT BERELLA GERMANTOWN (2 oz. balls)
- 2 Main Color (M C)
- 1 Color A
- 1 Color B
Yes, this is what “chubby” looked like in the heroin chic, starving seventies.
Poor Tracy. This pink pleated perky nightmare has been cruelly designed to make her look perfectly cylindrical, utterly waist-less, and neck-less too. No wonder she doesn’t care if chubby fashions are hard to find – she probably prays nightly that the local Sears will burn to the ground.
FOR SMALL SIZE
1 BERNAT-Aero crochet hook Size 1 (Canadian Wool Crochet Hook No. 5:50 mm)
FOR MEDIUM SIZE
1 BERNAT-Aero crochet hook Size J (Canadian Wool Crochet Hook No. 6:00 mm)
I was briefly excited to see the word Canadian in the pattern, but then I noticed that Bernat believes Canadians sort their Crochet Hooks according to a 24 hour clock. And also make them out of wool.
Yes, I live in a magical, if very cold, land.
OR ANY SIZE HOOK THAT WILL GIVE THE STITCH GAUGE GIVEN BELOW
GAUGE
3 sts = 1 inch on Size I hook
7 sts = 2 inches on Size J hook
NOTE 1: Both sizes are made on the same number of stitches, using the hook suggested for the correct GAUGE.
Note 2: Always count turning chain as 1 d c.
Granted, these notes may be useful for the beginning crocheter, but why do pattern editors always feel the need to shout at noobs? Are they really afraid they’ll use the hook suggested for the correct gouge instead of gauge?
Mind you, with this particular pattern the ability to correctly gouge with a crochet hook would be welcome. So maybe those all-caps are not a bully’s shout, but a terrified scream.
“It’s gauge, GAUGE! Please don’t gouge holes in me just because I wrote an incomprehensible pattern riddled with errors!”
HEART: Make 2. Using M C, ch 4. Row 1: 2 d c in first st of ch, ch 3, turn – 3 d c. Row 2: 1 d c in space of turning ch (inc), 1 dc in next space, 2 d c in last d c (inc) ch 3, turn – 5 d c. Row 3: 1 d c in space of turning ch (inc), 1 dc in next 3 d c, 2 d c in last d c (inc) ch 3, turn – 7 d c. Continue to inc one st at beg and end of every row until there are 36 d c, ch 3, turn. TO DIVIDE FIRST HALF: Row 1: 1 d c in each of the next 16 d c, ch 3, turn – 17 d c. Rows 2 and 3: 1 d c in each of the next 16 d c, ch 3, turn. Row 4: 1 d c in each of the next 13 d c, y o hook, draw up a loop in next st, y o, draw through 2 loops on hook, y o, draw up a loop in next st, y o, draw through 2 loops on hook, y o, draw through 3 loops on hook (dec), 1 d c in tuning chain, ch 3, turn – 16 d c. Row 5: 1 dec st in next st. 1 d c in each of the next 10 d c, 1 dec st in next st, 1 d c in turning ch, ch 3, turn – 2 sts dec. Continue to dec 1 st at beg and end of EVERY row until 6 sts remain. Fasten off. SECOND HALF: Starting at center of heart, skip 1 d c, join yarn in next d c and work to correspond to first half, working first dec at beginning of Row 4. Fasten off. EDGING: Join Color A in lower tip of heart and work 2 s c in edge of each row around side of heart. Fasten off. Join yarn at neck edge of heart...
Did you know your neck circumference is actually linked to your risk of heart disease? The bigger it is, the higher your chances of having a heart attack.
Feel free to share this fun fact with your date this Valentine’s Day! Men love it when you lecture them about their health.
... and work 2 s c in edge of each row to other side of neck edge. Fasten off. Join yarn at outside edge of remaining side of heart and work to correspond to other side, join with sl st to first st at tip of heart. Fasten off. SHOULDER STRAPS: Row 1: With right side facing you and working at top of heart, join Color A in first st, ch 3, 1 s c in each of the next 5 d c across row, ch 3, turn – 6 d c. Row 2: 1 d c in each s c, ch 3, turn – 6 d c. Repeat Row 2 six times more. Fasten off. Work other shoulder straps in same manner. SIDE LACING: Join Color A to st at tip of heart...
Do not confuse the tip of the heart with the top, or your skimp will not be tip-top.
Ba-dum-cha!
Men also find ba-dum-chas veeerrry sexy.
... and ch 20 sts loosely, turn. Row 1: 1 d c in 4th st of ch, * skip 1 st, ch 1, 1 d c in next st, repeat from * 7 times more (10 d c), ch 1, skip 2 s c at edge of heart, 1 s c in each of the next 3 s c at same edge, ch 1, turn. Row 2: Skip first d c, * 1 d c in next d c, ch 1, repeat from * 7 times more, ending 1 d c in top of turning chain, ch 4, turn – 9 d c. Row 3: * 1 d c in next d c, ch 1, repeat from * 7 times more, ending skip 2 s c, 1 s c in each of the next 3 s c at edge of heart, ch 1, turn – 9 d c, Row 4: Skip first d c, * 1 d c in next d c, chain 1, repeat from * 6 times more, ending 1 d c in turning ch, ch 4, turn – 8 d c. Continue to work in this manner having 1 d c less at heart edge every other row until 16 rows have been completed, ending last row with 1 d c, ch 1, 1 d c in top of turning ch. Fasten off. Join Color A at tip of heart and work other side to correspond. Work same side lacings on other heart. Sew shoulder seams. SIDE EDGING: Using Color B and with right side facing you, join Color B in corner st of side lacing, ch 3, 1 d c in same space, * 2 d c in next space (V), repeat from * 13 times more, ending 5 d c in next space (corner), 2 d c in next space, 1 s c in each s c to shoulder strap, 2 s c in each d c across shoulder straps, 1 s c in each s c of second heart, 2 d c in next space, 5 d c in corner space, 2 d c in each of the next 15 spaces. Fasten off. Work same edging around other side. NECK EDGING: Join Color B in s c at divide for heart and work 1 s c in each s c around to shoulder strap, work 2 s c in each space around shoulder strap. Work same edging around remaining neck edging and other shoulder strap, join with a sl st. Fasten off. TO JOIN SIDE LACINGS OF FRONT AND BACK: With wrong sides of heart touching...
That’s right, when it comes to your heart(s), two wrongs DO make a right!
So, if you’re still a spinster, it’s because you’ve let yourself be guided by outmoded concepts like fair play and the rule of law. Fortunately, this pattern has now provided you with a far more practical philosophy for your dating relationships.
... join M C in space at lower edge of front, * ch 3, 1 s c in first space of back, ch 3, 1 s c in space between 2 d c of next V of front, repeat from * to armhole edges, ending skip 2 d c of corner, 1 s c in next space, ch 3, skip 2 d c of corner of other armhole, 1 s c in same space. Fasten off. Join other side lacings in same manner. BAND AT LOWER EDGE: With right side facing you, join Color B at side lacing, ch 3, 1 d c in same space, 2 d c (V) in each space around entire lower edge, join with sl st. Fasten off Color B. Join M C in space of V, ch 3, 1 d c in same space, * 2 d c in space of V, repeat from * around, join with sl st. Fasten off M C. Join Color B in space of V, ch 3, 1 d c in same space, 2 d c in space of V, repeat from * around, join with sl st. Fasten off Color B. Steam lightly.
Now slip on your brand new All Heart skimp and pick out just the right Valentine’s Day card for your beloved.
Why yes, darling. I will stab you through the heart with my giant steel needles if you break my big, crocheted heart. But don’t worry, I KNOW you love me best of all.
This blog is the result of a near OCD compulsion to transcribe - and mock! - vintage patterns, ads, and other odds and sods. And you, dear reader, are the fortunate beneficiary.
Every month you will discover new patterns from the past century. These are the vintage gems that generations of women have inflicted upon husbands, children and themselves.
You are cordially invited to recreate these products of subconscious hostility and not-so-passive aggression. Send photos of the results to victoriadunnwrites (at) hotmail (dot) com, and I will be delighted to mock them for you.




 Posts
Posts


