Showing posts with label children's wear. Show all posts

Wednesday, April 18, 2012

Back to the Future

Tabby Tabard Pattern from Tabards, designs by Carole Rutter, Leisure Arts, Leaflet 94, 1977

Tabards were originally cloths worn by medieval knights over their armour, in a desperate attempt to differentiate one chainmail-encased man from another.


This knight’s tabard is giving him the bravery to fight on despite being cut off at the knees. Methinks he’s a relative of the Black Knight.

In any case, modern tabards are almost exclusively worn by professional cleaning staff.


Don’t be deceived by her mild mannered appearance. She could easily take out that stubby-legged knight. Just look at her smile. She’ll mop the floor with him!

However, between our distant, somewhat height-challenged past, and our terrifyingly clean dystopian present, there were the Sixties and Seventies. When, for one brief moment, we dared dream of a bright, shining future when absolutely everyone would wear tabards.


Even for the manliest of villains, tabards are the perfect sparkly accessory for the annual tribble hunt!

To make your own sexy, warrior tabard:

This woman and child are either space colonists or members of an oppressive cult. Or both!
TABBY

Size: See General Instructions

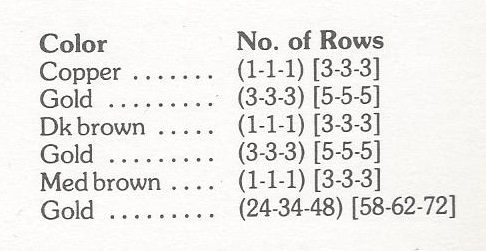
Note that this particular space cult allowed its members to use “personal preference” in placement of the ties. That’s why it didn’t survive past the Seventies. Allow cultists to make any decisions for themselves, and it’s only a matter of time before they decide to place the ties around the Supreme Alien Leader’s neck.
Materials: Worsted wt yarn, (6-8-10) [14-16-18] oz gold, (1-1-1) [2-2-2] oz each copper, dk brown and med brown heather; aluminum crochet hook sizes E and J (Canadian sizes 9 and 3) or sizes needed for gauge.

Gauge: With larger hook, in patt, 10 sts = 3’’; 7 rows = 2’’

Pattern Stitch
Row 1: Sc in first sc, * ch 1, sk next st, sc in next st; rep from * across; ch 1, turn. Row 2: Sc in first sc, * dc in skipped st 2 rows below, sc in next st; rep from * across; ch 1, turn. Rep Rows 1 and 2 for patt.

INSTRUCTIONS
Back : With larger hook and gold, ch (30-38-42) [48-54-62].
Foundation Row: Sc in 2nd ch from hook, * ch 1, sk next ch, sc in next ch; rep from * across; ch 1, turn. Next Row: (Mark this side as right side of work.) Sc in first sc, * dc in skipped ch of foundation ch, sc in next sc; rep from * across; ch 1, turn. Now work Patt Rows 1 and 2 until you have completed (3-5-5) [9-9-9] rows in gold, ending by working Row 1. Now work established patt in the following color sequence:

However, if you’re fortunate enough to escape the clutch of space cults obsessed with earth tones, this tabard will still be useful if you accidentally become Lost in Space.

Sure, you’ll have to put up with your annoyingly nice parents, your obnoxious siblings, an anxiety-ridden robot and a drippy old dude trying to take over the world. But at least you’ll be able to moon over the handsome Space Corps Major while rocking your groovy geometric tabard!

And let’s face facts, when it comes to the future, there’s a lot worse things that can happen to you than having to wear a tabard.


You have worked a total of (36-48-62) [86-90-100] rows. Neck and Shoulder Shaping: Continuing in patt with gold, work across (3-5-5-) [7-9-11] sts for 2 more rows; finish off. Skip center (23-27-31) [33-35-39] sts for neck opening. Join gold with a sl st in next st; beg in same st as joining and work in patt across rem sts for 2 rows; finish off. Front: Work same as back until you have completed a total of (34-44-58) [80-84-94] rows. Neck and Shoulder Shaping: Continuing in patt with gold, work across (3-5-5) [7-9-11] sts for (4-6-6) [8-8-8] rows; finish off. Skip center (23-27-31) [33-35-39] sts for neck opening. Join gold with a sl st in next st; beg in same st as joining and work in patt across rem sts for (4-6-6) [8-8-8] rows; finish off.

Finishing: Sew shoulder seams. Edging: With right side facing and smaller hook, join gold with a sl st in any st at outside edge of tabard, ch 1, work 1 rnd in sc around entire edge, working 3 sc in each of 4 corners, join with a sl st in beg ch-1; finish off. With right side facing and larger hook, join gold with a sl st in any st at neck edge, ch 1, work 1 rnd of sc loosely around neck edge, join with a sl st in beg ch-1; finish off.
Worse things like having your home planets destroyed by terrifying automatons, then being forced to join a rag-tag fleet, fleeing oppression and poor ratings across the stars. But you can happily survive it all so long as you’re wearing a stylish tabard.


Ties: With smaller hook, make 2 ties with copper and 2 ties with med brown heather; see General Instructions.
So crochet yourself a Tabby Tabard, and this simple medieval garb will ensure you’ll be gleefully fashionable wherever or whenever you travel in space and time.

Except the Eighties…


Click here for the printable pattern.


Read more!

Wednesday, February 29, 2012

The Days of Dysfunctional Summer

Water Sprite Suit from “The Children’s Book” 1935

Summer is coming!

Sure, it’s hard for those of us stuck in the Great White North to believe that right now, with all the snow piled up outside our windows. But it’s true. Summer is a mere four months away and that’s barely enough time to begin planning your children’s beach-side humiliation.

If you don’t start now, you’ll only have a half-finished Sprite Suit come August, and your well-adjusted, happy children won’t need a psychiatrist when they’re grown. Face facts, dysfunctional families now outnumber the so-called normal ones. So, if you want your children to fit in with the cool kids, you need to knit up this suit now to ensure a summer of sand, sun and suffering.

One day, your children will thank you.*


*Handmade by Mother is not responsible should your grown children’s gratitude be expressed by replying to your Christmas cards with cease and desist letters.

For the complete pattern (and more snark!):

Water Sprite Suit No. 780

Size 1-2 Years
The perfect age! There are just two times in your life when you will be blissfully unconcerned with what you wear. The first is when you’re too young to read fashion magazines:

And the second is when you’re old enough to know that supermodels are the true fashion victims.


MATERIALS – Bear Brand or Bucilla Cassimere Sport Yarn,
1 ball Main Color, 1 ball Contrasting Color.
1 pair Bucilla 14-inch Steel Knitting Needles, Size 1, Article 3499.
Be careful with those steel needles. I own several, and their points have a distressing habit of getting sharper with use. Eventually, you’re either constantly snagging wool on them or sticking their thorn-like tips through your fingers.

So, do your best not to injure yourself, as blood is not a positive addition to most fibre projects.
2 Bucilla Steel Needles, Sock Size, No. 14, Article 3494.
Unless you think you might have cancer, in which case stabbing yourself with your needles might save your life!
1 Bucilla Steel Crochet Hook, Size 4, Article 4300.

Gauge: 8 stitches = 1 inch, 12 rows = 1 inch.

With contrasting color and the small steel needles, cast on 64 sts; work in stockinette stitch (k 1 row, p 1 row) for 14 rows; break off yarn, leaving an end to sew with. With main color work 8 rows, with contrasting color 8 rows. Break off contrasting color and change to the large needles; work 2 rows even. Increase 1 st at both ends in next row, and in every 12th row thereafter, until there are 5 increases at each side (74 sts on needle).
If you lose count, you will only shame yourself, and not your child.
Work 7 rows even after the last increase. Bind off 4 sts at beginning of each of the next 4 rows, 2 sts at beginning of each of the following 10 rows, and 1 st at beginning of every row until 22 sts are left on needle. Work 5 rows even and then bind off.

Make a duplicate piece. Sew (or weave) the 2 halves together at crotch.
If you were planning to weave the crotch, putting the last 22 stitches on a spare needle would have been preferable to binding them off. Given that you were following the instructions carefully, it’s likely too late now and you’ll just have to put a seam in there.

Better hope your child isn’t the sort who acts like sock seams are toe-eating monsters.
Sew sides together. Turn in the first 6 rows around waist and hem. Work a row of single crochet around legs.

Straps – With main color and the fine needles, cast on 2 sts, k 1 row, turn, k 2 sts in each st. Next row, k 2 sts in first st, k 1, p 1, k 2 sts in last st; turn, k 2 sts in first st, p 1, k 1, p 1, k 1, k 2 sts in last st (8 sts on needle). Continue to work in ribbing of k 1, p 1, and to increase at beginning and end of every row, until there are 14 sts on needle. Work even in ribbing for 3 ¾ inches. K together the first 2 sts and the last 2 sts in every row until 2 sts are left; fasten off. Make a duplicate piece. Cast on 14 sts for the long strap, work in ribbing of k 1, p 1, until strap measures 23 inches; bind off.
While the halter straps are by far the most bizarre looking part of this swimsuit, they’re also the most practical. Much to your child’s chagrin, this handmade swimwear won’t easily float off their body and disappear into the surf.
Fold a pointed strap double and sew to center of front (see illustration), with one point on right side and the other on under side. Sew second pointed strap in same way to center of back. Insert the long strap in loops, join ends and tack to loop on back.
Now stuff your child into the suit and take lots of photos. Have the pictures blown up and laminated, so you can bring them out at every big event: birthdays, Christmases, bar/bat mitzvahs, graduations, weddings. Revel in the sweet revenge for years of sticky fingers, destroyed furniture and sleepless nights.

I mean, revel in the photographic proof that you were a good parent, and that your child never once doubted your fashion sense.


Click here for the printable pattern.

Read more!

Thursday, March 3, 2011

Snow Bound Bunnies!

Rabbit Slippers from Beehive for Bairns, 1980, original pattern c. 1950

It may be March, but the groundhog lied! Spring is still a long way away for most of Canada and the United States. Of course, we can’t really blame Canada’s own Wiarton Willie, as he was forced to make his Groundhog Day prediction indoors, due to a blizzard raging outside. And regardless of whether the Yankee Punxsutawney Phil or the Southern General Beauregard Lee deliberately led us astray, the fact remains that it’s still cold outside, and your baby needs toasty toes!

So, I recommend knitting up a pair of dead groundhogs for her feet. Sure, the pattern book calls these “Rabbit” slippers, but with just a few minor alterations, you can provide warm footsies for your child AND have your revenge on weather prognosticating rodents everywhere.


For the complete pattern (and more snark!):

Rabbit Slippers
A perfect little shower gift, reprinted from Beehive Book # 41.
Perfect if you want to show up at a shower with a gift that cost you a dollar fifty in leftover yarn scraps and thirty whole minutes of your time.

When you give these slipshod slippers to the new mum-to-be, don’t forget to announce, “I love you THIS much!”
MATERIALS: Beehive Baby Yarn (50 g): 1 ball main colour B. Small quantity of contrasting colour A. Two 2 ¼ mm (U.S. 1) knitting needles or whichever needles you require to produce the tension given below. One 3.50 mm (U.S. E or 4) crochet hook for ties. Stuffing.

TENSION: 9 ½ sts and 13 rows = 1 inch (2.5 cm) in stocking st.

MEASUREMENT: Length 3 ½ ins (9 cm).

COMPLETE SATISFACTION AND PERFECT RESULTS ARE ONLY GUARANTEED WHEN YOU WORK TO EXACT TENSION WITH THE SPECIFIED YARN.
Fortunately for the perfectionists among us, Beehive Baby Yarn is still available in a variety of sickeningly sweet pastel shades such as Precious Pink and Sleepy Sea. Unfortunately, that also makes knitting up miniature dead groundhogs more difficult, as those varmints don’t usually come in all the colours of a six year old girl’s rainbow unicorn obsession.

I recommend buying a ball of the Rose Bud red and telling everyone the groundhog was done in by an eighteen wheeler.
SOLE: With B cast on 22 sts and knit 1 row.
Continue in garter st (plain knitting every row) increasing 1 st beginning every row to 32 sts on needle. Knit 3 rows even.

Continue in garter st, decreasing 1 st beginning every row to 22 sts on needle. Cast off.

UPPER SECTION: With B, cast on 6 sts and work 2 rows garter st.
3rd row: K1. Inc 1 st in next st. Knit to last 2 sts. Inc 1 st in next st. K1.
4th row: Knit.
Repeat 3rd and 4th rows to 26 sts on needle.
Work 19 rows even in garter st.

Next row: K13. Turn.
Working on these 13 sts, work 35 rows garter st. Cast off.

Join yarn to remaining 13 sts and work 36 rows garter st. Cast off. Sew cast-off edges together.
Also, your bloody slippers will not only keep a baby’s feet warm, they’re even educational!

When baby starts walking, you can tie these slippers onto her feet and tell the tyke, “Don’t wander into the road, sweetie pie. Or you’ll end up smashed flat into the concrete with a tire tread down the middle of your back. Then someone will come along to scrape up your bloody remains and turn you into slippers.”
RABBIT HEAD: With A, cast on 3 sts and knit 1 row.
2nd row: Inc 1 st in each of 1st 2 sts. K1.
3rd row: Knit.
4th row: K1. Inc 1 st in next st. Knit to last 2 sts. Inc 1 st in next st. K1.
Repeat 3rd and 4th rows to 13 sts on needle.
Work 8 rows even in garter st.

Next row: K6. Turn.
Working on these 6 sts work 10 rows garter st.
Continue in garter st, decreasing 1 st each end of needle every row to 2 sts on needle. K2tog. fasten off.

Join yarn to remaining sts. K2tog. K5.
Work exactly as given for other ear.
Make another slipper the same.
Or if you prefer to maintain the magic of childhood, feel free to tell your toddlers that their groundhog slippers were made by pastel-coloured unicorns.

It’s never too early to instill fear of vengeance seeking unicorns.
TO MAKE UP: Placing one point of sole at back seam, sew evenly to upper, easing in fullness around shaped end of sole at front. With B, embroider eyes and nose on head as illustrated. Sew head in position, lightly stuffing nose and leaving the ears free. With 2 strands of B together, make a chain 12 ins (31 cm) long. Make 2 tassels and sew to each end of chain. Sew middle of chain to back of slipper.
Or of vengeance seeking groundhogs.


Click here for the printable pattern.

Read more!

Thursday, October 7, 2010

Time for Some Good Old Fashioned Cultural Misappropriation!

Boy’s Ski Mask from McCall’s Needlework & Crafts, Fall-Winter 1965-66

BOYS’ SKI MASK: Warm little Indian wears his feathers knitted over pipe cleaners, his war paint of duplicate stitch. Knitted nosepiece sewn on. Knitting worsted. 4-8.

Believe it or not, this ski mask is NOT a Halloween costume. And little Ronnie’s soul is NOT being crushed by the humiliation of having to wear it in public.

This was the swinging sixties, when grotesque zany ski masks were worn by every member of the family. Well, except Mom. She was too busy knitting ski masks to ever step outside. So, Ronnie’s NOT crying on the inside because he’ll be a warm little Indian on Halloween night. No, it’s because he’ll be wearing this feathered, freaky mask all winter long!

Alas, in our politically correct times, parading around as a “Red Indian” in “War Paint” is no longer acceptable. Modern historians have the pesky habit of pointing out that Native Americans are not – and have never been – red complexioned. Now, the Beothuk of Newfoundland did paint themselves with Sacred Red Ochre. However, they were a peaceful people whom European settlers massacred into extinction over fishing rights. So, dressing up pale-faced children as a cartoon version of these aboriginals would be in poor taste.

Except at Halloween, of course! Halloween is the one time of the year when whiteys can dress up as offensively as they like without fear of being sent to the dog house.


Who’s the cutest little racist? You are. Yes, you are!

For the horrifyingly complete pattern:
You may be concerned that if your little boy wears this ski mask on Halloween Night, he’ll get beat up and have all his candy stolen. Of course, he will!

But just remember, protecting your children will only turn them into wimps. Back in the 60s, Ronnie’s parents knew that a bit of physical abuse from his peers was how their little boy would grow up to become a real man.

And that’s why I’m going to buy this costume for my son.

Yep, my boy won’t be coming home with a full bag of candy this Halloween. In fact, he might not come home at all. I’ll probably find him the next morning stranded in a ditch, his legs waving helplessly in the air.
SIZE: Fits 4-8 yr. old.

MATERIALS: Boys’ Mask: Knitting worsted, 2 ozs. yellow (Y), 2 ozs. red (R), small amount black (BL). Yellow and red pipe cleaners/ Set of 10’’ dp needles No. 6. (Or English size 7.) Steel crochet hook No. 00. Tapestry needle.

GAUGE: 9 sts = 2’’; 6 rnds = 1’’ (stockinette st). See page 22, “You Must Be Sure to Check Your Gauge.”

Six pins for a 3” by 3” gauge swatch may seem like overkill, but McCall’s is actually teaching you how to use a swatch as a voodoo doll.

That’s the real reason why little Ronnie was tearing up. Every time his Mom stuck a pin into the swatch, his fake feathers stabbed his head.
MASK: With Y, loosely cast on 98 sts; divide evenly on 3 needles. Join, being careful not to twist sts. Mark end of rnd. Work in k 1, p 1 ribbing for 2 1/2’’.

First Dec Rnd: K 1, p 1 for 9 sts, * p 2 tog, k 2 tog, work in ribbing for 10 sts, repeat from * around, end p 2 tog, k 2 tog, p 1 – 84 sts. Continue in ribbing as established for 2’’.

2nd Dec Rnd: * K 5, k 2 tog, repeat from * around – 72 sts. Break off Y, join R. Work even in stockinette st (k each rnd) for 4 rnds.

Back Inc Rnd: Inc 1 st (to inc 1 st, pick up horizontal strand between st just knitted and next st, place it on left-hand needle, k 1 st in back of this strand), k to last 2 sts of rnd, inc 1 st as before, k 2 – 74 sts. K 4 rnds even, repeat back inc rnd – 76 sts.
I know what you’re thinking. “I don’t have time to knit this mask up before Halloween, I’ll just wait to next year.”

Don’t delay! The older your kids get, the harder it is to squeeze them into humiliating outfits.

Treasure these precious years when they’re still small enough that you can get away with all sorts of hilariously inappropriate and potentially unsafe costumes.

But whatever you do, don’t actually sit on the baby!
Shape Mouth: Rnd 1: K 33 sts, bind off 10 sts, k to end of rnd – 66 sts.

Rnd 2: K to bound-off sts, cast on 15 sts, mark 8th cast-on st for center st, k to end of rnd – 81 sts.

Rnd 3: K to 1 st before marked st, sl 1, k 2 tog, psso, mark last st on right-hand needle, k to end – 79 sts.

Rnd 4: Repeat back inc rnd – 81 sts.

Rnd 5: Repeat rnd 3 – 79 sts. K 1 rnd.

Rnd 7: K to marked st, sl marked st, k 1, psso, remove marker, k to end – 78 sts.

Rnd 8: Repeat back inc rnd – 80 sts.

Shape Eyes: Rnd 1: K 30 sts, bind off 20 sts, k to end – 60 sts.

Rnd 2: K to bound-off sts, cast on 20 sts, k to end – 80 sts. K 2 rnds even, repeat back inc rnd, k 4 rnds even, repeat back inc rnd – 84 sts.

Work even in R until piece measures 4 3/4’’ above ribbing when mask is measured at side of face. Break off R, join Y. Work 4 rows. Break off Y, join R. Work even in R until piece measures 6’’ above ribbing.
And if you’re the single, unemployed mother of octuplets...

At least she didn’t dress up the babies in Red Indian ski masks. That would have been offensive.
Shape Top: * Sl 1, k 1, pssp, k 10, repeat from * around. Continue to dec 7 sts every other rnd in same way having 1 st less between decs after each dec rnd 4 times more, then dec same way every rnd until 7 sts remain. Break yarn, leaving 12’’ end. Draw end through remaining sts, fasten securely on wrong side.

FINISHING: From right side, with BL, work 1 row sc around edge of mouth and eyes.

NOSE PIECE: Starting at bottom edge, cast on 6 sts. K 1 row, p 1 row. Dec 1 st each side of next row – 4 sts. P 1 row. Dec 1 st each side of next row – 2 sts. P 1 row. K 6 rows (garter st). K next row, inc 1 st each end – 4 sts. P 1 row, k 1 row. P next row, inc 1 st each side of next row – 6 sts. K 1 row, p 1 row. Bind off. Sew between eyes as pictured.

EMBROIDERY: Note: All embroidery is done in BL using duplicate st (see page 22).


Embroider a line of 8 sts 4 rows under mouth; embroider a line of 9 sts 2 rows above yellow band, centered over nose piece. Embroider “eyebrows” over eyes as pictured. Embroider “war paint” under eyes following chart.

This chart will also come in handy for the nurse stitching up your son after he goes trick-or-treating in Oka, Québec.
Steam press lightly.

FEATHERS: With R cast on 5 sts, leaving strand for sewing. K 1 row.

Pattern: Row 1: K 2 tog, yo, k 1, yo, k 2 tog.

Row 2: Purl. Repeat these 2 rows 4 times more.

Next Row: K 2 tog, k 1, k 2 tog – 3 sts. P 1 row, k 1 row, p 1 row. Next Row: K 1, yo, k 1, yo, k 1. P 1 row. Repeat rows 1 and 2 of pattern 4 times. K tog the 5 sts, end off. Run in yarn end. Thread needle with strand from cast-on edge. Run thread through cast-on sts, pull tog, fasten securely. Weave red pipe cleaner through center p st on wrong side. Make another feather same way using Y. Fold feathers in U shape. Sew on above BL line as shown.
If after all your knitting, sewing, steam pressing and feathering, your ungrateful spawn refuses to wear the ski mask, you can always pull out the big guns.

“Wear the mask, Junior, or your Dad and I will accompany you door-to-door dressed like this!”


Click here for the printable pattern.


Read more!

Tuesday, September 28, 2010

PoodleFest 2010: After Hours

Poodle Cardigan or Slipover for Girls from KNIT O GRAF, 1954

Are you over 18 years old? Are any children in your household at school or safely tucked away in bed?

Good. Because no responsible parent would want a child exposed to the utter depravity of this poodle sweater. True, your sons and daughters will eventually learn from the internet that poodles attend fetish clubs. However, there’s no need to flaunt the scandalous night life of Mr. and Mrs. Fluffy-Poo in front of pre-adolescents.

But V.D., you protest, the pattern clearly states that this sweater is for young girls, not teens or adults!

Yes, this sleazy sweater was designed for girls sized 4 to 10, but children were expected to grow up fast back in the 1950s. After facing the horrors of the H-bomb, polio outbreaks, and the invention of the TV dinner, these kids were much more blasé about BDSM poodles. But our own coddled children can’t handle the titillating truth!

This design also wasn’t as shocking in the 1950s. The poodle patriarchy was firmly entrenched back then, and the male poodle was the unquestioned dominant partner in any kinky canine caper. Now, of course, all we care about is whether both poodles are consenting adults. But won’t someone think of the children!

There’s only one wholesome use I can foresee for this perverted poodle pattern. When you’ve decided it’s time to destroy the last of your little girl’s innocence, this poodle sweater is the perfect icebreaker before you have ‘The Talk’.

Oh, you know what ‘Talk’ I’m talking about. The “sometimes when two poodles get married, they get bored with each other, and begin experimenting with kinky S&M sex in a desperate attempt to keep their love alive” Talk.

For not quite the entire pattern (but definitely more snark):

MATERIAL REQUIREMENTS

3 PLY FINGERING YARN OF ALL WOOL, ALL NYLON, OR BLENDS OF WOOL AND NYLON
Why are these poodles using all caps to encourage me to use whatever kind of 3 ply yarn I want? It would be like an Army Drill Sergeant shouting “Give me twenty, soldier! At your convenience, whenever you can fit push-ups into your busy schedule.”
NEEDLES …………. 1 Pair No. 1 (English No. 12)
1 Pair No. 2 (English No. 11)
GAUGE …………..... 8 stitches and 10 rows equal 1 inch

DESIGN ON BACK AND FRONT

Background
Size 4 – ¾ oz., Size 6 – 4 oz., Size 8 – 4 ¾ oz., Size 10 – 5 ¾ oz.

All Sizes
Poodles 80 yds, Collar Hat etc. 10 yds, Leash 2 yds, Eyes 1 yd.

COLORS SHOWN
Background Red, Poodles White, Collar Hat etc. Blue, Leash Navy, Eyes Navy
Colours shown, huh?

I grew up on black & white TV, so I’m willing to believe that’s a red sweater. But for those readers who had their youthful imaginations stifled by the invention of colour television, here’s proof.

I’m amused by how the etsy merchant above described the pattern as two poodles dancing. I’ve heard of the Bunny Hop and the Mashed Potato, but I had no idea another popular 50s dance was the Yanked Leash.
OTHER COLOR COMBINATIONS
Background Navy, Poodles Gray, Collar Hat etc. Red, Leash Red, Eyes Navy
Background Med. Blue, Poodles White, Collar Hat etc. Red, Leash Red, Eyes Med. Blue
Background Green, Poodles Beige, Collar Hat etc. Green, Leash Green, Eyes Green
I don’t want to be critical… oh, who am I fooling. I’ve spotted two serious problems here.

First, the green sweater has the collar, hats and bows of the poodles the exact same colour as the background. It’ll look like someone crushed the poodles’ skulls and then decapitated their fluffy corpses. True, no one will mess with your little girl on the playground when she wears it, but you will be getting a call from the principal.

Second, all the “other colour combinations” sweaters match the poodles eyes with the background colour, but the “colors shown” poodles have navy eyes. I want a red sweater with poodles that have glowing red eyes!

Yikes!

I’ve changed my mind. Navy eyes are cool.
GENERAL INSTRUCTIONS


KNIT OF GRAF PATTERNS are life size. Lay work on graph occasionally to check your size. For ease in following, outline the size wanted with a colored pencil.
HANDMADE BY MOTHER is not life size. Feel free to hold your work up to the monitor to check your size. Do not use coloured pencils on your monitor. Remember, ease in following a perverted poodle graph is not an acceptable excuse for workplace vandalism.
EACH SQUARE in the graph represents a stitch. Every row is shown purled and knit rows. Follow graph from right to left on knit rows, from left to right on purled rows. Changes in color are shown on graph with difficult types of shading. Ribbing is not shown in most patterns but it is explained in the printed instructions.

GAUGE – Since no two people knit exactly alike it is necessary to test your knitting and yarn by making a sample before starting your work. There may be a difference of as much as four sizes in the finished work, using the wrong yarn and needles. Method for testing gauge is given at the beginning of the printed instructions for each pattern.
I feel like I’m being talked down to. After all, no beginner knitter is going to take on S&M poodles for their first project.

Other than the masochists, I suppose.

INCREASES AND DECREASES – When graph shows one extra square, increase one stitch. To increase, knit (or purl if on a purled row) first in front, then knit in back of stitch of left needle before slipping it off left needle. Increases of more than one stitch must be cast on at the end of row as shown on graph.

When graph shows a decrease of one square, knit or purl two stitches together. Decreases of more than one stitch must be bound off at the beginning of row.
Seriously, noobs, don’t let all these helpful stitch by stitch explanations lead you astray. If you want to make a poodle sweater, just buy a child’s sweater and use duct tape to attach two of the poodles below.


BEFORE STARTING GARMENT READ THE GENERAL INSTRUCTIONS ON BACK COVER FOR INCREASING, DECREASING, EXPLANATION OF GRAPHS, ETC. THEY MAY NOT BE REPEATED ELSEWHERE IN PATTERN.
I’m beginning to suspect that the S&M poodles are going to keep SHOUTING at me until I agree to be their slave. I’m going to need a safeword to make them back off.

I’d use POODLE, but the safeword has to be something I don’t normally shout while knitting.
GAUGE—With No. 2 needles cast on 24 sts, knit 1 row, purl 1 row, for 20 rows. Bind off, press with damp cloth, measure. Piece should measure exactly 3 inches by 2 inches. If it is smaller, try again with a larger needle. If it is larger, try again with a smaller needle.
Now, there’s always the safeword used by Parisian poodles, but I doubt shouting BALLS calms poodles down.

Yeah, that’s what I thought.
HOW TO WORK DESIGN

Changes in color of yarn are shown on graph with different types of shading. Wind large bobbins (holding at least 20 yards) with background color, smaller bobbins may be used for smaller designs. Keep bobbins wound up close to work to avoid tangling. NEVER CARRY YARN ACROSS BACK OF WORK but use a separate bobbin for every color change.
Don’t you dare CARRY YARN instead of using the dozens of bobbins called for in this pattern. Multinational Bobbin Manufacturers Inc., AKA Big Bobbin, monitors your monthly purchases, and if you dip below quota, watch out!

I heard from a friend of a friend that a knitter in Moosejaw died in a stampede … of bobbins. *shudder*
Small markings such as lines, eyes, etc., may be knit in or embroidered later in duplicate stitch after garment is finished.

Work to first row of design. Work across row to dark squares.
With all the shouting and bobbin threats, I’m sure I’ve forgotten something important. But what?
TIE DESIGN YARN TO BACKGROUND YARN, SLIP KNOT AS CLOSE TO NEEDLE AS POSSIBLE.
Ahhhh! I promise I’ll slip knot my needle close to the background yarn or whatever you want, just please stop shouting at me!
Tie yarn in this manner whenever graph indicates us of a new color. With design yarn, work the shaded squares, tie another bobbin of background yarn, work across blank squares (background sts) to end of row. Next row work to design. DROP BACKGROUND YARN ACROSS DESIGN YARN PICKING UP DESIGN YARN FROM UNDER BACKGROUND YARN.
I can’t take it anymore! I refuse to transcribe any more of this pattern. If you desperately want to make a fetish night poodle sweater, just use the KNIT O GRAF design graph…Whoops.

I knew I forgot to include something.

Now slap those poodles on the sweater pattern of your choice. Or onto any knitted clothing or house ware your heart desires. Personally, I think it’s the perfect design for a tablecloth and matching napkin set. After one S&M Poodle Thanksgiving, your family and in-laws will never darken your door again.

In 1981, Theresa Dacenzo of Cornwells Heights, Pennsylvania sent this photo to Crochet World of the knitted afghan she made for her niece.

And yes, Theresa made that afghan in 1981 not 1961. Her niece later wrote a scathing essay in her Woman Studies class about male-female poodle oppression in 1980s Pennsylvania.

Now, if you suspect that your 21st century niece wouldn’t appreciate a sexist poodle motif, feel free to make alterations to the original design. You could leave out the leash or replace it with something less offensive like a garrotte. Makes a lovely going away to prison gift! Or if you’d prefer a more GLBT-friendly design you could make both poodles the same gender.

Also, you don’t have to limit yourself to the formal top hat look. The most stylish poodles don’t.

Now if your heart is absolutely set on a genuine 100% vintage KNIT O GRAF poodle cardigan, you can still purchase the pattern. Not only can you find it on e-bay and etsy, there was evidence as recently as 2006 that the KNIT O GRAF PATTERN CO. was a going concern.

Unlike Big Bobbin, KNIT O GRAF was a cottage industry founded by a knitter, one Della Fitch of Minneapolis, Minnesota Smith. Alas, Della is no longer with us, but the company was taken over by her daughter Karen Fitch Mott. The last known contact information was 958 Redwood Drive, Apple Valley, MN, 55124 (952) 432-5630.

After all, if you’re going to spend money on this pattern, you might as well give it to the family who brought such an entertaining design into being.

Hopefully, Ms. Mott won’t want to sue Handmade by Mother for copyright violation. However, if she does, Theresa Dacenzo of Pennsylvania better watch out because I’ll squeal on her. At least I didn’t pretend to Crochet World that S&M poodles were the product of my twisted imagination.

Welsh zombies, yes. Dolphin lust demons (this year's novel!), yes. Perverted Poodles … well, maybe for the next 3-Day novel.

Click here for the printable pattern (such as it is).

Read more!

Tuesday, September 14, 2010

Fun is in the eye of the beholder.


Poodle Set from McCall’s Needlework Fall-Winter, 1952-53

To properly celebrate PoodleFest, it’s not enough to cover your toilet rolls and hair spray with poodles. You need to turn your children into poodles, too.

As McCall’s helpfully points out, “What makes it fun is – her crocheted hat has poodle ears, her scarf, poodle legs, and a poodle muff cuddles her pinkies.”

Yes, wearing the dismembered body parts of your favorite pet is what makes it fun!

But wait, someone in the photo is clearly not having fun.


In fact, her poodle pal looks downright depressed.

If he doesn’t turn that frown upside down pronto, he’s going to find himself turned into a cap, scarf and muff set. Just like the last poodle who failed to live up to his billing as “funniest thing”.

For the complete pattern (and more snark!):

FRENCH POODLE

Size: 9’’ x 12’’.
Materials: Columbia Knitting Worsted, 6 1 oz balls brown. Small amount of black for mouth; strand of white for teeth. Cotton for stuffing. 1 pair of glass eyes No. 14 (or 2 buttons). “Boye” steel crochet hook No. 1.
Gauge: 6 s c = 1’’; 6 rows of s c = 1’’.
Take note – you have the option of using buttons instead of glass eyes. Don’t get all giddy with your newfound sense of freedom, though. This poodle only comes in one colour – brown.

If you make it black or white, your poodle will no longer be the “funniest thing”. Instead, the poodle will be a symbol of your profound failure as a Mother.

Pink is right out.


Body: Starting at back, ch 6, join in ring with sl st.
Row 1: 8 s c in ring.
Row 2: 2 s c in each st (16 sts).
Row 3: * 2 s c in first st, 1 s c in next st, repeat from * around (24 sts).
Row 4: Same as row 3 (36 sts).
Row 5: 2 s c in every 9th st (40 sts). Work even for 30 rows. Break off yarn. Turn inside out.

Tail: Ch 6, join in ring with sl st.
Row 1: Work 8 1’’ lps in ring as follows: * With strand over first finger of left hand (1’’ from work), insert hook in ring, draw strand through ring from under the finger, then yarn over hook and through the 2 loops on hook (finishing 1 s c), repeat from * 7 times more (draw lps up to make sure they are 1’’ long and even). Continue to work around.
Row 2: 2 lps in each st (16 lps). Work 1 lp in each st around for 2 rows, then work 1 s c in each st for 9 rows.
Row 14: Work 7 s c, ch 1, turn.
Row 15: Skip 1 st, work 6 s c, ch 1, turn.
Row 16: Skip 1 st, 5 s c, ch 1, turn.
Row 17: Skip 1 st, 4 s c, break off yarn.

Stuff Tail and Body: Sew tail to body, having last row of tail at center back of body.
Just make sure to orient your poodle’s tail up, like in the McCall’s photo. You want a happy poodle, not a clinically depressed poodle who might suddenly turn around and chew on a former head of state.
Head: Starting at top, ch 8, join in ring with sl st.
Row 1: Work 10 lps in ring (as in tail).
Row 2: 2 lps in each st (20 lps).
Row 3: 2 lps in each st (40 lps).
Rows 4 and 5: 1 lp in each st.
Row 6: 1 s c in each st, increasing 6 sts around (46 sts).
Rows 7 to 9: 1 s c in each st.
Row 10 (Start face): 1 s c in each of 23 sts, ch 18 for chin and fasten with s c in first st, then work around for face as follows:
Row 1 (continue on wrong side): 1 s c in each of 4 sts, fasten eye in next st, or place marker for button, 1 s c in each of 11 sts, fasten eye in next st, 1 s c in each of 5 sts, 1 s c in each of the 18 ch (41 sts around).
Row 2: Sk 1 st, 21 s c, sk 1 st, 18 s c; 39 sts.
Row 3: Sk 1, 20 s c, sk 1, 17 s c, 37 sts.
Row 4: Sk 1, 19 s c, sk 1, 16 s c, 35 sts.
Row 5: Sk 1, 18 s c, sk 1, 15 s c, 33 sts.
Row 6: Sk 1, 17 s c, sk 1, 14 s c, 31 sts.
Row 7: Sk 1, 16 s c, sk 1, 13 s c, 29 sts.
Row 8: Sk 1, 15 s c, sk 1, 12 s c, 27 sts.
Row 9: Sk 1, 14 s c, sk 1, 11 s c, 25 sts.
Row 10: Sk 1, 13 s c, sk 1, 3 s c, work 2 lps in each of 2 sts, 1 s c at center, 2 lps in each of 2 sts, 2 s c.
Row 11: Sk 1 st, 12 s c, sk 1 st, 2 s c, 4 lps over 4 lps, 1 s c, 4 lps over 4 lps, 2 s c.
Row 12: * Sk 1 st, 1 s c in each of 2 sts, repeat from * around, break off yarn.
With black yarn, work 2 rows of s c around, break off yarn, close mouth with a few sts.
Of course, some poodles have legitimate reasons for being both depressed and homicidal.


Continuing on wrong side, join brown yarn at neck edge and work 24 s c across back of head, and 20 s c across ch (44 sts). Continue to work around, skipping 1 st each side on each of the next 6 rows (32 sts remaining). Work even for 10 rows, then work across front only as follows:
Row 1: Ch 1, turn, sk 1 st, work 14 s c, ch 1, turn.
Row 2: Sk 1 st, 13 s c, ch 1, turn.
Row 3: Sk 1 st, 12 s c, ch 1, turn. Work 4 more rows in this manner, break off yarn. With white, work 4 long sts for teeth below black nose. Cut lps at chin.
My, what sharp teeth you have, Grandma... I mean Mr. Poodle!
Stuff head firmly, shaping face. Sew body to edge of neck.

Paws and Legs (Make 4 legs the same for 8 lp rows): Starting at sole, ch 4, join in ring with a sl st.
Row 1: 6 s c in ring.
Row 2: 2 s c in each st (12 sts).
Row 3: 2 s c in each st (24 sts).
Row 4: 1 s c in each st (24 sts).
Row 5: 5 s c, 2 s c in each of 7 sts, 12 s c (31 sts).
Row 6: 8 s c, sk 1 st, 1 s c, sk 1 st, 2 s c in each of 3 sts, sk 1 st, 1 s c, sk 1 st, 14 s c (30 sts).
Row 7: 8 s c, sk 1, 3 s c, sk 1, 3 s c, sk 1, 3 s c, sk 1, 9 s c (26 sts).
Row 8: 8 s c, sk 1, 3 s c, sk 1, 3 s c, sk 1, 9 s c (23 sts).
Row 9: 8 s c, sk 1, 4 s c, sk 1, 9 s c (21 sts).
Row 10: 10 s c, sk 2, 9 s c (19 sts).
Row 11: 19 s c (ending row at center back of heel).
Row 12: 1 lp in each st (19 lps). Repeat rows 11 and 12, seven times more (8 lp rows).
Repeat row 11, then work top of legs as follows:
Poodles of the world unite! You have nothing to lose but your leashes!

And your incredibly silly hair cuts...


Right front and right back legs:
Row 1: Work 1 lp in each of 9 sts, ch 1, turn.
Row 2: 1 s c in each of 11 sts, ch 1, turn.
Row 3: 11 lps, ch 1, turn.
Row 4: 2 s c in first st, 1 s c in each of 9 sts, 2 s c in last st, ch 1, turn.
Row 5: 13 lps, ch 1, turn.
Row 6: 13 s c, break off yarn, leaving enough length to sew leg to body.

Left front and left back legs (Starting at center back): Row 1: Sl st across 10 sts, 9 lps to end of row, ch 1, turn.
Row 2: 11 s c, ch 1, turn.
Row 3: 11 lps, ch 1, turn.
Row 4: 2 s c in first st, 9 s c, 2 s c in last st, ch 1, turn.
Row 5: 13 lps, ch 1, turn.
Row 6: 13 s c, break off yarn.
Place cardboard shapes in paws, then stuff legs. Sew legs to body, paws facing front. Complete poodle by making the ears as follows:

Ears (Make 2): Ch 15, turn.
Row 1: Sk 2 ch, 13 s c, ch 2, turn.
Row 2: 1 lp in each st, ch 2, turn.
Row 3: 13 s c, ch 2, turn. Repeat rows 2 and 3 three times more, then repeat row 3 for 8 rows.
Row 18: Sk every other st, break off yarn.
Sew ears to head close to last lp row on top of head.

Leash: Use heavy cotton yarn. Cut 9 28’’ strands. Divide in 3, knot one end, braid. Knot other end. Tack one end back for 5’’ handle. For collar, cut 24 9’’ strands. Divide, braid. Sew ends and attach leash.

“POODLE” CAP, SCARF, MUFF

Materials: Knitting Worsted, 6 oz. red.
Red? Since when do poodles, or even “poodles,” come in red? Brown, black, white, even pink, sure! But never red!

Well... except for this poodle.

But why would you want your daughter to look like the day-glo spawn of Carmen Miranda and a Russian folk dancer?
“Boye” non-inflammable 5 ¾’’ crochet hook, Letter “F.” ½ yd. ¼’’ elastic.
Interesting historical tidbit: the words inflammable and flammable, both mean “this item burns like bejeezus and might spontaneously combust if you look at it sideways”, but come from entirely different Latin roots. Today flammable is the preferred term, because English speakers look at the prefix “in” and assume incorrectly (see how INcorrect is the opposite of correct?) that inflammable actually means “safe as houses, feel free to dress your children in it and allow them to play with matches”.

Unfortunately, none of this answers the real question of why our crochet hooks must be fireproof in order to safely complete this pattern.
Gauge: 4 s c = 1’’.
Knot Stitch: † * Draw up a ¾’’ lp on hook, yo and through lp, insert hook under thread at left of lp and work 1 s c, repeat from * once, s c in next ridge st, repeat from † across.

Poodle Trimming: Row 1: Attach yarn to first ridge st of first ridge row, work knot st across row. Row 2: Ch 1, work 1 knot st (turning knot st), s c in first ridge st of next row and work knot st across. Repeat row 2 for remainder of trimming.

CAP: Starting at center of head, ch 22.
Row 1: S c in 2nd ch from hook, and in each ch across (21 s c), ch 1, turn. Work s c in back lp of each s c (slipper st) and work even until piece measures desired length to top of ear, ch 1, turn.
Ear Muff: Dec 1 s c each side every row until 1 st remains. End off. Attach yarn to first st of starting ch, work 21 s c across, ch 1, turn. Finish same as first side. Work poodle trimming over each ear muff. Work 1 row knot st around edge of each ear muff.
Ties: Make six 30’’ chs; braid 3 chs tog for each tie. Knot one end, attach other end to tip of each ear muff.
Maybe the hooks need to be “non-inflammable” because of the extreme sport of speed crocheting. I sure wouldn’t be surprised to see scorch marks on Lisa Gentry’s hooks!


SCARF: Ch 11. S c in 2nd ch from hook, and in each ch across (10 s c), ch 1, turn. Work slipper st for 3’’, ch 1, turn. Dec row: * Draw up a lp in each of 2 s c, yo and through all lps on hook, repeat from * across (5 s c). Work even for 1 ½’’, ch 1, turn. Work 2 s c in each s c across (10 s c), ch 1, turn.
Neck Piece: Work slipper st until neck piece measures 12 ½’’ or desired length around neck. Repeat dec row (5 sts remain), ch 1, turn.
Slit: Work slipper st for 2’’. End off. Attach yarn to first row of slit and work another piece across same 5 sts for 2’’, do not end off.
Join Slit Section: * S c in first s c of first piece, s c in first s c of 2nd piece, repeat from * across (10 s c), ch 1, turn. Work slipper st for 3’’. End off. Work poodle trimming over first and last 3’’ of scarf.

MUFF: Ch 26. Row 1: S c in 2nd ch from hook and in each ch across (25 s c), ch 1, turn. Work slipper st for 12’’ or desired length. End off. Work poodle trimming over entire piece. Sl st tog first and last row of muff. Work 4 rows s c around side openings (facings). Turn under and hem facings. Insert elastic in facings, cut to wrist measurement.
Handle: Make one tie as for cap, fold in half and sew in place.
There! Your child is now securely encased in bright red “Poodle” wear, with Prozac the Clinically Depressed Poodle to keep her company. You are officially a Good Mother.

But don’t rest on your laurels, even if they’re inflammable! There’s more poodles to come...

Click here for the printable pattern.


Read more!

Thursday, May 27, 2010

Happy Blogiversary!

Peter Pan collar from “Fluffy Ruffles”, 1951

Poor Sandy. All year, she was a good girl. She obeyed her parents, thought of others before herself, was only seen and never heard.

And this was the thanks she got on her birthday. A cupcake instead of a birthday cake. One lousy candle instead of seven (with one more to grow on). And a hand-me-down velveteen dress that used to belong to her odious big sister, Jane.

“Don’t sulk, Sandy,” Mother scolded. “I crocheted that Peter Pan collar so the dress would be like new. It’s what my mother did when I was growing up. I thought a good girl like you would understand.”

Sandy understood, all right. Unlike her mother, she understood that the privations of the Great Depression and the War Years were over. What’s more, she understood that doing the whole good girl routine from becoming a Brownie to becoming a housewife was for saps. Mom and Jane could go ahead and be patsies, but Sandy wouldn’t be conned anymore.

And when she grew up, she’d never wear Peter Pan collars again!


For the complete pattern (and more snark!):

Peter Pan

MATERIALS:

Clark’s O.N.T. Best Six Cord Mercerized Crochet, Art. B.4, Size 50: 2 balls of White . . . Milwards Steel Crochet Hook No. 12.

Starting at inner edge of collar, ch 203 to measure 12 inches.

1st row: Sc in 3rd ch from hook (picot made), ch 5, skip 3 ch, sc in next ch, * ch 1, picot, ch 5, skip 3 ch, sc in next ch. Repeat from * across. Turn.
Hang on, since when do you make a picot by single crocheting in a chain? Where’s the slip stitching? I was raised to believe you can’t make a picot without slip stitching!
2nd to 11th rows incl: Sl st to center of first loop, sc in same loop, * ch 1, picot, ch 5, sc in next loop. Repeat from * across. Turn. Break off at end of 11th row.
It’s bad enough Sandy got a fake birthday cake and gift, but she also got a fake picot?
EDGING . . . 1st row: Attach thread to end of first row on collar, sc in same place, * ch 5, sc in next loop. Repeat from * across to opposite end of first row. Ch 1, turn.

2nd row: Cut 6 strands of thread slightly longer than outer edge of collar. Working over these strands, make 6 sc in each sp. Cut off remaining strands. Ch 1, turn.

3rd row: * Picot, ch 5, skip 4 sc, sc in next sc, ch 1. Repeat from * across, ending with sc in last sc. Ch 5, turn.
Yeah, you keep telling yourself that your daughter won’t notice it’s not a real picot. One day, she’ll be surfing the interwebs and discover it’s a FAKE!
4th row: * Sc in next loop, ch 5. Repeat from * across. Ch 1, turn.

5th row: Repeat 2nd row.

6th row: * Picot, ch 5, skip 2 sc, sc in next sc, ch 1. Repeat from * across, ending with sc in last sc. Ch 1, turn.
Your daughter will never trust you again. Next thing you know, she won’t listen to your warning not to mix Pop Rocks and Coca Cola and when her stomach explodes, it’ll be all your fault!
7th and 8th rows: * Picot, ch 5, sc in next loop, ch 1. Repeat from * across. Ch 1, turn. Break off at end of 8th row. Attach thread to inner edge of collar and sc closely across. Break off.

Starch lightly and press.
Because everybody knows what will happen if you don’t starch lightly...

But what is absolutely, 100% true is how much fun Handmade by Mother has been over the past year. I’m grateful to every single DIYer, commenter, linker, and reader for supporting this labour of sick and twisted love. I look forward to a future filled with frightful knits and crochets.

Click here for the printable pattern.


Read more!

Monday, May 24, 2010

Phentex Wants to Break your Little Girl’s Heart

“Pretty Little Miss” Dress Style No. 6959, 1969

During the 1960s, the little Miss Phentex pageant was held every Victoria Day here in Canada. Above is the winner for 1969, Vicki Regina, whose shrewd mother had insisted her daughter wear gloves. When all the other girls in the competition touched the scratchy surface of their Phentex dresses without the same protection, they burst into hysterics over their hemorrhaging hands. As the last little girl standing, Vicki won the dubious prize of becoming Phentex’s corporate shill for a year. Oh, and a Phentex clad Barbie that she could only play with if she took a decontamination shower immediately afterward.

But, Victoria, you say, little Vicki seems perfectly happy with her Barbie doll in its matching Phentex dress. True, crystalline polypropylene polymer yarn violates the laws of nature and humankind, but couldn’t you admit that this time it’s a victimless crime?

Absolutely NOT! Because Little Miss Phentex wasn’t the real victim here. No, the true casualties were every other Canadian girl of the time period who loved Barbies and turquoise and white dresses.


Victim #2532 above, along with her peers, begged her mother to make this matching daughter and dolly pattern. I was These little girls were too young and innocent to know of Phentex’s deadly reputation. Of course, their new Phentex dresses eventually attempted to strangle them with the front trim bow and feed on their cooling bodies, but that wasn’t the real heartbreaker. This was:

Note:— You will find the instructions for the doll’s dress in our Knit Knack book at your favourite store soon.

That’s right, the Barbie doll pattern is not included! And the above note was tucked underneath the last bit of instruction on how to make the dress. Leaving thousands of sobbing little girls wearing a bloodthirsty Phentex dress, and clutching a naked Barbie.

Fortunately, a class action lawsuit launched by the harried mothers successfully shut down the Little Miss Phentex pageant the following year. So, now Canadian girls from sea to sea to sea can celebrate a Phentex-free, LOL-full Victoria Day.

For the complete pattern (and more snark!):

MATERIALS:— Phentex Ruban, 2 skeins blue and one skein white; one metal crochet hook No. 10 white and bleu material for lining; one dome fastener.
Ruban is French for ribbon, while Phentex Ruban is French for you’re going to pay more for this Phentex yarn, but it’s still going to leave welts. Bleu is French for our blue is better than yours, na-na-na-na-na. And dome fastener is the Canadian name for what Americans call a press stud. Which as far as I know are just snaps, and not sexy journalist breeding stock.
SIZE:— Directions are given for one size only – size 4.
If you want instructions on any other size, you have to “send the sum of one dollar ($1.00)” directly to Phentex Inc. So now, your so-called twenty cent (.20¢) pattern will cost one dollar and seventy cents ($1.70) to get the right size dress and the fifty cent (.50¢) Barbie pattern.

Sure, the above scam sounds penny ante, but remember this is 1969 dollars. For $1.70 you could have bought just under five gallons of gas or seventeen 10 oz. bottles of Pepsi! So, not only did Phentex break your daughter’s heart, it also ruined your Victoria Day Picnic.
TENSION:— 7 d.c. to one inch in width and 5 rows to two inches in depth, worked with a No. 10, worked with a No. 10 metal crochet hook, or any size that will give the correct tension.
Yes, you read correctly, that’s two inches in depth not length. In the 1960s, Phentex was sold by the fathom.
MEASUREMENTS:— Length from shoulder, 19 ins. Chest measurement, 24 ins.

If only this diagram emphasized that the back had the same width as well as lengths (AKA depths), Little Miss Phentex’s dress wouldn’t have been marred by such uneven shoulders.
PATTERN STITCHES:— S.c. insert hook into next st. yarn over hook and pull thro’ loop; yarn over hook and pull thro’ the two loops on hook.

D.c. yarn over hook, insert into next ch and pull thro’ loop. (3 loops now on hook), yarn over hook and pull thro’ 2 loops, yarn over hook and pull thro’ remaining 2 loops.

YOKE FRONT:— Using the white ruban, ch. 73.
I’m resisting the temptation to tell a yoke.
1st ROW:— 1 d.c. in 4th ch. From hook, then 1 d.c. in every ch. to end. (70 d.c. in row)

2nd ROW:— 2 ch. to turn, 1 d.c. in each d.c. of previous row. Rep. the 2nd row 12 times more – 13 rows in all.

14th ROW:— 2 ch. to turn, work next 27 d.c., turn.

15th ROW:— 2 ch. to turn, skip next d.c., then 1 d.c. in each st. to end. (26 d.c.).
After all, it might be funny now, but in a couple of years time it could be in very poor taste.
Continue to dec. one st. at the neck edge on the next 3 rows, when 23 d.c. will remain. Fasten off. Leave 16 sts. For neckline. Join the ruban to the 17th st. and work to correspond to other side.

RIGHT BACK YOKE:— Using white ruban, ch. 41.

1st ROW:— 1 d.c. in 4th ch. from hook, then 1 d.c. in every ch. to end. (38 d.c.)

NEXT ROW:— 2 ch. to turn, 1 d.c. in each d.c. of previous row. Rep. the 2nd row 12 times more – (13 rows in all).

Now work as from the 14th row of front.

LEFT BACK YOKE:— Work to correspond with Right Back Yoke, reversing all shapings.
Instructions on how to do a single crochet are provided, but when it comes to reversing shapings, you’re on your own, noob!
Place the yoke pieces on the white material and cut allowing for turnings.

SKIRT FRONT:— Using blue ruban, ch. 6, now working along lower edge of front yoke, work 1 s.c. in each of the 70 d.c., and finish with 6 ch.

1st PATTERN ROW:— 3 ch. to turn, 4 d.c. in 5th ch. from hook, * skip 2 sts., 1 d.c. in next st., skip 2 sts., 4 d.c. in next st. Rep. from * finishing, skip 2 sts., 1 d.c. in last st.

2nd and 3rd ROWS:— 3 ch. to turn, work 1 d.c. over each single d.c. of previous row, and 4 d.c. into the centre of the groups of 4 d.c. of previous row.

4th – 12th ROWS:— 3 ch. to turn. * Work 1 d.c. over each single d.c. of previous row. 4 d.c. into the centre of the 1st group of 4 d.c. and 6 d.c. in the next group. Rep. from * to end of row.
And no, they weren’t running out of space. There’s a ten centimeters by nine centimeters space (that’s 4 inches by 3 ¼ inches for Yankee Doodle Dandies) at the end of the pattern that only contains these words:

do not press

no
dry cleaning


I can only assume that the prominence given to these instructions was the result of a class action lawsuit resulting from a pressed, dry cleaned Phentex outfit caused the Cuyahoga River to catch fire.
13th – 16th ROWS:— As previous rows, working 6 d.c. into the “groups”.

17th – 24th ROWS:— As previous rows, alternating the “groups” of 6 d.c. with 8 d.c.

25th – 33rd ROWS:— As previous rows, working 8 d.c. into the “groups”. Fasten off.

SKIRT BACK:— Overlap the right and left yoke back for 4 d.c. Now work as for front.

FINISHING:— Pin the pieces out to the measurements and cover with a damp cloth. Holding a steam iron about 2 ins. Above the pieces, pass lightly over, allowing only the steam to pass thro’ the cloth. Leave pinned out to dry.
Finishing AKA Enhanced Interrogation Techniques because you don’t ever want Phentex to think you’re soft on terrorism.
Cut the lining for the skirt from the blue material. Join the shoulder and skirt seams. Make up the lining separately, place inside dress, turn under edges and sl. st. around neck and armholes.
Hang on, are you telling me that in 1969 a woman who’d never crocheted before would be able to slip stitch a lining in place? Whereas, when I started crocheting, I found self-striping yarn challenging?

Clearly, baby boomer noobs were far more skilled than those of Generation X.
Using blue ruban, work one row of single crochet around neck and back opening, also around armholes. Now work a picot edge as follows:— NEXT ROW:— * 1 s.c. in s.c. of previous row, 3 ch. and sl.st. into top of previous s.c. 1 s.c. into each of next 2 s.c. Rep. from * around. Fasten back neck with a dome fastener. Fasten lower edge of armholes, with two 6-ch. bars, half an inch apart.

FRONT TRIM BOW:— With white ruban, ch. 8.

1st ROW:— 2 d.c. in 6th ch. from hook, skip 1 ch., 1 d.c. in last ch.

2nd ROW:— 2 ch. to turn 2 d.c. into the centre of the 2 d.c. of previous row, skip next st., 1 d.c. into turning ch. of previous row. Rep. the 2nd row until the work measures 30 ins. From the beginning. Fasten off. Press lightly, form into a bow and attach to centre front of dress.
At least, I can feel more skilled than the generations Y and Z, who’ve known nothing but the metric system and the microwave. They’ll be bamboozled by these strange ins. and steam iron references.

But whatever you do, kids, don’t microwave Phentex!

Click here for the printable pattern.


Read more!