Saturday, December 31, 2011

Happy New Year!

The Workbasket, December, 1983

Elegance for Evening

Perfect for the holidays! The black sport weight yarn creates skyscrapers against a sparkling sky of metallic yarn.
Ah, the eighties! When the smoggy sky literally sparkled with volatile organic compounds. Every New Year was greeted with the festive sound of Grandpa’s emphysema acting up as he tried to sing Auld Lang Syne with the family. After Grandpa’s oxygen treatment, everyone would run outside to dance gaily in the acid rain until the hairspray in Mom’s hair caught fire.

Yes, hearken back to that halcyon yesteryear with an elegant sweater depicting a pollution-blackened cityscape.

For the complete pattern (and more snark!):

Directions are given for small (finished bust measurement: 36 inches) with changes for medium (38 inches) and large (40 inches) in parentheses. You will need 3 (4,5) ounces sport yarn, 3 ounces metallic yarn and a size G crochet hook (or size required for gauge). Use double strand of metallic throughout.
Shoulder pads are highly recommended, unless you’re into having your shoulders rubbed raw by metallic thread. Yes, looking like a linebacker really did have a practical purpose in that synthetic era.
Gauge: 9 sts equal 2 inches
5 rows equal 2 inches
Five rows of sport weight yarn every two inches? If you want to complete this project before the December 2012 apocalypse, you’d best start now. Don’t you want a sweater that will match the burning ruins of your hometown?
TO SAVE TIME, TAKE TIME TO CHECK GAUGE.
Ooh… catchy phrasing! So much better than the usual all-caps gauge warnings. This needs to be part of a poster campaign.


Note: Sweater is worked sideways. Rows are worked back and forth from waist to neckline.

FRONT: With black, ch 81 (87, 93).
Row 1: Dc in 4th ch from hook and in each of next 35 (41, 47) ch, join metallic, dc in next 42 ch, ch 3, turn – 78 (84, 90) sts.
Sweater is worked entirely in dc, with no shaping. Directions will be for number of sts and color only. Diagram will further clarify. Ch 3 and turn at end of each row. Ch 3 at end of row always counts as first dc of next row.
A fetish for counting stitches helps!

Count von Count makes all his own clothes.
Row 2: 42 Metallic, 36 (42, 48) black.
Row 3: 46 (52, 58) Black, 32 metallic.

Note: All even rows are worked with same number of stitches in same color as preceding row.
Row 5: 42 (48, 54) Black, 36 metallic.
Row 7: 32 (38, 44) Black, 46 metallic.
Row 9: 55 (61, 67) Black, 23 metallic.
Row 11: 37 (43, 49) Black, 41 metallic.
Row 13: 52 (58, 64) Black, 26 metallic.
Row 15: 35 (41, 47) Black, 43 metallic.
Row 17: 29 (35, 41) Black, 49 metallic.
Row 19: 43 (49, 55) Black, 35 metallic.
Row 21: 62 (68, 74) Black, 16 metallic.
Row 23: 37 (43, 49) Black, 41 metallic.
Row 25: 48 (54, 60) Black, 30 metallic.
Row 27: 36 (42, 48) Black, 42 metallic.
Row 29: 54 (60, 66) Black, 24 metallic.
Row 31: 32 (38, 44) Black, 46 metallic.
Row 33: 27 (33, 39) Black, 51 metallic.
Row 35: 43 (49, 55) Black, 35 metallic.
Row 37: 50 (56, 62) Black, 28 metallic.
Row 39: 39 (45, 51) Black, 39 metallic.
Row 41: 33 (39, 45) Black, 45 metallic.
Row 43: 59 (65, 71) Black, 19 metallic.
Row 45: 44 (60, 66) Black, 34 metallic.
Hopefully you haven’t sunk too far into a haze of “Vun, two, tree, ha-ha-ha!” because there’s a mistake in the forty-fifth row. Do you see it? Here’s a hint… all the other rows add up to 78 (84, 90) sts across. You’ll be fine if you’re crocheting a small size sweater, but you’re going to run into trouble if you’re trying to make a medium or large size.

I suspect it’s not a mistake, but instead a diabolical plot to make us all regret overindulging this holiday season. Only small sized people and muppets get a pass as they can’t hold their eggnog anyway.


Fasten off for small size. For medium, repeat rows 1 through 4. For large, repeat rows 1 through 8. Back is worked exactly the same as front. Sew 3 ½ inch shoulder seams. Sew side seams leaving 7 (7 ½, 8) inch opening for arms. Work 2 rnds dc around sleeve openings, join, fasten off. At waist, beginning at side seams, work 4 rnds dc, join, fasten off.
And tah-dah! You are now the proud owner of an authentic Eighties sweater. Add a bottle of hairspray and some legwarmers, and you’ll be all set to party hardy until the Police show up.


Click here for the Printable Pattern.

Read more!

Tuesday, December 20, 2011

Silent Night, Deadly Night

The Workbasket, December 1983

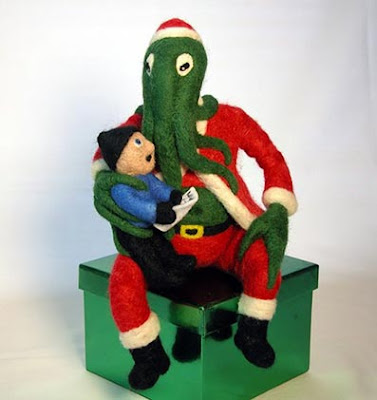
Create a chorus of pine cone carolers for “singing” around your Christmas tree.
“Singing” is in quotes because clearly this caroller is “screaming”. Because nothing says Winter Solstice like terrifying crafts.

This merry masterpiece was inspired by the ancient pagan tradition of sacrificing frozen carollers to ensure the return of the sun. Revellers would then impale the decapitated heads on pine cones, and hang them on their Solstice tree!

No, it’s true, I read all about it on the interwebs.
For the complete pattern (and more horror!):

For each caroler you will need scraps of red and green felt, a medium sized cotton ball, a pipe cleaner, a pine cone of any size, 2 blue sequins for eyes and 1 red for mouth, a small gold pearl, small pins, white glue and a polystyrene ball. Be sure to select a pine cone that is flat on bottom so that caroler isn’t wobbly.
Carollers should only be wobbly after they’ve drunk all your wassail, not before.


Using given pattern, cut hat and shawl from felt. Glue cotton ball to hat, let dry.
Trust me, cotton balls glued onto circles of green felt look exactly like Victorian top hats.

If you can’t see the clear resemblance, you clearly haven’t eaten enough delicious Rum Balls.
The size of the polystyrene ball selected for head should be chosen according to pine cone size. Using small pins, position sequins and gold pearl for face. Set aside.
The ceremonial importance of the nose being gold has been lost in the mists of time. Nevertheless, do not mess with tradition! One slip up, and you’ll be condemned to twelve months of flood, famine, and ill-fitting thermal underwear.
Wrap pipe cleaner around small end of pine cone, forming arms.
See photo to ensure that the arms are properly positioned to illustrate the caroller’s terrified supplication to the merciless Elder Gods.


With straight end of crochet hook make small hole in center of bottom of polystyrene ball. Fill hole with white glue and press onto center part of pine cone. Glue felt hat to ball, leaving a brim.
All good pagans own a crochet hook. It doesn’t need to be included in the materials list.


Finally, attach shawl by wrapping around pine cone and drawing one end through slit, pull up tight. Let dry for about 2 hours.
One man’s shawl is another man’s scarf. Be sure to make it of red fabric as it symbolizes the ritual beheading of the carollers at midnight. Then, cookies and milk for everyone!
If desired, cut songbook from gold or silver cardboard using pattern. Position in carolers’ arms.
Now kick back and enjoy your new decorations, while munching on a gingerbread man. Be sure to leave his head for last, so Gingy’s screams will drown out those annoying carollers who’ve temporarily escaped Cthulhu’s grasping tentacles.


Click here for the Printable Pattern.


Read more!

Friday, December 16, 2011

DIY – Ripple Socks for Superheros!

While I’ve been neglecting this blog (but for very good reason, which I promise I’ll reveal with great fanfare soon), faithful reader Jenny has been busily crocheting up a storm. She’s even made the famous Ripple Socks!


Jenny writes: “Pay no mind to the fact that these socks are worn through...”

Keep reading for her hilarious explanation of the sad state of her ripple socks.
I wear my socks hard. No, really! Sometimes, on my long treks to the store (literally: a mile.5 to get to the shopping center, who knows how much walking in & between stores, then the mile.5 back carrying, for example, 10 pounds of flour, 5 pounds of sugar, a can of coffee, some yarn perhaps, 4 pounds of dry beans, a 2 liter of soda water...), I take my shoes off because my feet have been warmly squeezed into my shoes for so long, I just gotta relieve the pressure. [edit, my feet are only squeezed in when wearing thick socks such as these] [edit 2: i only wear the socks when it's cold out] Walking on the concrete sidewalks, and sometimes in the rain, has led to the demise of these poor socks. Most of the time, though, they are house socks--worn over my sock socks.
I’m sure our gentle reader can’t help but notice that Jenny is a superhero. And clearly these socks were not designed to stand up to the rigors of a life battling crime while toting 25 lbs of groceries around. I would suggest Jenny knit her next pair out of unstable molecules (yarn available for purchase at the Baxter Building, at the corner of 42nd and Madison in NYC).


Also, you will notice that I have demonstrated in the second photo that the socks do not stay put--as exampled by the left sock. The picture with the pattern had me all excited about big tall socks that would stay up--obviously the photo is either doctored or carefully setup then quickly shot because the slightest ant fart brings them down. Not to worry though--they're just socks, after all...and they're worn through anyway. When they first started showing signs of hole making, I thought to myself, I can just seam that back together with my handy dandy, uh, fixing things skills. More time passed and there were more long treks to the store with more concrete walkin' in my stockin's, and the holes just blew out irrationally.
I suspect supervillains were involved.
Don't know if I'll ever fix them, but boy do I enjoy wearing them! I made them! They're the first I've made in the sock-genre, so I'm sure there will be others.

One thing I will say as a note to others who may wish to produce these fine foot clothings is that the pattern only leads you up to the ankle. They say to repeat the last round until 18 somethings have been made or to desired length. Once again, the picture to accompany is misleading, and I think that's filthy. Not as filthy as making people believe the socks will stay up though. No hard feelings, honest. I did have a little, "whaaat?" about the heel, but I was new at crochet in general, and obviously I got through it :)
Jenny also included this important disclaimer.
p.s. there have not been any recorded incidents of seizures induced by my wearing of these socks.......for the record.
That would be for the official record, I’m sure. Those in the know are well aware zigzags (AKA ripples) were standard issue for super heroines in the sixties.


This “Vintage Super Hero Dress” will go beautifully with Jenny’s Ripple Socks, sending villains into helpless convulsions for miles around!


Read more!

Monday, October 31, 2011

Happy Halloween!

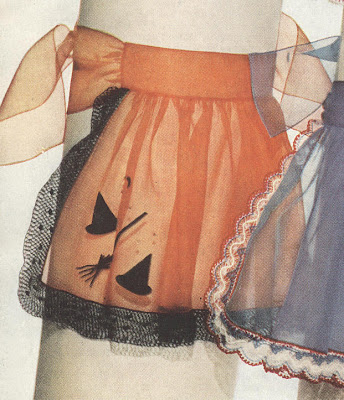
Halloween Apron from Coats & Clark’s Edgings Book No. 305, 1954

At last the truth is revealed! Halloween isn’t about eating candy until you puke, or watching scary movies involving an excessive amount of projectile vomiting. Halloween is all about preserving your femininity.

So, there’s no better way to celebrate Halloween than to don a ladylike apron you made with your very own little ladylike hands. However, don’t confess your plans ahead of time to your husband, or he may try to persuade you to make a sexy French Maid apron instead! Men just don’t understand that only fallen women oppressed by the Patriarchy wear French Maid costumes.


Unlike the poor, downtrodden woman pictured above, you are no victim of depraved male fantasies. Your Halloween apron will celebrate radical feminism! It will proclaim a liberated woman’s inalienable right to choose … to spend Halloween in the kitchen!

Besides your new apron will come in real handy once the inevitable Halloween barfing begins.

For the complete pattern (and more snark!):

How to Make Aprons

Each apron requires 1 yard of organdy, 36 inches wide, and 1 spool of Coats and Clark’s Mercerized Sewing Thread, Art. C. 3, in a matching color. Aprons are made identically: Cut a piece of organdy 12 ½ x 36 inches and roll a ¼ inch hem around three sides. Slip stitch hem. Cut a piece of organdy 6 ½ x 15 ½ inches for waistband. Cut two pieces of organdy 6 x 36 inches for ties, roll and sew a ¼ inch hem around three sides. Gather top of apron to measure 15 inches. Fold waistband in half lengthwise, turn in ¼ inch hem on raw edges and sew across top of apron.

Gather raw ends of ties to measure 3 inches, insert in ends of waistband and sew in place.
I’m actually hopeless at sewing, so I won’t tell if you sneak off to Wall-Mart and buy a pre-made apron. Or if you’re low on cash, just mug a Wall-Mart greeter for their vest.

Wall-Mart vests make great Halloween costumes.

Just don't try this right after a snowstorm!
Halloween Apron: Appliqué hats and 1 strip of felt ¼ x 4 ¼ inches for handle of broom. Use bugle beads for bristles and decorate hats with sequins.
Sadly, bugle beads are long tube-shaped beads, not Mardi Gras beads you get from flashing boogie woogie bugle boys.

This picture is provided just in case you don't know what a witch's hat looks like. You wouldn't want to accidentally applique top hats all over your apron instead.

I'm not sure what this apron means ("I cook with style"? "I killed Fred Astaire and served him for dinner"?), but I do know it definitely doesn't say, "Happy Halloween"!

Halloween Apron Edging . . . S-532

COATS & CLARK’S O>N>T> TATTING-CROCHET, Art. C. 21, Size 70: 3 balls of No. 12 Black.

Milwards Steel Crochet Hook No. 14.

Orange organdy apron.

Make a chain 6 inches longer than outer edge of apron. 1st row: Sc in 2nd ch from hook, * ch 5, skip next 2 ch, sc in next ch. Repeat from * across until piece measures 4 inches longer than outer edge of apron, having number of loops divisible by 8 and 7 more at end of row.
Show your kids this pattern to prove they will have to use math in every day life.

Better yet, have them make the apron for you. It's educational! And then no one will ever have to know that you can't divide correctly by eight.
Ch 3, turn. 2nd row: * Draw loop on hook out to measure ¼ inch, thread over and draw loop through, insert hook between single and double loops and draw a loop through, thread over and draw through two loops on hook, (knot st made), sc in next loop. Repeat from * across, ending with sc in last loop, dc in last sc. Ch 3, turn. 3rd row: * (Make a knot st, sc under double loop of next knot st) 7 times; ch 3, make 9 dc under double loop of next knot st (shell made), ch 3, sc under double loop of next knot st. Repeat from * across, ending with sc in last knot st, dc in top of turning chain. Ch 3, turn. 4th row: * Make a knot st, ** sc in next knot st. Repeat from * across, ending with sc in knot st preceeding next shell; make a knot st, sc in center dc of shell, make a knot st, sc in next ch-3 loop, make a knot st. Repeat from ** across, ending with sc in last knot st, dc in top of turning chain. Ch 3, turn.
The insistence on repeating from * or ** across leads me to believe there will be dire consequences if you attempt to repeat up-and-down.

Of course, if you read this Halloween pattern backwards, you will discover the hidden satanic messages.
5th row: (Make a knot st, sc in next knot st) 3 times; * ch 3, make a shell in next knot st, ch 3, sc in next knot st, (make a knot st, sc in next knot st) 7 times. Repeat from * across, ending with sc in last knot st, dc in top of turning chain. Ch 3, turn. 6th row: Work as for 4th row. 7th row: Work as for 3rd row. 8th row: Work as for 4th row, ch 5 at end of row. 9th row: * Sc in next knot st, ch 5. Repeat from * across. Ch 1, turn. 10th row: Sl st in first loop, sc in same loop, * make 2 knot sts, sc in next loop. Repeat from * across. Ch 5, turn. 11th row: Sc in center of first knot st loop, * ch 5, sc in center of next knot st loop. Repeat from * across. Break off. Sew edging neatly in place, gathering 2 inches at each corner.
And naturally, there are also dire consequences to NOT sewing edging neatly!

Like… um… social stigma? That’s right! Just think of the horrible shame you will feel if you’re seen in public wearing a slovenly Halloween apron. Nothing could be more humiliating!

Oh dear.

Click here for the printable pattern.


Read more!

Friday, October 14, 2011

Don’t You Dare Use Your New Potholders in Your Old Kitchen!

Planning & Remodeling Kitchens, c. 1975

Now that you’ve crocheted up some new anthropomorphic, tea-partying potholders, you need a new kitchen to show them off. Besides, you probably burned down your old kitchen attempting to simultaneously crochet and deep fry parsley.

But you don’t need just any old kitchen. You need a seventies kitchen. Bright, modern, spacious... Wait, what’s that ominous figure in the corner of the room?


Aaaugh, aliens!

Your new seventies kitchen will also help you welcome our new alien overlords.

For more seventies scullery snark:

Despite the cheery cover on this home remodeling book, the seventies were not really about modernity or spaciousness. They were about Authenticity. Rip off that drywall! Expose those beams and brickwork! And if you can’t, then at least cover everything in sight with wood paneling. Lies will not be tolerated. It’s about Keeping it Real.

It was also about keeping Mom in her place.


Seventies kitchen designers loved “pass-throughs”. These handy-dandy holes in the wall allowed Mom to stay in the kitchen and pass food out to her family on the other side, like a short-order cook or a prison cafeteria.

The one above is particularly well designed as the family can use the sliding door to seal Mom off from sight, when they get tired of her showing off her prison tats.


Whereas in this kitchen, dinner orders can be conveniently shouted at Mom from above. If Mom attempts to ignore him, Dad can always tip a fern over on her head.

Yes, the war of the sexes was alive and well in the seventies. And really, keeping Mom segregated from the rest of the family was probably for the best.


Any moment now this woman is going to turn around and bury a butcher knife in her husband’s chest. “Don’t tell ME how to cook, you micro-managing S.O.B.!”

One the plus side, no one will mess with her in the prison cafeteria.


Only in the seventies could hanging your antique kitchen tools from a row of flimsy screw-in hooks seem like a terrific idea.


Many an unfortunate seventies-era housewife was brained by falling mallets and skewered by BBQ forks as she cooked up hot dog casseroles for the family. But concussions and kitchen lobotomies were a small price to pay for the convenience (and authenticity!) of having all her kitchen implements ready at hand.

I advise that you invest in kitchen hard-hats before installing your very own kitchen utensils of Damocles.


Of course, some kitchen implements are just a little too pointy to dangle directly overhead. A Mom needs to be able to reach out, grab a knife and stab it into... dinner, of course. And that’s what the handy-dandy magnetic strip is for!

These days, not only can you use that magnetic strip to hold your assorted implements of culinary death, you can also use it to wipe your credit cards. Unfortunately, demagnetizing the stripe on your Visa card will not erase the debt on it.

In the seventies, however, a kitchen knife was not as dangerous as a tin of Campbell’s Soup.


Yes, Junior is about to learn a valuable lesson that gravity is a heartless kitchen witch.


Seventies Do It Yourself Furniture! The perfect way for a seventies guy to demonstrate his commitment to recycling. After all, getting back to the Earth is far more important than any petty concerns about his wife wasting hours of her life cleaning encrusted food and grime off chicken wire.

Rumour has it that the above photo was Exhibit A in the infamous Seventies divorce case Kramer vs. Kramer.


How convenient, you have to stand on the table to water your plants! And if your guests complain about baby spider plants landing in their food, just assure them they’re extra roughage. After all, spider plants are non-toxic, not like that English Ivy... Yeah, you might not want to put your chair right under that one.


Still, despite the risk of poisonous plants in my food, knives dangling overhead and the sheer impossibility of ever adequately cleaning exposed brickwork and stucco, I can’t help but want a seventies kitchen of my very own.

My breakfast nook needs a fireman’s pole!


Read more!

Monday, September 26, 2011

Puff the Magic Parsley!

Potholder patterns and Parsley Puffs recipe from Star Potholders, c. 1955
Your eyes do not deceive you – the good people at Star Potholders combined recipes with crochet patterns. After all, everyone who loves to crochet must also love to cook, right? And vice versa, naturally. Just such a versatile lady is pictured above, barefoot but not visibly pregnant in the Star Potholder kitchen.

Don’t get me wrong. I greatly admire multitaskers who can cook and crochet simultaneously without setting the house on fire. The fact that these people do so despite being only three inches tall is especially admirable. When was the last time you crocheted two blanket-sized potholders, then stirred a pot twice your size all the while ignoring enormous vegetables bent on revenging their cooked kin?

Indeed, this Parsley Puff Potholder pattern recipe combination – or pattipe, if you prefer – is a testament to perseverance in the face of overwhelming adversity.

Either that, or its evidence that the designers of this book were on heavy medication.
Parsley Puffs

1 bunch of parsley
1 egg
2 teaspoons flour
1 tablespoon water
1 teaspoon salt
1/8 teaspoon pepper

Wash parsley and break into small sprigs and put in ice water to crisp. Separate egg: to the beaten yolk, add flour, water, and seasonings...
Yes, this recipe calls for “seasonings”. I’ve been told such ingredients may be purchased from congenial vendors on street corners.
... and beat until thoroughly mixed. Then fold in egg whites beaten stiff. Dip the parsley sprigs into this batter and fry in deep fat at 390 degrees F until golden brown. Drain and serve hot. This is a tempting garnish for meats.
The terrifying implications of a three-inch tall housewife operating a deep-fryer aside, I’m of the opinion that restaurants exist so I may pay other people to do my deep frying for me.

However, if you’re brave enough to attempt this recipe, why stop at the garnish? After all, you’ve got a whole pot of boiling oil, just waiting for you to dump the entire entree into it.

Yum?

For the actual potholder patterns (and more snark!):

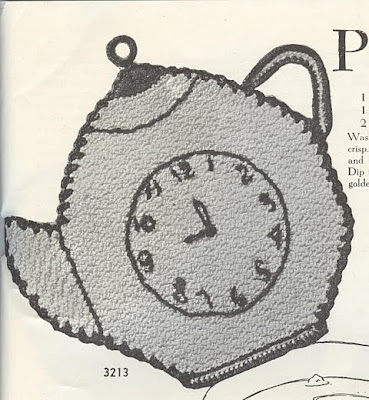
I don’t know what teapots have to do with deep-fried vegetation.

For that matter, I really don’t know why there’s a clock face on this teapot. And I really, really don’t know why there’s a world full of teapot-shaped clocks – or t-pocks, as they’re known to the kids these days.

The point is, these t-pocks can’t be used to make tea, or if they can, then they’re not functional clocks.

Plus, when you invite your mother-in-law to tea, you’re humiliated when you discover fairies are humping your t-pock. Again.
No. 3213

Materials Required–
AMERICAN THREAD COMPANY
“PURITAN” MERCERIZED CROCHET
AND KNITTING COTTON


150 yds. White.

“STAR” PEARL COTTON, SIZE 5.

25 yds. Red.

Steel Crochet Hook No. 7.

With White, ch 28, turn and work 27 s c on ch, ch 1, turn.
2nd Row– 1 s c in each s c, ch 2, turn.
3rd Row– Skip 1 s c, 1 s c in each of the next 2 s c, * ch 1, skip 1 s c, 1 s c in each of the next 2 s c, repeat from * across row, ch 2, turn.
4th Row– 2 s c in 1st s c, ch 1, 2 s c in next s c, (an increase) * ch 1, skip 1 s c, 2 s c in next s c, repeat from * across row, ch 1, 2 s c in end ch, ch 2, turn.
5th Row– Skip 1 s c, 2 s c in next s c, * ch 1, skip 1 s c, 2 s c in next s c, repeat from * across row, ch 2, turn.
Repeat the 4th row.
7th, 8th & 9th Rows– Same as 5th row.
10th Row– Increase 1 pattern at beginning of row and 1 pattern at end of row then work 2 rows even in pattern.
And then pattern the pattern using the pattern until the entire pattern is patterned.

Wait, what was the pattern again?
Repeat the last 3 rows.
16th Row– Increase 1 pattern at beginning and end of row, then work 20 rows even in pattern.
37th Row– Decrease 1 pattern each end of row, then work 3 rows even.
Repeat the last 4 rows.
45th Row– Decrease 1 pattern each end then work 2 rows even.
48th Row– Decrease 1 pattern each end then work 3 rows even.
52nd Row– Decrease 1 pattern each end then work 2 rows even.
55th Row– Decrease 1 pattern each end then work 1 row even, break thread.
57th Row– With Red, skip 2 sts, 1 s c in each of the next 10 s c, ch 1, turn.
Next Row– 1 s c in each s c, ch 1, turn, skip 1 st, 1 s c in next st, 1 s d c in next st, (s d c; thread over, insert in st, pull through and work off all loops at one time) 1 d c in each of the next 4 sts, 1 s d c in next st, 1 s c in next st, break thread.
In the olden days, pattern books often had to invent their own abbreviations. These days “s d c” is more commonly known as “hdc” or a “half double crochet”.

Despite my usual preference for vintage things, I find hdc, rather less confusing than s d c which I can only presume translates as “single double crochet”. But you can’t be a single in a double unless you’re Barbara Mandrell.
SPOUT. With White, attach thread in first st at straight edge and working toward lower edge work 9 patterns across straight edge, ch 2, turn, work a pattern in each pattern increasing 1 pattern at end of row, ch 2, turn.
Next Row– Decrease one pattern at end of row then work 1 row even.
Next Row– Decrease one pattern at end of row.
I heard that the Star Potholder test crocheter was found dead in a locked room with “decrease one pattern at end of row” written over and over on all the walls – in blood. But I’m sure that was just a coincidence.
Next Row– Decrease one pattern at beginning of row.
Next Row– Decrease one pattern at end of row, break thread.
Work another section in the same manner.
Fortunately for the longevity of their dear readers, the Star Potholder editor has opted to eschew any further line-by-line instructions.
With Red, crochet the 2 sections together, starting at lower edge, work 1 s c in each s c across bottom, * ch 3, d c in same space, skip 1/8 inch space, s c in next st, repeat from * all around, break thread.
Thread Red into needle and work a row of outline st about 1 inch down from Red top. Work another outline st ¼ inch from lower edge and across side to separate the spout from the body. Draw a 3 ½ inch circle in center and work numerals on it as illustrated. Work a small solid circle in center of clock and work 2 hands using the lazy daisy st.
You do know how to embroider, correct? You wouldn’t be at this point in the pattern (which, of course, you read all the way through before embarking upon), if you didn’t know how to embroider.

Is that weeping I hear? I know what’ll cheer you up. A nice cup of tea!

Please be patient while I scrape the bird poo out of this upcycled t-pock.
HANDLE. With White, ch 37, and work 36 s c on ch, break thread.
Attach Red and work 1 s c in each s c working 3 s c at end, turn and working on other side of s c, work 1 s c in each of the next 7 s c, * skip 1 s c, s c in next s c, repeat from * 6 times, 1 s c in each remaining st, break thread leaving an end to sew.
Sew to potholder as illustrated.
LOOP. Wrap Red around small finger 3 times, remove from finger and work 20 s c over loop. Attach to top of potholder.

Faces, unlike clocks, actually make a certain amount of sense here. Who doesn’t love anthropomorphizing household objects? “How may I serve you?” we can imagine our teapot asking, in a hilarious British accent.

Of course, if teapots really could speak, it’d be more likely they’d shriek, “Why are you pouring out my BRAINNNNS?” Which would definitely put a damper on your next tea party.


No. 3214

AMERICAN THREAD COMPANY
“DE LUXE: MERCERIZED CROCHET
AND KNITTING COTTON


155 yds. White. 35 yds. Red.

“STAR” SIX STRAND MERCERIZED
EMBROIDERY COTTON


3 yds. Black.

Steel Crochet Hook No. 7 or 8.

With White, ch 37 and work 36 s c on ch. (Turn each row.)
2nd Row– Ch 3, 2 d c in first s c, 1 d c in each s c, with 2 d c in last s c.
3rd Row– 2 d c in first d c, 1 d c in each remaining d c, with 2 d c in last d c.
Repeat 3rd row 10 more times.
14th to 17th Rows– 1 d c in each d c.
Unless it’s a zombie tea party!


18th to 22nd Rows– Decrease 1 st at the beginning and end of each row, remaining sts even. (Decrease; insert needle in first d c, pull thread through, insert needle in next d c, pull thread through, thread over and pull through 2 loops on needle, thread over and pull through remaining loops.)
23rd to 28th Rows– Decrease 2 sts at beginning and end of each row.
29th Row– Ch 1, decrease 1 st, 1 s c in next d c, 1 s d c in each of the next 3 d c, (s d c; thread over, insert in st, pull through and work off all loops at one time) 1 d c in each d c to within the last 6 d c, 1 s d c in each of the next 3 d c, 1 s c in next d c, then decrease 1 st.
Working down side of kettle, work 2 s c in each d c row, across lower edge work over entire st, 3 s c over first and last s c, 1 s c over each remaining st. Up opposite side work 2 s c in each d c row, 1 s c in each st across top, break thread.
With Red, work 1 row of s c all around, break thread. Work another section to correspond.
With Red, crochet the two sections together, ch 3, thread over, insert needle in same space with ch 3, pull thread through, thread over, insert needle in same space, pull thread through, thread over and pull through all loops on needle, * thread over, insert needle in next st, pull thread through, thread over, insert in same st, pull thread through, thread over and pull through all loops on needle, repeat from * all around, break thread.
HANDLES. With White, ch 32 and work 31 s c on ch. Attach Red and work 1 s c in each s c, ch 2, turn and work a row of puffs same as on kettle, break thread.
Is that what all that interminable threading over and inserting business was about? We were making “puffs”?

I just hope there’s no deep-frying involved as there was in making the parsley puffs. I refused to deep-fry my crochet, no matter how effective a batter-delivery system cotton yarn might be.
With Red, work an outline st for lid, starting at about the 5th row from top and working down to about the 8th row, then back to 5th on opposite side, then over the outline st work 1 row of s c, break thread.
Work s c over a small bone ring and attach to top of lid.
Embroider face as illustrated.
Wait a t-pock minute! The lid of the clock potholder didn’t require a bone ring, but this one does? But it’s not even included in the materials list.

That tears it! Who edited this rag, and where do they live?

Well, that explains a lot.

Click here for the printable pattern.
Click here for the parsley puffs recipe.

Read more!

Saturday, July 16, 2011

The Boys of Summer!

By the He Sea and Ripple Poncho patterns from Aunt Lydia’s Rug Yarn Collection, c. 1970

You won’t find the “He Sea” on any map, but Aunt Lydia assures me that you’ll find these handsome beach bums right by it. And who am I to doubt Aunt Lydia? Sure, she wants to cover up our menfolk in heavy rug yarn for the summer, but that doesn’t mean she’s completely delusional.

I think this He Sea is totally worth checking out. The photo above proves that it’s packed with hot (especially in that poncho), sweaty (very sweaty in polyester beachwear), clean cut gentlemen who are on the lookout for lady friends.

Why else would they book a vacation at the He Sea? They took one look at the name and knew it would be the perfect place to play beach volleyball and just hang out with other macho men in sexy rippled ponchos… er, before picking up bikini-clad babes.

Just like the Lords South Beach Hotel in Miami Beach, another resort with a manly name, I bet the He Sea also attracts the ladies men with stay-naked dining service and bonfire disco parties.


Aunt Lydia assures me that they’re discussing their new girlfriends.

For the complete patterns – yes, all three of them (and three times the snark!):


SLIP OVER
Wow, I had no idea that spray tanning was popular in 1970.
SIZES: Small, Medium, Large

Materials Required:
AMERICAN THREAD “AUNT LYDIA’S” HEAVY RUG YARN
4 (5, 5) – 70 Yd. skeins Spice
Because he’s spicy!
5 (6, 6) – 70 Yd. skeins White
1 Pr. Knitting Needles No. 10 ½ OR ANY SIZE NEEDLES WHICH WILL RESULT IN STITCH GAUGE BELOW

GAUGE: 3 sts = 1 inch
Directions are given for Small size. Changes for Medium and Large sizes are given in parentheses.

MEASUREMENTS: Width across front or back at underarm 21’’, 22 ½’’, 23 ½’’.

BACK: With Spice, cast on 42 (45, 48) sts. (Work in stripes of 6 rows Spice and 4 rows White.) Starting with a P row work in stockinette st (P 1 row, K 1 row) inc 2 sts at the beg and end of every K row 5 times, 62 (65, 68) sts. Work even until there are 9 complete White stripes. Work 1 row Spice.
His skin tone certainly resembles my Aunt’s Pumpkin Spice Cake.
SHAPE ARMHOLES: Bind off 4 sts at beg of next 2 rows. Dec 1 st at beg of next 3 rows (this completes Spice stripe), cut Spice. NEXT ROW: Attach White and use for entire yoke. Dec 1 st at beg of row. NEXT 2 ROWS: Dec 1 st at beg of each row. Work even until armholes measure 9 (9 ½, 10) inches. SHAPE SHOULDERS AND NECK: Bind off 7 (8, 8) sts, work across 9 (9, 10) sts and place on holder. Bind off next 16 (17, 18) sts for neck, work across remaining 16 (17, 18) sts. Working one shoulder at a time. Bind off 7 (8, 8) sts, work across row. NEXT ROW Dec 1 st at neck edge, work across. Bind off remaining 8 (8, 9) sts. Attach yarn at neck edge, dec 1 st, work across row. NEXT ROW: Bind off remaining sts.

FRONT: Work same as Back until armholes measure 5 ¼ (5 ½, 6) inches. SHAPE NECK: Work across 18 (19, 20) sts and place on holder, bind off next 12 (13, 14) sts for neck, work across remaining 18 (19, 20) sts. Working one shoulder at a time, dec 1 st at neck every other row twice; 16 (17, 18) sts. Work even until armhole measures same as back. SHAPE SHOULDER: Bind off 7 (8, 8) sts at armhole edge, work across. NEXT ROW: Dec 1 st at neck edge, work across. Bind off remaining stitches. Work other shoulder to correspond.
Gondor has no pants. Gondor needs no pants!


Viking helmet optional, but if you’re going to wear a mini and slather on the pumpkin spice bronzer, you might as well go full Boromir.
FINISHING: Steam and block sections. Weave 1 shoulder seam. With wrong side facing, attach White at neck opening, pick up and K 1 st in each st all around neck. K 1 row, bind off loosely. Weave other shoulder. With White and wrong side facing, work edge around each armhole same as neck. Weave 1 side seam. With White and wrong side facing, attach yarn at opening and complete lower edge same as neck. Weave other side seams. Turn all edges to right side and tack in place. Steam edges.
Tack and steam those edges all you want, they’re still going to roll up and expose your man’s tushie.

You’ll have to decide for yourself if that’s a bad thing.


LACED TANK TOP
Because the medieval page look suits middle-aged men so well.
SIZES: Small, Medium, Large

Materials Required:
AMERICAN THREAD “AUNT LYDIA’S” HEAVY RUG YARN
4 (4, 5) – 70 yd. skeins Bongo – Color B
Hey, it’s our old friend Bongo again!In 1965, Aunt Lydia believed that the colour of African antelopes and Disney circus bears was best suited to placemats. By 1970, she was recommending it for beach attire. Granted, this top looks like a bunch of placemats stitched together, but still I suspect that Aunt Lydia was in the pay of Big Bongo.
3 (3, 3) – 70 yd. skeins Orange – Color C
2 (2, 3) – 70 yd. skeins Antique – Color A
1 Pr. Knitting Needles No. 10 ½ OR ANY SIZE NEEDLES WHICH WILL RESULT IN STITCH GAUGE BELOW
Plastic Crochet Hook Size H

GAUGE: 3 sts = 1 inch

MEASUREMENTS: Width across front or back at underarm: 20’’, 21’’, 22’’ (each section)

Directions are given for small size. Changes for medium and large sizes are given in parentheses.
Word of advice: Have safe search on before attempting to do internet research on Big Bongos.
NOTE: When changing colors always pick up yarn from under 1st color thus crossing yarn to prevent a hole.

BACK: With color A, cast on 40 (44, 48) sts. K 3 rows. NEXT ROW: With Color A K 4 (border), with color B, K 32 (36, 40) sts, attach another skein of color A (for other border), K 4. NEXT ROW: K 4 color A, P 32 (36, 40) color B, K 4 color A. NEXT ROW: K 4 color A, with color B inc 1 st in next st (to inc: K 1 in usual manner, then K in back of same K st), K to within last st of color B; inc as follows: K 1 st in row below, K last st (the inc on the right will slant to right, the inc on left will slant left), K 4 color A. Repeat last 2 rows until there are 56 (60, 64) color B sts.
Don’t overlook the instructions to make the stitches slant off in different directions. Otherwise, your stylish Bongo Babe Magnet top will end up resembling a piece of African Antelope poop.
NEXT 2 ROWS: K 2 border sts tog at each end before and after color B. Continue in established pattern having only 2 A border sts at each end until section measures 10 inches above lower border on wrong side, cut color B. NEXT 4 ROWS: With color A K across all sts. NEXT ROW: K 2 color A, attach color C and K to within 2 sts, K 2 color A. Continue in established border sts and stockinette st (P 1 row, K 1 row) for 10 inches, ending on wrong side, cut color C. NEXT 3 ROWS: With Color A K across all sts. ARMHOLE SHAPING: Bind off 4 sts at beg of next row, K across row. NEXT ROW: Bind off 4 sts, K 4 sts (border), attach color B, K 44 (48, 52) sts, attach color A, K 4 sts (border); 52 (56, 60) sts on needle. NEXT ROW: K 4 color A, P 44 (48, 52) sts color B, K 4 color A. NEXT ROW: (Dec): K 4, K 2 tog, K to within last 6 sts, K 2 tog, K 4; 50 (54, 58) sts. Repeat last 2 rows twice; 46 (50, 54) sts. Work even in established colors until armhole measures 9 (9 ½, 10) inches from 1st armhole bind off, ending on wrong side of work. SHAPE SHOULDER: Work across 12 (12, 12) sts, turn; work back. Repeat last 2 rows once. NEXT ROW: Bind off 6 sts in matching colors, cut A, K to end of row. NEXT ROW: P 6, bind off. NECK BAND: With right side facing, attach color A and K across row to within last 12 sts (all sizes), turn. NEXT 5 ROWS: K across these neck sts only, bind off, cut A. 2nd SHOULDER: Attach color B in 1st st of other shoulder and work to correspond, reversing shaping. With blunt needle, weave neck band at each side to shoulder edges.
Word of advice: Have safe search on before attempting to do internet research on African Antelope po—Actually, don’t. Just don’t research it.
FRONT: Work same as back to armhole shaping, ending with 3 rows of color A. ARMHOLE SHAPING: Bind off 4 sts at beg of next row, K to end of row. NEXT ROW: Bind off 4 sts, K 4 color A, K 20 (22, 24) color B, attach A and K 2 for center border. Leave remaining sts on needle to be worked later, turn. Working in established colors, dec 1 st at armhole edge every other row same as back; at the same time work 1st eyelet for front lacing on 5th row (eyelet: Work across row to within last 4 sts of center, K 2 tog, YO, K 2). Work 2 more eyelets in same manner every 2 inches. Work even until section measures 6 inches from 1st armhole bind off, ending on wrong side.
Besides the colour of this beach top more closely resembles Blue Whale poop. No, seriously.

Don’t ever say you haven’t learned anything from this blog.
NEXT ROW: K 4 color A, K 11 color B (all sizes), cut color A. At center, attach color A to color B and work remaining 8 (10, 12) sts of neck band and border, ending at front edge. NEXT ROW: K across 8 (10, 12) color A sts, with color B, P 2 tog, P across to border, K 4. Repeat last 2 rows twice; at the same time when there are 3 ridges at neck edge bind off 4 (6, 8) sts at neck edge. Then work 4 border sts at each end with color A and 8 center sts in color B. Work in established pattern until armhole measures same as back. SHAPE SHOULDERS: With matching colors, bind off 8 sts at beg of armhole edge, turn. Attach color A at center front and work other side to correspond reversing shaping and eyelets.
Clearly, the pattern editor is too grossed out by the Bongo/Whale Poop resemblance to instruct you on how to bind off the remaining stitches.
FINISHING: Block each section to size. Weave shoulder and side seams matching stripes. With color C make a chain about 30 inches long and lace through eyelets as illustrated.


Ripple Poncho
This is the Rippled Poncho Ted Bundy would wear.
One size fits all
Serial killers.
Materials Required:
AMERICAN THREAD “AUNT LYDIA’S” HEAVY RUG YARN
1 – 180 yd. skein each of any 5 colors or
3 – 70 yd. skeins each of any 5 colors
Aluminum Crochet Hook Size K OR ANY SIZE HOOK WHICH WILL RESULT IN STITCH GAUGE BELOW
All that shouting is just to distract you from the promise that you can use “any 5 colors”. Spoiler alert: It’s a lie.
GAUGE: 2 sts = 1 inch; 2 rows = 1 inch

1st ROW: With Rust ch 119, s c in 2nd st from hook, 1 s c in each of the next 5 sts, * 3 s c in next st, 1 s c in each of the next 6 sts, skip 2 sts, 1 s c in each of the next 6 sts, repeat from * 6 times, 3 s c in next st, 1 s c in remaining 6 sts, ch 1 to turn all rows.
See? I told you it was a filthy lie! You’re to begin with Rust, and only Rust!
2nd ROW: Working in back loop of all sts throughout skip 1 s c, 1 s c in each of the next 6 s c, * 3 s c in next s c, 1 s c in each of the next 6 s c, skip 2 s c, 1 s c in each of the next 6 s c, repeat from * 6 times, 3 s c in next s c, 1 s c in each of the next 5 s c, skip 1 s c, working in both loops of st, 1 s c in last s c, ch 1, turn. Repeat last row throughout working 2 rows each Rust, Brown, Bongo, Antique and Yellow, cutting all colors at end of each 2nd row. (When changing colors always complete last half of st with next color). Repeat last 10 rows once more (20 rows in all).
Long story short, you can use any five colours so long as they are Rust, Brown, Bongo, Antique and Yellow.

Although to be fair, these were the only five colours people were allowed to wear in 1970.

Solid, baby!
NECK OPENING: Work in established pattern and colors across 4 points only, ch 1, turn. Work across these 4 points for 20 rows. Attach yarn at center and work across the remaining 4 points in same manner until there are 20 rows; then work across all 8 points for 20 more rows in colors as established, cut yarn.

COLLAR: Attach Yellow at neck edge in last of short rows, work 1 s c in each row increasing 1 st every 4th row (50 s c) around neck, join and ch 1 to turn each row. Working in back loop of remaining sts work 2 rows Yellow, 2 rows Antique, 2 rows 2 Rows Bongo, and 2 rows Brown, join, cut yarn.
Now drape your criminal in this rug yarn poncho, so he’ll be too overheated to outrun the fuzz.

You may also want to crochet up some matching hand-cuffs.

Because revenge is a dish best served cold, but Justice should always be warm and fuzzy.

Click here for the printable pattern.

Read more!

Thursday, July 14, 2011

The Zombies of Summer!


The good news is that a small (but feisty) Canadian publisher has expressed interest in my 2009 3-Day Novel Alice’s Adventures with Welsh Zombies. As the novel is about 20,000 words short of being ... well, a novel, I’ve spent the past two months writing my still beating heart out.

The bad news is that I haven’t had time to devote to Handmade by Mother. I haven’t even been knitting! Fact is, needles and hooks will not protect you when zombies invade your yarn stash!


However, my love of tacky vintage knits and crochets remains as strong as my love of kitschy zombies. So, I promise to write at least one post a month.

After all, I know what will happen if I let Handmade by Mother die...


The blog will come back and eat my brains!


Read more!