Showing posts with label 1960s. Show all posts

Monday, January 30, 2012

Crochet is the Opium of the Masses

Double Crochet Belt from “Learn to Crochet,” 1963

This belt is the very first project in “Learn to Crochet”. The method of instruction, the reader is assured, is most “pleasant”, although one is warned to always keep in mind the importance of neatness of execution. In other words, if your finished work is not lovely, it’s your own damn fault and your time would be better spent pursuing messier hobbies like pottery or bog snorkelling.

Observe the young lady in the picture above. She clearly understands the necessity for neatness as she’s shellacked her hair in place. There’s no arguing with results, her crocheted belt is lovely. True, she also has the pale complexion and lethargic poise of an opium addict, barely able to lift her arm toward her books.

Looks like she’s been reading Morocco by Jean-Louis Miège, an historian so obscure he only rates three sentences in the French language Wikipedia. I’m not sure what this tells us about our crochet model. Has she visited Morocco? Is she planning to? Is her opium supplier Moroccan?


Look, there he is! Seconds after this photo was taken, the fellow opened his robe, and asked historian Jean-Louis, “Say, wanna buy some opium? Primo stuff. Fell off the back of a truck. Would I lie to you?”

Or possibly our model can’t breathe and really needs to loosen her double crochet belt before she passes out.

For the complete pattern (and more snark!):

Double Crochet Belt

Coats Mercer-Crochet No. 10 (20 grm.): 2 balls.

There’s a strange symbol directly after Coats. Exhaustive internet research reveals that sadly it’s not a secret symbol used by opium smugglers. It’s actually just an older version of the modern Coats logo.

This model is worked in White, but any shade of Mercer-Crochet maybe be used. No. 10 is available in White, 610, (Dk Ecru), 609 (Ecru), 442 (Mid Buttercup), 621 (Lt. French Blue), 623 (Spring Green) and Spec. 8918 (Lt. Coral).
Lots of choice, so long as you stick to bland, inoffensive shades. No Ravishing Reds or Sex-Kitten Sapphires for you! Even Light Coral has to be special ordered, as a mere glimpse of a colour approaching pink will upset your opium-addled, ahem, delicate sensibilities.

And don’t even think about using any crochet thread other than Coats. Page six of the instructions, which you’ve memorized to ensure the loveliness of your work, decrees: “Coats Mercer-Crochet possesses qualities which are of the utmost importance to the work. It washed beautifully, never loses its colour or becomes ‘stringy’… it is the ideal crochet thread.”

Heaven help you if your thread becomes stringy! Your neighbours will accuse you of being strung-out.
Beads and sequins. 1 buckle.

¾ yd. corded silk ribbon for lining.

Milwards Steel Crochet Hook No. 2 ½. (Slack workers could use a No. 3 hook and tight workers a No. 2.

Slack workers lack proper motivation. This being the early sixties, tight workers simply need a strong sedative.

Of course, even the slack workers will need Nervine, a dry martini, or just plain ol’ opium, as the very first project in this book involves teeny tiny needles and thread.

Welcome to crochet! Please enjoy the complimentary eye-strain.
Tension: 12 rows = 1 in.

Measurements: 3 ½ in. deep x 22 in. long.


Commence with 33 ch.
You can tell this is a classy pattern by the way the designer invites you to “commence” instead of “begin”.
1st Row: 1 dc (double crochet) into 2nd (second) ch (chain) from hook, 1 dc into each of remaining ch, 1 ch, turn.

2nd Row: 1 dc into each dc, 1 ch, turn.

Repeat 2nd row until belt measures 23 in. (or 1 in. longer than waist measurement), omitting turning ch at end of last row.
Or until you have a nervous breakdown from row after row of nothing but double crochet. No wonder the model for this pattern was dreaming of escaping to Morocco!

This also explains why she quit crocheting her belt despite it being clearly several inches too small.
Fasten off.

Damp and press.

Sew on buckle. Then sew on beads and sequins as shown in illustration or as desired. Line inside of belt with corded ribbon.


Don’t go wild with the beads and sequins. Three beads and two sequins is all you can handle as a beginner crocheter and a social opium smoker.

Of course, if you believe that after this pattern you’re ready for the hard stuff, I won’t warn you to just say no. However, if the police show up at your door, you didn’t get this from me.


Click here for the printable pattern.

Read more!

Saturday, January 7, 2012

Oh, the Weather Outside is Frightful...

Ladies’ Ski Mask from “Easy to Make Fashions for the North, South, East, West”, c. 1960

So, clearly it’s time to fight back by frightening the heck out of Jack Frost.

Those who remember the 1960s speak fondly of the Summer of Love, but they never mention the Winter of Rabid Hate. But now I understand why so many hippies fled to San Francisco in 1967 and overindulged in free love and inexpensive marijuana. How else could they block out childhood memories of their mothers wearing this terrifying mask as she hunted them down like so many snowshoe bunnies? Yes, thousands of baby boom youngsters huddled behind snow banks in their urine-soaked snowsuits praying that this terrifying visage wouldn’t find them and make them come indoors to massage Mommy’s hammer toe.

Don’t believe me? Then explain this: George R.R. Martin, the infamous fantasy author, was but a tender twelve years old in 1960, and he believes to this day the most ominous phrase for all of humankind is...


I rest my case.

For the complete pattern (and more snark!):

Ski Masks

Materials Required:
AMERICAN THREAD COMPANY “DAWN” KNITTING WORSTED
I do believe this calls for another sign...


4 ounces Buff Heather
1/3 ounce each Red, Tangerine and Black
Red sequins, Red and Black felt, 2 large bone rings for Ladies’ Mask
1 pr. knitting needles No. 8
Aluminum crochet hook size F
I’ve complained in the past about the creepiness of so-called skin toned ski masks, but Buff Heather will make you look even less like a ski bunny and more like a bog body that’s been dug up at the 2014 Winter Olympics’ site.

Now, even though dead Soviets have turned up in bogs, I want to make it very clear I’m not accusing the Russians of anything. Especially Vladimir Putin.
LADIES’ MASK: Work Basic Mask.

BASIC MASK:
Cast on 82 stitches (sts) and work in Knit (K) 2, Purl (P) 2 ribbing for 2 inches ending last row with P 2.
NEXT ROW: K 2, P 2 for 28 sts, K 26, P 2, K 2 for 28 sts (Right side).
NEXT ROW: P 2, K 2 for 28 sts, P 26, K 2, P 2. Repeat last two rows for 1 inch ending with K 2, P 2.
NEXT ROW: K 2, P 2 for 28 sts, K 12, increase (inc) 1 st in each of the next 2 sts, K 12, P 2, K 2 for 28 sts.
NEXT ROW: K 2, P 2 for 28 sts, P 12, inc in next st, P 2, inc in next st, P 12, K 2, P 2 for 28 sts.
NEXT ROW: K 2, P 2 for 28 sts, K 12, inc in next st, K 4, inc in next st, K 12, P 2, K 2 for 28 sts.
NEXT ROW: P2, K 2 for 28 sts, P 12, inc in next st, P 6, inc in next st, P 12, K 2, P 2 for 28 sts. Continue in same manner until there are 12 sts between increasing points (94 sts).
The helpful definitions of common short forms, along with the pedantically spelled out instructions and the enthusiastically shouted NEXT ROWS, all imply that this basic ski mask is an ideal first project for a beginner.

Of course, it’ll be your first and last knitting venture after your family sees the finished hat and locks you away as a danger to yourself and others.
NEXT ROW: K 2, P 2 for 28 sts, K 38, P 2, K 2 for 28 sts.
NEXT ROW: P 2, K 2 for 28 sts, P 38, K 2, P 2 for 28 sts. Repeat last 2 rows 4 more times ending with K 2, P 2.
NEXT ROW: K 2, P 2 for 28 sts, K 11, bind off 16 sts for Mouth, K 10, P 2, K 2 to end of row.
NEXT ROW: P 2, K 2 for 28 sts, P 11, drop yarn. Attach new skein of yarn on the other side of Mouth, P 11, K 2, P 2 for 28 sts.
NEXT ROW: K 2, P 2 for 28 sts, K 11, drop yarn, pick up 1st skein of yarn, K 11, P 2 K 2 for 28 sts.
NEXT ROW: P 2, K 2 for 28 sts, P 11, cast on 18 sts, P 11 on other side of Mouth, K 2, P 2 for 28 sts, cut yarn of 2nd skein.

It’s not clear at this point how the Ski Mask will end up looking like a Sock Monkey who died of lock jaw.
NEXT ROW: K 2, P 2 for 28 sts, K 40, P 2, K 2 for 28 sts.
NEXT ROW: P 2, K 2 for 28 sts, P40, K 2, P 2 for 28 sts. Repeat last 2 rows twice.
NEXT ROW: K 2, P 2 for 28 sts, K 16, bind off 8 sts for Nose, K 15 P 2, K 2 for 28 sts.
NEXT ROW: P 2, K 2 for 28 sts, P 16, cast on 17 sts, P 16, K 2, P 2 for 28 sts.
NEXT ROW: K 2, P 2 for 28 sts, K 16, P 8, K 1, P 8, turn. Working across Nose sts only, K 8, P 1, K 8, turn, P 8, K 1, P 8, K 16, P 2, K 2 for 28 sts.
NEXT ROW: P 2, K 2 for 28 sts, P 16, K 2 together (tog), K 6, P 1, K 6, K 2 tog, P 16, K2, P 2 for 28 sts.
NEXT ROW: K 2, P 2 for 28 sts, K 16, P 2 tog, P 5, K 1, P 5, P 2 tog, K 16, P 2, K 2 for 28 sts.
NEXT ROW: P 2, K 2 for 28 sts, P 16, K 2 tog, K 4, P 1, K 4, K 2 tog, P 16, K 2, P 2 for 28 sts.
NEXT ROW: K 2, P 2 for 28 sts, K 16, P 2 tog, P 3, K 1, P 3, P 2 tog, K 16, P 2, K 2 for 28 sts.
NEXT ROW: P 2, K 2 for 28 sts, P 16, K 4, P 1, K 4, P 16, K 2, P 2 for 28 sts.
NEXT ROW: K 2, P 2 for 28 sts, K 17, P 3, K 1, P 3, K 17, P 2, K 2 for 28 sts.
NEXT ROW: P 2, K 2 for 28 sts, P 18, K 2, P 1, K 2, P 18, K 2, P 2 for 28 sts.
NEXT ROW: K 2, P 2 for 28 sts, K 19, P 1, K 1, P 1, K 19, P 2, K 2 for 28 sts.

Normally, I don’t recommend nose jobs for ski masks, but a knitted schnoz really shouldn’t look like it was on the losing end of an argument with a garden hoe.
NEXT ROW: P 2, K 2 for 28 sts, P 7, bind off 12 sts for Eye, P 2, bind off 12 sts for other Eye, P 6, K 2, P 2 for 28 sts.
NEXT ROW: K 2, P 2 for 28 sts, K 7, drop yarn, attach about 1 yd. of yarn at Nose and K 3, drop yarn, attach another skein of yarn at other side of other Eye and K 7, P 2, K 2 for 28 sts.
NEXT ROW: P 2, K 2 for 28 sts, P 7, drop yarn, pick up other yarn, P 3, drop yarn, pick up other yarn at other side of Eye, P 7, K 2, P 2 for 28 sts.
NEXT ROW: K 2, P 2 for 28 sts, K 7, drop yarn, pick up other yarn, K 3, drop yarn, pick up other yarn at other side of Eye, K 7, P 2, K 2 for 28 sts.
NEXT ROW: P 2, K 2 for 28 sts, P 7, cast on 12 sts, P 3, cast on 12 sts, P 7, K 2, P 2 for 28 sts.
NEXT ROW: K 2, P 2 for 28 sts, K 41, P 2, K 2 for 28 sts.
Unkind people might comment that the eyes look a tad close together...

...and they’d be right. However, keep in mind that the field of Ski Mask Physiognomy has been debunked, so we cannot conclude that only the criminal class would be caught dead or alive in this mask.

Although, it’s true that the last lady wearing this mask was seen in the company of this fellow ski enthusiast.

NEXT ROW: P 2, K 2 for 28 sts, P 41, K 2, P2 for 28 sts. Repeat last 2 rows once, then P 1 row, K 3 rows.
Work next 35 rows in stockinette stitch (K 1 row, P 1 row), decreasing 4 sts evenly spaced every other row but do not work decreases directly over decreases of previous row until 25 sts remain, cut yarn leaving an end. Thread yarn into needle and draw sts tog, sew seam.

Cut a section of Red felt for lower Lip and stitch in place. Cut a section Red felt for upper lip and stitch in place taking care to keep corners of Mouth neat. Cut two sections of Black felt for Eyes and stitch in place. Outline Eyes with red sequins and also stitch a few sequins on each Cheek.
Only a few sequins on those cheeks, mind you! Whether bog ladies were sacrificial victims or young misses with a poor sense of direction, they did NOT make themselves up to look like whores.

Of course, if you use too few, you risk creating sparkly duelling scars.
Embroider Nostrils in red. Cover 2 bone rings with single Crochet using Tangerine yarn and stitch in place for Earrings.
Go big or go home.
HAIR: Starting at ridge as illustrated and with Tangerine, join yarn over a K st. Working toward top of Mask, * skip 1 K st, wind yarn around index finger to form a 1 inch loop, insert hook through both loops of next K st and complete sc. Repeat from * in same row of K sts to top of mask, skip 1 row of K sts and repeat from 1st * until top of Mask is covered with loops.
Why Tangerine hair? Because you won’t win first prize at the Bog Body Costume Party if you forget that the acids in peat bogs eventually turn everyone into gingers. (Warning: only click the link if you’re a fan of graphic forensic content!)

Of course, the red sequins on your mask may disqualify you anyway, as no bog body has been discovered in sparkly disco wear.

Yet.

Click here for the Printable Pattern

Read more!

Saturday, April 16, 2011

You Never Forget your First Time…

Knitted Place Mats from Aunt Lydia’s Heavy Rug Yarn, c. 1965

Yes, the first time a new bride welcomes her husband into her most private sanctum is a nerve-racking affair. It’s that magical moment when, with trembling hands … dare I say it … she sets the table for breakfast.

That’s right, what happens in your breakfast nook is far more important to your marital bliss than all that neurotic nudity in the bridal boudoir. So, there’s no such thing as too much attention to detail here. Note how perfectly the place mats have been aligned, and how the spoons have been arranged with precision behind the cups, each of them filled exactly three quarters of an inch from the rim. A ruler is a newlywed’s best friend – so long it’s kept out of the bedroom!

See how everything on the table has been carefully labeled? Heaven knows, otherwise a silly girl might end up stuffing the napkins into the jam jar, storing the jelly in her bra, and the bridal brunch would descend into chaos, pure CHAOS!


Ahem. Of course, it’s anyone’s guess how the newly-minted housewife was supposed to get the jelly out of that impractically shaped jelly-jar, much less clean it afterwards. But then again, tears and recriminations are naturally a part of a girl’s first time.

For the complete pattern (if you can even call it a “pattern”):


Knitted Place Mats
Simple and Quick to Make

For once, there’s absolutely nothing misleading about this description. These placemats are incredibly simple to make.

In fact, they’re so simple, that if you skip the “bind off” part of the instructions and just keep going, you’ll end up with a Dr. Who Scarf!

I’m a bit obsessed with Time Lord accessories right now, because I’m actually working on one for my son. Which he WILL wear! Because after thirteen years he’s learned to respect (and fear) the phrase “Handmade by Mother”.

No, that’s not my son.
10 ½ x 18 Inches

Materials Required:

AMERICAN THREAD COMPANY “AUNT LYDIA’S” HEAVY RUG YARN
If you’re determined to break Aunt Lydia’s heart by using an inferior product, I strongly recommend Red Heart Supersaver. Not only is it inexpensive and hypoallergenic, Red Heart will give your placemats a nice scratchy texture guaranteed to keep your kids’ elbows off the table!
7 – 70 yd. skeins Bongo
2 – 70 yd. skeins Lt. Yellow will make 4 mats
Wait – what the heck is a “Bongo”?

Yes, but an African antelope seems like an unlikely inspiration for a 1960s, whitebread place setting.

Ah ha! Bongo was also the name of a Disney circus bear who wore a red jacket with yellow stripes.

I assume that after the designer turned Bongo’s jacket into a place mat, she used the rest of him as a kitschy living room decoration.


1 Pr. Knitting Needles No. 9 or ANY SIZE WHICH WILL RESULT IN STITCH GAUGE BELOW
GAUGE: 4 sts = 1 inch
ALWAYS CHECK YOUR GAUGE! THE GAUGE IS GOD! IF YOUR PLACEMATS ARE TOO SMALL OR LARGE YOU’RE GOING STRAIGHT TO HELL!

No pressure.
NOTE: Entire mat is worked in garter st (K each row).
With Bongo cast on 42 sts. NEXT 10 ROWS: K across each row, drop Bongo. Then work as follows: 10 rows Lt. Yellow, 76 rows Bongo, 10 rows Lt. Yellow, 10 rows Bongo. Bind off.
Block to measurements.
Work 3 more mats in same manner.
Of course, even if you get THE ALL IMPORTANT GAUGE right, you’re still condemned to the mind-numbingly, tedious hell of making these place mats. And staring at them every morning over your cup of coffee will cause many of your brain cells die of sheer boredom.

Still, there’s worse ways to cause brain damage over breakfast!


Click here for the printable pattern. (Hah!)

Read more!

Wednesday, April 6, 2011

Pompon Therapy

Pompon Chick from Bazaar Time, c. 1965

Pompon chick design supplied by the County Borough of Brighton Occupational Therapy Dept.

Yes, this unique pompon chick design was actually donated to Bazaar Time by the Brighton Occupational Therapy Department of the Brighton County Borough Asylum! There’s no indication whether they also provided the yummy lollipops.

Clearly, the OT Dept. of the Brighton Asylum felt that non-institutionalized crafters, like the institutionalized mentally ill, could benefit from pompon Art Therapy.


Doesn’t this look like a fun place to live? Why I can just imagine all the inmates happily making pompon chicks.

My mentally ill friend enthusiastically agrees that group therapy in her hospital would have been much more entertaining if she’d been able to pelt her fellow inmates with pompon animals.

For the complete pattern (and more snark!):

Pompon Chick

Materials
3 (50 g) balls in Beau Blue 0350 and 2 (50 g) balls Snow White 504 Patons Double Knitting.

Pieces of felt as follows:–
Red 6 x 4 in. (15 x 10 cm); Yellow 3 x 2 in. (7 x 5 cm); Black and White 2 in. (5 cm) square.

Measurement

Height 7 in. (18 cm)

Chicken is made from two woolly balls.
You might suppose the instructions end right here. After all, there isn’t much more to say. Slap two pompons together, stick felt feet and eyes on it, and you’re done!

Not so fast!

Professional therapists know that the mentally ill cannot be trusted with free form crafting.

Damn their uncrushed spirits!

Of course, one might question the wisdom of giving the mentally ill sharp objects and encouraging them to stick them into what appears to be an eyeball.

But no matter what TV shows like Criminal Minds tell you, remember, the vast majority of mentally ill people are NOT violent.

Don’t make my mentally ill friend smack you.
Cut two circles of card 5 in. (13 cm) diameter for body with centre hole 2 ¼ in. (6 cm) diameter, diagram 1 A. Place circles together and thread a blunt-ended needle with a long length each of Blue and White yarn. Thread yarns round circles until centre hole if filled, diagram 1 B. Cut round outer edge of circles between cards, diagram 1 C. Tie a double length of yarn tightly round centre, knotting securely, diagram 1 D. Do not cut off the ends. Remove cards and clip away any uneven ends of pom pon.
Word keeps autocorrecting my typing, so if any of the pom pons in this pattern have been replaced with pomp on, don’t blame me.

Evidently Word likes to get its pomp on.

Just like this fellow!

Click the link, you won’t regret it.
For Head, cut two circles of card 4 in. (10 cm) diameter with centre hole 1 ¾ in. (4 cm) diameter and, using Blue yarn only, make pom pon as described for Body.

Finish – Tie the two pom pons firmly together, then tie remaining ends of yarn for hanging.
Goodness, the chick’s not even assembled yet, and we’re already being told to hang it? I’m no occupational art therapist, but I don’t think it’s healthy to have the mentally ill make cute suicidal animals.


Trace outlines of Feet, Beak and Eyes from diagrams and cut out and draw round each shape on appropriate pieces of felt as follows:

Feet (2) and Tongue (5) on Red; Beak (4) on Yellow; Eye (1) twice on White and Iris (3) twice on Black. Using rubber solution, stick the features and feet in position, see photograph. Fold Beak in half and insert tongue, sticking straight edge of tongue to fold of beak.
I also thought occupational therapists weren’t supposed to encourage OCD behaviour in their patients, but clearly I’m not a professional.

After all, I wouldn’t think it would be a good idea to give the mentally ill this kind of equipment to play with, either.

Oh wait, my mentally ill friend says she thinks this kind of Art Therapy is a great idea. She suggests leaving her alone with the writers of Criminal Minds for an hour or two, and she’ll make them some crafts they’ll never forget!

Or did she say make them INTO some crafts?

Uh oh.


Click here for the printable pattern.


Read more!

Thursday, December 23, 2010

You Better Watch Out...

Large Santa Claus from “YOU asked for these”, Star Book No. 208, c. 1965

You better not cry,
You better not pout,
I’m telling you why...

Because not only is Santa Claus coming to town, he’s bringing what YOU asked for!

Yes, YOU asked for a shapeless granny square pullover. YOU asked for a useless doily for your disco dancing cherub. And, since you’re a sucker for punishment, YOU also asked for a “Large Santa”.


Clearly, YOU should be a lot more careful what you ask for.

Boy, Large Santa sure looks cranky. It’ll take a lot more than an offering of milk and cookies to placate him. Maybe next time you’ll remember that Kris Kringle prefers the nickname Big-Boned Santa.

For the complete pattern (and more snark!):

Yikes, never mind cranky! Large Santa’s come to life and he’s out for vengeance!

So what if he’s only 18 inches tall and made of yarn? Just look at that murderous expression, and remember, he knows when you’re sleeping...
Large Santa Claus

Materials Required:
AMERICAN THREAD
“AUNT LYDIA’S” HEAVY RUG YARN
7 – 70 yd. skeins Red.
1 – 70 yd. skein White
3 Black Buttons
1/3 yd. Red Felt
This year, instead of dreaming of sugarplums, your children will be lying awake in terror, listening for the sound of woolly feet stomping across the floor.
BODY: Wind 5 skeins of Red over an 18 inch cardboard, tie with a double strand of yarn at one end for top of head. Tie tightly about 3 ½ inches from top of head for neck. Divide remaining yarn in half for legs and tie each section about 2 inches from each end. Cut and trim for feet.

ARMS: Wind 2 skeins of Red over a 14 inch cardboard, tie 2 inches from each end for hands, then tie each side about 3 ½ inches from each hand tying for shoulders, insert through center of body. Tie about 5 inches from neck for waist. Cut and trim for hands.

Sew buttons in place for eyes and nose.
Don’t let Santa’s jolly old elf act fool you – he’s as judgmental as he is jolly. And if you’ve been very naughty, he’ll deliver those lumps of coals with a twelve gauge shotgun!


HAT: Cut a triangle 16 ½ x 14 ½ x 14 ½ inches of Red felt. Fold and seam the two 14 ½-inch edges tog for back seam. Turn about ½ inch under and tack in position to head. Finish with a pompon.

POMPONS: Wind White 40 times over a 2 inch cardboard, slip off cardboard, tie in center, cut both ends, trim into shape. Attach to top of hat. Work 2 more pompons, and attach in place for buttons.
This Large Santa doll will reinforce the lesson that children should always approach any Santa with extreme caution. After all, according to the Mayan calendar, every 1,000 years Santa completely loses his Christmas cheer.


WHISKERS: With White work a 7 inch ch. Cut yarn into 6 inch lengths. Fold 4 lengths in half and knot through each ch. Bush slightly and trim.

MUSTACHE: Cut 10 strands 10 inches long. Tie in center. Sew in place. Brush and tirm..

EYEBROWS: Take 4 strands 1 ½ inches. Tie in center. Open strands. Glue in place.
Make those eyebrows extra bushy, to enhance Large Santa’s glare. Then prop up the completed toy beside your children’s bedside, as a reminder that they better be good... or else St. Nick will take them to his North Pole Sweatshop where stunted, malnourished children (AKA elves) work non-stop making toys for better-behaved girls and boys.

You asked for it, kid!

Click here for the printable pattern.

Read more!

Wednesday, November 17, 2010

She’s a Maneater!

“Touch Appeal” dress from Spinnerin International Preference, Vol. 171, 1964

For a pattern called “Touch Appeal”, that gentleman is very cautious about getting too close to her. “Is it safe?” he wonders. “I know, I’ll poke it with a stick, and see what happens.”

Of course, he was never seen again, because she was actually the comic book villainess Poison Ivy in disguise. She pelted him with poison petals until his precious parts popped off.


No?

Okay, so she’s not quite that fatal a femme fatale. Instead of superpowers, she clearly relies on her poor man’s Audrey Hepburn good looks to lure her defenseless prey into the forest. Once this maneater’s had her way with him, she’ll abandon his used up body for the other woodland predators to finish off.

If only he’d watched Mutual of Omaha’s Wild Kingdom, he would have known better than to challenge a cougar in her natural habitat.

For the complete pattern (and more snark!):

Touch Appeal - Style No. 904

These directions are written for small size (32-34). Changes for medium size (36-38) and large size (40-42) are in parentheses.
Handmade by Mother accepts no responsibility if your dress does not fit because you made it on the basis of the sizes listed. Keep in mind, people were smaller in the 1960s and dress sizes were larger. Plus, these are European sizes, not North American.

Handmade by Mother is also not responsible should the title of this post cause Hall & Oates Maneater to be stuck in your head all day.
Blouse

MATERIALS FOR BLOUSE

SPINNERIN Frostlon Petite (1-oz. balls): 5 (6-6)
OR SPINNERIN Mohaire Boucle or alpine (50-gram balls): 6 (7-7)
1 pair each knitting needles Nos. 5 and 8
1 steel crochet hook No. 0
GAUGE: 5 sts = 1 inch, 7 rows = 1 inch

BODY MEASUREMENT: At bustline 33 (37-41) inches.
BLOUSE MEASUREMENT: At bustline 35 (39-43) inches.
What’s that? You were humming Nelly Furtado’s Maneater, because Hall & Oates is before your time?

That is completely unacceptable! If you’re going to be infected with an earworm at this site, it will be a vintage one!


No need to thank me.
BACK: With smaller needles cast on 73 (83-93) sts. Rib in K 1, P 1 for ½ inch. Change to larger needles. Work in stockinette st (K 1 row, P 1 row) inc 1 st each side every 1 ½ inches 5 times.
Work even on 83 (93-103) sts, until piece measures 10 inches from beg, or desired length to underarms.

ARMHOLES: Bind off 3 (4-6) sts at beg of next 2 rows. Dec 1 st each side every other row 5 (6-7) times. Work even on 67 (73-77) sts until armholes measures 7 ¾ (8 ¼ -8 ¾) inches. End with a P row.

SHOULDERS: Bind off 6 (7-8) sts at beg of next 2 rows. P next row on right side for hemline.

NECK HEM: Continue in stockinette st, inc 1 st each side every other row for 1 inch. Bind off.
I don’t want to hear any complaining about how boring this blouse is to make. When the apocalypse arrives, you’ll be glad you know how to knit your own blouses.
FRONT: With smaller needles cast on 75 (85-95) sts. Rib in K 1, P 1 for ½ inch. Change to larger needles. Work in stockinette st inc 1 st each side every 1 inch 5 times, every ¾ inch 4 times.
Work even on 93 (103-113) sts until piece measures 10 ¾ inches or ¾ inch longer than Back to Armholes.

ARMHOLES: Bind off 5 (7-8) sts at beg of next 2 rows. Dec 1 st each side every other row 7 (7-9) times. Work even on 69 (75-79) sts until armholes measure 7 ¼ (7 ¾ -8 ¼) inches.

SHOULDERS and NECK HEM: Work same as on Back.

FINISHING: Sew underarm and shoulder seams. Turn Neck Hem to wrong side at hemline and sew in place, sewing inc edge to shoulder seam. Working from right side, work 1 row sc around armholes. Block.
Otherwise, when civilization collapses, you’ll end up looking like Raquel Welch in One Million Years B.C.

Ignore your husband’s comment about wanting you to look like Ms. Welch. If he persists, threaten to feed him to the Sabertooth Cougar herself; 70 year old Raquel.


Skirt

MATERIALS FOR SKIRT

SPINNERIN Frostlon Petite (1-oz. balls) 8 (9-10) balls Main Color (MC) and 1 ball each Colors A, B and C for trim.
OR SPINNERIN Mohair Boucle or SPINNERIN Alpine (50-gram balls) 11 (12-13) balls Main Color (MC) and 2 balls each Colors A, B and C for trim.
1 pair straight knitting needles No. 10 ½
1 each steel crochet hooks Nos. 2 and 0
1 aluminum crochet hook No. 4
1 yd. nylon net for lining
1 yd. 1 ½-inch grosgrain ribbon
1 7-inch placket zipper
GAUGE: 4 sts = 1 inch, 5 rows = 1 inch

BODY MEASUREMENTS: At hipline 35 (39-43) inches. At waistline 25 (29-33) inches.
SKIRT MEASUREMENTS: At lower edge 49 (53-57) inches. At hipline 37 (41-45) inches. At waistline 26 (30-34) inches. Length 25 inches.

NOTE: Skirt Length is planned for 25 inches. Make any necessary adjustment for length before first dec and keep a record of adjustment made.

PATTERN STITCH: Multiple of 2 sts.
Row 1 (wrong side): *P 2 tog, leave on needle, K same 2 sts tog, drop from left needle*, repeat between *’s to end.
Row 2: Knit.
Row 3: P 1; repeat between *’s of Row 1 to last st, P 1.
Row 4: Knit.
Repeat these 4 rows for pat st.
Unlike an earworm, this pattern will not drive you mad.
BACK: With MC cast on 98 (106-114) sts. Work even in pat st until piece measures 4 inches from beg. Keeping continuity of pat, dec 1 st each side of next row and repeat decs every 2 inches twice, every 1 ½ inches 5 times, then every 1 inch twice. There are 78 (86-94) sts on needle and piece should measure 17 ½ inches from beg. Work even until piece measures 18 inches from beg. End on right side. Place a marker between the 20th (22nd-24th) and 21st (23rd-25th) sts from each end for dark markers. 11th Dec Row: K to within 2 sts of marker, K 2 tog twice, K to within 2 sts of next marker, K 2 tog twice. Keeping continuity of pat, work even on 74 (82-90) sts until piece measures 19 sts from beg. 12th Dec Row: Dec 1 st each side. Work even on 72 (80-88) sts until piece measures 20 inches from beg. 13th Dec Row: Same as 11th Dec Row. Work even on 68 (76-84) sts until piece measures 21 inches from beg. 14th Dec Row: Dec 1 st each side of each dart marker. There are 64 (72-80) sts on needle. Repeat last Dec Row every 1 inch 3 times more. Work even on 52 (60-68) sts until piece measures 25 inches. Bind off remaining sts.
However knitting miles and miles of this pattern, while simultaneously counting decrease rows will very likely drive you over the edge.

Which means you’re now ready to design your own patterns! After all, if there’s anything I’ve learned on this blog, it’s that insanity is a prerequisite for knitwear design.

You want fries with that?
FRONT: Work same as Back.

FINISHING: Sew seams leaving a 7-inch opening on left side for zipper. Cut a nylon net skirt to measurements of knitted skirt, allowing for seams. Sew seams. Sew net skirt to waistline and lower edge of skirt. If preferred, hem net – do not attach to bottom of skirt. Face waistband with grosgrain ribbon, leaving 2 inches extended at back for underlap. Sew snap fasteners on ribbon to close. If desired, work 1 row s c around zipper opening. Sew in zipper so that it does not show.
Sewing? Our knitted dress requires sewing!

Good thing all knitters love sewing, right?
TRIMLarger Roses (Make 19): With No. 0 crochet hook and Color A, ch 6. Join with a sl st to form a ring. Rnd 1: *Draw up a loop ½ inch long, pull yarn through loop, work 1 s c in back strand of loop (loop st made): repeat from * twice more (3 loop sts made), sl st in back loop of next ch of ring (1 petal made). Make 4 more petals in same way. Rnd 2: Sl st in front loop of first ch of ring. *Ch 1, work 1 loop st, ch 1, sl st in front loop of next ch of ring (1 center petal made). Make 4 more center petals in same way. Break yarn and fasten off.
Smaller Roses (Make 2): With No. 2 crochet hook and Color A, ch 6. Join with sl st to form a ring. Rnd 1: Drawing loops up to ¼ inch, work same as Rnd 1 of Larger Roses. Sl st in front loop of next ch of ring. Rnd 2: *Ch 3, sl st in front loop of next ch of ring (1 center petal made); repeat from * 3 times more (4 center petals made). Break yarn and fasten off.
And crocheting! Lots and lots of crocheting!

Good thing all knitters love crochet, too.
STEMS: With No. 4 aluminum crochet hook and B, make loose chains, working to desired length following illustration.

LEAVES: Work with 1 strand each of B and C in Lazy Daisy Stitch.
Don’t look around for further instructions. REAL maneaters already know how to make lazy daisy and chain stitches.

They also read the pattern thoroughly before they start, so they aren’t ambushed by the sudden introduction of sewing, crocheting, and embroidery. Not to mention, placket zippers which are a mutated plant/jacket zipper hybrid favored by super villainesses.

Okay, okay, placket zippers are just plain old metal zippers, tucked under a flap so that the teeth don’t show. It’s what 1960s femme fatales had to use before invisible zippers came along.

I still like my theory better, though.
Cut tissue paper – 1 piece to match size of Back and one piece to match size of Front of skirt. Trace designs below. Then scale to proper sizes for your skirt. Transfer enlarged designs to papers. Pin or baste the papers to the corresponding parts of Skirt. Beginning with the Back and being sure to sew through net lining, sew Stems over sketches. Sew 5 larger roses in place. Embroider Leaves as described above. Sew Stems and Roses on Front in same way, having the 2 Smaller Roses at top of design. Embroider Leaves. Cut away the papers.
Alternatively, if you’re not keen on embroidering roses onto your outfit, you could always just toss a few decorative blossoms over yourself. If you stay very, very still, in no time at all, men will be sneaking up to poke you with sticks. Sure, they’re checking to see if you’re alive, but once they’re within reach they’re easy prey... I mean, easy to impress.

“Little ol’ me, a maneater? Don’t be ridiculous. Now, put down that silly stick and come just a wee bit closer.”

Click here for the printable pattern.

Read more!

Thursday, October 14, 2010

Phentex Has Broken Your Heart

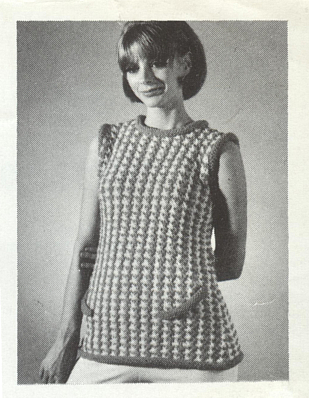
Houndstooth Tunic from Phentex, 1967

First, Phentex went after your son and husband. Then your little girl was next on the chopping block. Still, you thought you were safe. Foolishly, you thought that Phentex wouldn’t bite the hand that knit it.

That’s what Jeanie thought too. Lured in by Phentex’s promises not to stretch or shrink, she slapped down her twenty cents thinking that was the only price she’d have to pay.

Okay, obviously Jeanie knew she’d have to buy the yarn too. I’m trying to create a dramatic mood here. Sheesh.

But little did Jeanie know that her decision to knit up a 100% Polypropylene Pumpkin Tunic would haunt her for many Halloweens to come. For her sister-in-law took one look at Jeanie’s attempt at Phentex panache and dubbed her Pumpkin Hips.

Jeanie tossed the tunic in the dryer, but it refused to shrink. She borrowed the Spanish Inquisition’s rack (I bet you weren’t expecting the Spanish Inquisition!), but the tunic refused to stretch. It was then that Jeanie realized with horror that Phentex’s promise to keep “the shape you knit in” was actually a threat. And that 20¢ had bought her a lifetime of regret.


Oh sweetie, please don’t cry. I was exaggerating the tragedy that is your life for comedic effect! Yes, it’s true that moths hate the taste of Phentex (and who can blame them), the colours of your pumpkiny Phentex will never fade, and long wearing does mean you’re your Phentex tunic will last a couple of centuries, but... please stop wailing, I’m trying to cheer you up!

Oh, for goodness sake, suck it up, Pumpkin Hips!

For the complete pattern (and more snark!):

Look closely at this photo, keeping in mind that professional take multiple shots to guarantee at least one high quality photo for their client. That’s right, this photo of Jeanie about to burst into tears was the best of the lot. I can only assume that all the other photos showed her prostrate on the floor, weeping uncontrollably.
Houndstooth Tunic Style No. 6722
Houndstooth is a two-tone check pattern developed by the Scots as a weapon of war. No, really. Do you think it’s an accident that staring at houndstooth clothing will make your eyesight go wonky?


SIZES: Directions are for size 14. Changes for sizes 16 & 18 are in parentheses.
Apparently, women under size 14 won’t wear a Phentex Houndstooth Tunic. Which begs the question, why would women size 14 and over wear one?

C’mon, you Big, Beautiful Women! You deserve so much better than this pattern.
GAUGE: 7 sts. to 2 ins. and 4 rows to one inch measured over the pattern on No. 13 needles, or any size that will give the correct gauge.

MEASUREMENTS: Tunic will fit a bust size of 34 (36-38) ins.; width all round lower edge, 43 (45½-47½) ins.; length from shoulder at armhole edge, 28 (28¾-29½) ins.
In other words, this tunic will make you look like a Phentex pear. I know women size 14 and above often have self esteem issues, but honestly a hair shirt would be more stylish, and far less itchy.
MATERIALS: Phentex Yarn, 3 ply, 2 (3-3) 4-oz. skeins of Orange (MC), and 2 (2-2) 4-oz. skeins of White (CC); one pair of No. 10½, No. 11 & No. 13; 7 inch MC neck zipper; 2 st-holders.

PATTERN STITCH: Multiple of 4 plus 2.

1st row: With CC * k.3, with right hand needle as if to p. lift the 2nd st. on left hand needle over onto right hand needle, the first st., will be passed thro’ the 2nd st. as it is lifted over – this will be reffered to as “cross one”. Rep. from * to last 2 sts., k.2.
Whereas this overabundance of periods and commas will be reffered to as “poor editing”.
2nd row: With CC, p.

3rd row: With MC, * cross one, k.3. Rep. from * to last st., k.1.

4th row: With MC, p. Rep. these 4 rows for pattern.

B A C K:
First, you abuse a couple of periods and commas. Next, you’ll be unable to resist the temptation of throwing in some extra spaces.
Begin at the lower edge. Using No. 10½ needles and MC cast on 74 (78-82) sts. P. one row, k. one row, p. one row, k. one row, p. one row, k. one row.
Then you’ll lose your ability to write simple instructions like: P one row, k one row 3 times.

And no, sloppy editing is not a victimless crime! You’ll break your English Teacher’s heart!

Again.
Change to No. 13 needles and p. the following row. Join on CC, and continue in pattern-st., dec. one st. both sides of work every 2 ins. until 62 (66-70) sts. remain. Place a marker at side edge.

Change to No. 11 needles and work a further 4 ins. from marker. Change back to No. 13 needles and continue until work measures 20 (20½-21) ins. from beginning, finishing after a wrong side row.
These measurements didn’t sound quite right for a size 14 or 18, and it turns out that’s because a 1960s size 14 isn’t the same as a size 14 in 2010. For decades, clothing manufacturers have been lowering the numbers and monkeying with the measurements to appeal to our vanity. And they’re not just lying to the ladies anymore!
To shape the armholes, bind off 3 (4-4) sts. at the beginning of the next 2 rows, then dec. one st. at both ends of every other row until 50 (54-56) sts. remain, finishing after a wrong side row.

Now divide for the zipper opening. Next row: Pattern across 25 (27-28) sts., join on another skein of yarn and continue over the remaining 25 (27-28) sts. Working both sides at the same time, continue until the armholes measures 8 (8¼-8½) ins. on the straight, finishing at side, armhole edge.

To shape shoulders, bind off 6 (7-7) sts. at beginning of next 2 rows, then 7 (7-8) sts. at the beginning, armhole edge, of the following alternate row. Place the remaining 12 (13-13) sts. of each side onto st-holders.

These measurements are accurate, but this diagram is still a lie. Air brushing was used to erase all of the bumpy, lumpiness caused by the houndstooth pattern stitch.
F R O N T:
Begin at the lower edge. Using No. 13 needles and MC yarn, cast on 78 (82-86) sts. and work exactly as for the back, except that you will have 4 more sts. on the needles, until the work measures 20 (20½-21) ins. from the beginning, finishing after a wrong side row.

To shape the armholes, bind off 4 (5-5) sts. at the beginning of the next 2 rows, then dec. one st. both each end of every other row until 50 (52-54) sts. remain.
Both each end? I think it’s time someone went back to school!

Never mind.
Continue on these sts. until the armholes measure 5½ (5¾-5¾) ins. on the straight, finishing after a wrong side row.

To shape the neck – Next row: Pattern across 16 (17-18) sts., place the centre 18 sts. on a st-holder, join on another skein of yarn and work the remaining 16 (17-18) sts. Working both sides at the same time, dec. one st. at neck edge on every other row 3 times, 13 (14-15) sts. Continue on these sts. until armholes measure 8½ (8¼-8½) ins. on the straight, finishing at side, armhole, edge.

To shape shoulders, bind off 6 (7-7) sts. at beginning of next row, work one more row and bind off remaining 7 (7-8) sts.

Warning: This diagram omits the impact of erosion caused by years of crying whenever you wear this tunic.
FINISHING:
Not F I N I S H I N G?
Pin pieces out to measurements and cover with a damp cloth. Holding a steam iron about 2 ins. above pieces, pass lightly over allowing only the steam to pass thro’ the damp cloth. Leave pinned out to dry. Join shoulder seams.
And absolutely no extreme ironing!
Neck Trim: With the wrong side of work facing you and using No. 10½ needles and MC, k. across 12 (13-13) sts. of one side of back neck; pick up and k. 9 sts. from side of neck; then k. across the 18 sts. left for front neck; then pick up 9 sts. along other side of neck; then the remaining 12 (13-13) sts. of the other side of back neck. 60 (62-62) sts. on needle.

** K. one row, p. one row, k. one row, p. one row, k. one row. Bind off purlwise.

Armhole Trim: With the wrong side of work facing you and using No. 10½ needles and MC, pick up and k. 60 (63-66) along each armhole edge. Work as neck trim from ** to **.
Except there is no 2nd **. So obviously you should keep doing the armhole trim until you have sleeves.
Pocket Trim: Using No. 10½ needles and MC, cast on 21 (21-22) sts. and work in stockinnette-st. for 1½ ins. Bind off. Make another piece the same.
I’m sure stockinnette isn’t a typo. It must have been some cool 1960s L.S.D. inspired stitch.

Turn on, tune in, drop stitches!
Join the side seams, roll trim at neck, armholes and lower edge forward and slip st. in place. Roll pocket trim in the same way, and sew in position as illustrated in the photograph.
Boring ol’ natural fibers will roll naturally if you knit them with a stockinette stitch. Whereas, you’ll have to forcibly roll and sew down your Phentex Phake Pockets. Otherwise, your Phentex may become sentient and mess up your home.


“COPYRIGHT © 1967 by PHENIX TEXTILES LTD.”
The quotation marks here clearly indicate that there never was a real copyright. The spelling of Phenix is to ensure they didn’t incur the wrath of Phoenix by violating her copyright.

Funny how Phoenix shares the same first name as Jeanie Pumpkin Hips, has the same hair colour, and is wearing an orangey fabric that even the fires of hell can’t destroy.

Uh oh.

Well, at least she stopped crying!

Click here for the printable pattern.

Read more!