Showing posts with label winter gear. Show all posts

Saturday, January 7, 2012

Oh, the Weather Outside is Frightful...

Ladies’ Ski Mask from “Easy to Make Fashions for the North, South, East, West”, c. 1960

So, clearly it’s time to fight back by frightening the heck out of Jack Frost.

Those who remember the 1960s speak fondly of the Summer of Love, but they never mention the Winter of Rabid Hate. But now I understand why so many hippies fled to San Francisco in 1967 and overindulged in free love and inexpensive marijuana. How else could they block out childhood memories of their mothers wearing this terrifying mask as she hunted them down like so many snowshoe bunnies? Yes, thousands of baby boom youngsters huddled behind snow banks in their urine-soaked snowsuits praying that this terrifying visage wouldn’t find them and make them come indoors to massage Mommy’s hammer toe.

Don’t believe me? Then explain this: George R.R. Martin, the infamous fantasy author, was but a tender twelve years old in 1960, and he believes to this day the most ominous phrase for all of humankind is...


I rest my case.

For the complete pattern (and more snark!):

Ski Masks

Materials Required:
AMERICAN THREAD COMPANY “DAWN” KNITTING WORSTED
I do believe this calls for another sign...


4 ounces Buff Heather
1/3 ounce each Red, Tangerine and Black
Red sequins, Red and Black felt, 2 large bone rings for Ladies’ Mask
1 pr. knitting needles No. 8
Aluminum crochet hook size F
I’ve complained in the past about the creepiness of so-called skin toned ski masks, but Buff Heather will make you look even less like a ski bunny and more like a bog body that’s been dug up at the 2014 Winter Olympics’ site.

Now, even though dead Soviets have turned up in bogs, I want to make it very clear I’m not accusing the Russians of anything. Especially Vladimir Putin.
LADIES’ MASK: Work Basic Mask.

BASIC MASK:
Cast on 82 stitches (sts) and work in Knit (K) 2, Purl (P) 2 ribbing for 2 inches ending last row with P 2.
NEXT ROW: K 2, P 2 for 28 sts, K 26, P 2, K 2 for 28 sts (Right side).
NEXT ROW: P 2, K 2 for 28 sts, P 26, K 2, P 2. Repeat last two rows for 1 inch ending with K 2, P 2.
NEXT ROW: K 2, P 2 for 28 sts, K 12, increase (inc) 1 st in each of the next 2 sts, K 12, P 2, K 2 for 28 sts.
NEXT ROW: K 2, P 2 for 28 sts, P 12, inc in next st, P 2, inc in next st, P 12, K 2, P 2 for 28 sts.
NEXT ROW: K 2, P 2 for 28 sts, K 12, inc in next st, K 4, inc in next st, K 12, P 2, K 2 for 28 sts.
NEXT ROW: P2, K 2 for 28 sts, P 12, inc in next st, P 6, inc in next st, P 12, K 2, P 2 for 28 sts. Continue in same manner until there are 12 sts between increasing points (94 sts).
The helpful definitions of common short forms, along with the pedantically spelled out instructions and the enthusiastically shouted NEXT ROWS, all imply that this basic ski mask is an ideal first project for a beginner.

Of course, it’ll be your first and last knitting venture after your family sees the finished hat and locks you away as a danger to yourself and others.
NEXT ROW: K 2, P 2 for 28 sts, K 38, P 2, K 2 for 28 sts.
NEXT ROW: P 2, K 2 for 28 sts, P 38, K 2, P 2 for 28 sts. Repeat last 2 rows 4 more times ending with K 2, P 2.
NEXT ROW: K 2, P 2 for 28 sts, K 11, bind off 16 sts for Mouth, K 10, P 2, K 2 to end of row.
NEXT ROW: P 2, K 2 for 28 sts, P 11, drop yarn. Attach new skein of yarn on the other side of Mouth, P 11, K 2, P 2 for 28 sts.
NEXT ROW: K 2, P 2 for 28 sts, K 11, drop yarn, pick up 1st skein of yarn, K 11, P 2 K 2 for 28 sts.
NEXT ROW: P 2, K 2 for 28 sts, P 11, cast on 18 sts, P 11 on other side of Mouth, K 2, P 2 for 28 sts, cut yarn of 2nd skein.

It’s not clear at this point how the Ski Mask will end up looking like a Sock Monkey who died of lock jaw.
NEXT ROW: K 2, P 2 for 28 sts, K 40, P 2, K 2 for 28 sts.
NEXT ROW: P 2, K 2 for 28 sts, P40, K 2, P 2 for 28 sts. Repeat last 2 rows twice.
NEXT ROW: K 2, P 2 for 28 sts, K 16, bind off 8 sts for Nose, K 15 P 2, K 2 for 28 sts.
NEXT ROW: P 2, K 2 for 28 sts, P 16, cast on 17 sts, P 16, K 2, P 2 for 28 sts.
NEXT ROW: K 2, P 2 for 28 sts, K 16, P 8, K 1, P 8, turn. Working across Nose sts only, K 8, P 1, K 8, turn, P 8, K 1, P 8, K 16, P 2, K 2 for 28 sts.
NEXT ROW: P 2, K 2 for 28 sts, P 16, K 2 together (tog), K 6, P 1, K 6, K 2 tog, P 16, K2, P 2 for 28 sts.
NEXT ROW: K 2, P 2 for 28 sts, K 16, P 2 tog, P 5, K 1, P 5, P 2 tog, K 16, P 2, K 2 for 28 sts.
NEXT ROW: P 2, K 2 for 28 sts, P 16, K 2 tog, K 4, P 1, K 4, K 2 tog, P 16, K 2, P 2 for 28 sts.
NEXT ROW: K 2, P 2 for 28 sts, K 16, P 2 tog, P 3, K 1, P 3, P 2 tog, K 16, P 2, K 2 for 28 sts.
NEXT ROW: P 2, K 2 for 28 sts, P 16, K 4, P 1, K 4, P 16, K 2, P 2 for 28 sts.
NEXT ROW: K 2, P 2 for 28 sts, K 17, P 3, K 1, P 3, K 17, P 2, K 2 for 28 sts.
NEXT ROW: P 2, K 2 for 28 sts, P 18, K 2, P 1, K 2, P 18, K 2, P 2 for 28 sts.
NEXT ROW: K 2, P 2 for 28 sts, K 19, P 1, K 1, P 1, K 19, P 2, K 2 for 28 sts.

Normally, I don’t recommend nose jobs for ski masks, but a knitted schnoz really shouldn’t look like it was on the losing end of an argument with a garden hoe.
NEXT ROW: P 2, K 2 for 28 sts, P 7, bind off 12 sts for Eye, P 2, bind off 12 sts for other Eye, P 6, K 2, P 2 for 28 sts.
NEXT ROW: K 2, P 2 for 28 sts, K 7, drop yarn, attach about 1 yd. of yarn at Nose and K 3, drop yarn, attach another skein of yarn at other side of other Eye and K 7, P 2, K 2 for 28 sts.
NEXT ROW: P 2, K 2 for 28 sts, P 7, drop yarn, pick up other yarn, P 3, drop yarn, pick up other yarn at other side of Eye, P 7, K 2, P 2 for 28 sts.
NEXT ROW: K 2, P 2 for 28 sts, K 7, drop yarn, pick up other yarn, K 3, drop yarn, pick up other yarn at other side of Eye, K 7, P 2, K 2 for 28 sts.
NEXT ROW: P 2, K 2 for 28 sts, P 7, cast on 12 sts, P 3, cast on 12 sts, P 7, K 2, P 2 for 28 sts.
NEXT ROW: K 2, P 2 for 28 sts, K 41, P 2, K 2 for 28 sts.
Unkind people might comment that the eyes look a tad close together...

...and they’d be right. However, keep in mind that the field of Ski Mask Physiognomy has been debunked, so we cannot conclude that only the criminal class would be caught dead or alive in this mask.

Although, it’s true that the last lady wearing this mask was seen in the company of this fellow ski enthusiast.

NEXT ROW: P 2, K 2 for 28 sts, P 41, K 2, P2 for 28 sts. Repeat last 2 rows once, then P 1 row, K 3 rows.
Work next 35 rows in stockinette stitch (K 1 row, P 1 row), decreasing 4 sts evenly spaced every other row but do not work decreases directly over decreases of previous row until 25 sts remain, cut yarn leaving an end. Thread yarn into needle and draw sts tog, sew seam.

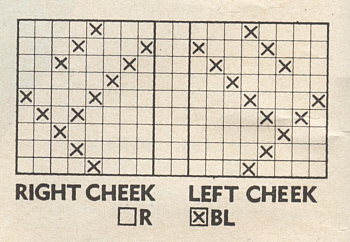
Cut a section of Red felt for lower Lip and stitch in place. Cut a section Red felt for upper lip and stitch in place taking care to keep corners of Mouth neat. Cut two sections of Black felt for Eyes and stitch in place. Outline Eyes with red sequins and also stitch a few sequins on each Cheek.
Only a few sequins on those cheeks, mind you! Whether bog ladies were sacrificial victims or young misses with a poor sense of direction, they did NOT make themselves up to look like whores.

Of course, if you use too few, you risk creating sparkly duelling scars.
Embroider Nostrils in red. Cover 2 bone rings with single Crochet using Tangerine yarn and stitch in place for Earrings.
Go big or go home.
HAIR: Starting at ridge as illustrated and with Tangerine, join yarn over a K st. Working toward top of Mask, * skip 1 K st, wind yarn around index finger to form a 1 inch loop, insert hook through both loops of next K st and complete sc. Repeat from * in same row of K sts to top of mask, skip 1 row of K sts and repeat from 1st * until top of Mask is covered with loops.
Why Tangerine hair? Because you won’t win first prize at the Bog Body Costume Party if you forget that the acids in peat bogs eventually turn everyone into gingers. (Warning: only click the link if you’re a fan of graphic forensic content!)

Of course, the red sequins on your mask may disqualify you anyway, as no bog body has been discovered in sparkly disco wear.

Yet.

Click here for the Printable Pattern

Read more!

Friday, February 4, 2011

Fur is tacky, tacky murder.

Fur Trimmed Helmet and Mittens from Good Housekeeping Needlecraft, Fall-Winter 1973-74

USE FUR FOR A SPECIAL EFFECT
But not a real fur helmet, that’s cruel.

Seriously, that shaggy stuff drooping from her knitwear doesn’t look remotely real. However, it’s a timely reminder that you should always take off your mitts before eating cotton candy.
You can bundle up in cold weather and still look pretty as a picture with fur-trimmed accessories like these. The head covering and mittens have a knitted-in diamond pattern. Ribbing around the neck, face and mitten cuff proves a snug, warm fit. Strips of real fur are sewed on for a unique touch.
Wait, what? That’s REAL fur actually peeled off a REAL animal?

C’mon, what kind of creature has fur like that?

Holy Spaceballs, first a Wookie, and now a Wampa! Although, to be fair, hunting Wampas wasn’t made illegal until a full decade after this pattern was published.

What? Doesn’t everyone know that one of the first acts of the successful Rebels was to protect the gentle, misunderstood Wampa from maniacs with lightsabers?

You must at least be aware of the shameful black market trade in Wampa-skin rugs. Rumour has it that Princess Leia is now wanted for shooting several endangered Wampas from her Space Helicopter.

She’s such a maverick.
For the complete pattern (and more snowman skinning horror):

FUR TRIMMED HELMET/MITTENS

SIZES: One Size Fits All.
Yep, one size fits all, in exactly the same way that the ribbing around the helmet can be described as a “snug, warm fit”.
MATERIALS: Reynolds Lopi: 4 skeins MC, 1 each colors A and B, 1 package Lopi Fur Trim.
Hurray, the helmet and mitts aren’t trimmed with real fur after all! Lopi is yarn that comes from the fleece of Icelandic sheep, which means the trim is made from hanks of unspun wool. So, you can make this pattern with a clear conscience.

What’s that? Wool is cruel too?!

Fine, I’ll just shear my Phentex spiders instead.
Susan Bates knitting needles Nos. 9, 10 ½ and 11 or size to give gauge. Circular needle No. 9. Steel crochet hook Size 0. 1 set large bobbins.

GAUGE: 3 sts =1’’; 4 rows = 1’’.

NOTES: Use bobbins for color changes. Change colors on wrong side, lock strands by picking up new color from under dropped color to prevent holes. Cut and join colors as needed. Run in ends on wrong side. To Follow Chart: Odd Rows (right side): K from right to left on Chart. Even Rows: P from left to right on Chart.
Yes, there’s a couple of charts. Let me assure you,
no animals, real or imaginary, have ever been harmed in the production of charts.

No, really, they’re all fine. A little psychotic, perhaps, but still fine.
MITTENS

RIGHT MITTEN: With MC and No. 10 ½ needles, cast on 40 sts. Work in St st (p 1 row, k 1 row), beg with a p row, for 5 rows. Next Row (right side): K 3, * k 2 tog, k 6, repeat from * across, ending k 2 tog, k 3. Working on 35 sts, work even for 5 rows. Next Row (right side): K 3, * k 2 tog, k 5, repeat from * across, ending k 2 tog, k 2. Working on 30 sts, work even for 5 rows. Next Row (right side): K 3, * k 2 tog, k 4, repeat from * across, ending k 2 tog, k 2. End of Cuff. Change to No. 9 needles. Next Row (wrong side): Working on 25 sts p 1, * k 1, p 1, repeat from * across. Next Row: K 1, * p 1, k 1, repeat from * across. Repeat these 2 rows for 2’’, ending on wrong side. Change to No. 10 ½ needles. NOTE: Follow Chart A for color pat to top of Chart, beg and ending as indicated on Chart. When Chart is completed, work with MC only. Work in St st for 4 rows.

Ta-dah, it’s the first chart! Though, you’ll probably want this part, too...

Otherwise, you might reverse the colours A and B which will lead to all sorts of ecological trouble. Birds will fly off course, bees will try to pollinate you... it’ll be complete anarchy!
Thumb (right side): K 12 sts, inc 1 st in next st, k 12 sts. Working on 26 sts, p across. Next Row: K 12 sts, inc 1 st in next 2 sts, k 12 sts. Working on 28 sts, p across. Next Row: K 12 sts, inc 1 st in next st, k 2 sts, inc 1 st in next st, k 12 sts. Working on 30 sts, p across. Next Row: K 12 sts, inc 1 st in next st, k 4, inc 1 st in next st, k 12 sts. Working on 32 sts, p across. Next Row: K 12 sts, inc 1 st in next st, k 6, inc 1 st in next st, k 12 sts. Working on 34 sts, p across. Next Row: K 12 sts, and sl them on first st holder, k next 9 sts for thumb, sl remaining 13 sts on 2nd holder, turn work and cast on 1 st (this cast-on st will be before 9 sts knitted on last row). Working on 10 sts, work in St st until piece measures 4’’ or desired length for thumb, ending with a p row. K 2 tog across next row (5 sts). P 2 tog twice (3 sts). Leaving a 10’’ strand, cut yarn. Run end through remaining sts; draw sts tog. Using same piece of yarn, sew sides of thumb tog. Join yarn at base of thumb where sts were put on 2nd holder; k across 13 sts on holder. Next Row: P across 13 sts, and with same strand of yarn p across sts from first holder. Working on 25 sts, work in St st following chart until piece measures 4 ½’’ from joining or desired length to top of little finger, ending with a p row. SHAPE TOP – Dec Row 1: K 1, sl 1 as to k, k 1, psso, work to within last 3 sts, k 2 tog, k 1. Next Row: Purl. Next Row: Bind off center st, place marker between 2 center sts. Repeat Dec Row 1, 3 times; and at same time k 2 tog before center marker, sl 1 as to k, k 1, psso after center marker 3 times (10 sts). Weave top tog. Work Left Mitten the same, beg Chart for diamond motifs with B instead of A.
As an alternative to Lopi “fur”, which tragically appears to have gone extinct, I recommend using faux fur.
FINISHING: Steam press pieces. Sew side seams tog. With MC work 1 row sc along lower edge of Cuff. Fasten off. Fur Trim: Holding Mitten with Cuff away from you, using MC, work sc in each st around bottom of ribbing for ridge. Sew fur under ridge so that fur will lay against Cuff.
However, always ensure that your faux fur comes from an ethical supplier.

This woman is presently serving jail time for disemboweling these teddies in front of several (now permanently traumatized) children.
HELMET

Beg at bottom edge with MC and No. 11 needles, cast on 104 sts. P next row. Next Row (right side): Following Chart, beg with Pat Row 1 of Chart B-1. Work from U to V on Chart B-1, * k 1, k 2 tog, k 1, work from W to X on Chart B-2, k 1, k 2 tog, k 1, work from Y to V on Chart B-1, repeat from * twice, k 1, k 2 tog, k 1, work from W to X once, k 1, k 2 tog, k 1, work from Y to Z (1 st dec in each MC section).

The second eco-friendly chart – guaranteed to be 100% organic and vegan-friendly.
Next Row: Working on 96 sts, p across following chart for motifs; and at the same time, dec 1 st in center of each MC section every other row 3 times, ending with Row 8. Rows 9 and 10: Work in pat on 72 sts. Next Row: Dec 1 st in center of each MC section every other row 3 times. Ribbing. Change to No. 9 needles. Working on 48 sts, work in k 1, p 1 ribbing for 3’’, ending on the right side. Next Row (wrong side): With MC, * p 4 sts, inc 1 st in next st, repeat from * twice, p 3, drop yarn, join another ball of MC, work next 12 sts in ribbing as established and sl them on a holder for face opening, with same strand of MC, p 3 sts, * inc 1 st in next st, p 4 sts, repeat from * twice. Left Half – Next Row: Working on 21 sts, work from WW to X on Chart B-2, then from Y to V on Chart B-1, then from W to WW, then with MC work last 3 sts (face edge). This establishes diamond design. Following Charts B-1 and B-2 for diamond motifs, work 3 sts at face edge in MC, work in pat until piece measures 8’’ above ribbing or desired length to top of back of head, ending with a wrong side row on Chart; and at the same time repeat pat rows reversing Colors when charts are completed. Keeping continuity of pat throughout, on next row bind off 7 sts. Work in pat on 14 sts for 3 rows. On next row bind off first 7 sts. Work in pat for 3 rows. Bind off last 7 sts. Right Half: Join MC at right front neck edge and k first 2 sts; work from WW to X on chart, then from Y to V, then from W to WW. This establishes diamond design. Work to correspond to Left Half, ending 1 row less than Left Half before bind-off. Work same as for Left Half.
If you’re too busy saving the world to wade through this long, indigestible chunk of text, you can always skip the knitting and just use the faux fur.
FINISHING: Steam-press lightly. Sew back and top seam, matching diamonds. Face Ribbing: With right side facing, No. 9 circular needle and MC, beg at neck edge on right half, pick up and k 1 in 3 out of every 4 rows or sts around entire face edge, making sure to have an even number of sts; then work 12 sts from holder on front ribbing as established. Join and work in ribbing for 5 rnds. Bind off loosely in ribbing. With MC work 2 rows of sc along lower edge of hood. Fasten off. Fur Trim: With right side facing, using MC, work 1 row sc around base of ribbing along row from which sts were picked up for ridge. Beg at neck on Right Half and end at neck on Left Half; do not work across 12 sts of ribbing on front. Sew fur under ridge so that fur will lay against helmet.

Because nothing says “I love all of nature’s children” like wearing the skinned carcass of a stuffed animal you killed all by yourself.

Click here for the printable pattern.


Read more!

Thursday, October 7, 2010

Time for Some Good Old Fashioned Cultural Misappropriation!

Boy’s Ski Mask from McCall’s Needlework & Crafts, Fall-Winter 1965-66

BOYS’ SKI MASK: Warm little Indian wears his feathers knitted over pipe cleaners, his war paint of duplicate stitch. Knitted nosepiece sewn on. Knitting worsted. 4-8.

Believe it or not, this ski mask is NOT a Halloween costume. And little Ronnie’s soul is NOT being crushed by the humiliation of having to wear it in public.

This was the swinging sixties, when grotesque zany ski masks were worn by every member of the family. Well, except Mom. She was too busy knitting ski masks to ever step outside. So, Ronnie’s NOT crying on the inside because he’ll be a warm little Indian on Halloween night. No, it’s because he’ll be wearing this feathered, freaky mask all winter long!

Alas, in our politically correct times, parading around as a “Red Indian” in “War Paint” is no longer acceptable. Modern historians have the pesky habit of pointing out that Native Americans are not – and have never been – red complexioned. Now, the Beothuk of Newfoundland did paint themselves with Sacred Red Ochre. However, they were a peaceful people whom European settlers massacred into extinction over fishing rights. So, dressing up pale-faced children as a cartoon version of these aboriginals would be in poor taste.

Except at Halloween, of course! Halloween is the one time of the year when whiteys can dress up as offensively as they like without fear of being sent to the dog house.


Who’s the cutest little racist? You are. Yes, you are!

For the horrifyingly complete pattern:
You may be concerned that if your little boy wears this ski mask on Halloween Night, he’ll get beat up and have all his candy stolen. Of course, he will!

But just remember, protecting your children will only turn them into wimps. Back in the 60s, Ronnie’s parents knew that a bit of physical abuse from his peers was how their little boy would grow up to become a real man.

And that’s why I’m going to buy this costume for my son.

Yep, my boy won’t be coming home with a full bag of candy this Halloween. In fact, he might not come home at all. I’ll probably find him the next morning stranded in a ditch, his legs waving helplessly in the air.
SIZE: Fits 4-8 yr. old.

MATERIALS: Boys’ Mask: Knitting worsted, 2 ozs. yellow (Y), 2 ozs. red (R), small amount black (BL). Yellow and red pipe cleaners/ Set of 10’’ dp needles No. 6. (Or English size 7.) Steel crochet hook No. 00. Tapestry needle.

GAUGE: 9 sts = 2’’; 6 rnds = 1’’ (stockinette st). See page 22, “You Must Be Sure to Check Your Gauge.”

Six pins for a 3” by 3” gauge swatch may seem like overkill, but McCall’s is actually teaching you how to use a swatch as a voodoo doll.

That’s the real reason why little Ronnie was tearing up. Every time his Mom stuck a pin into the swatch, his fake feathers stabbed his head.
MASK: With Y, loosely cast on 98 sts; divide evenly on 3 needles. Join, being careful not to twist sts. Mark end of rnd. Work in k 1, p 1 ribbing for 2 1/2’’.

First Dec Rnd: K 1, p 1 for 9 sts, * p 2 tog, k 2 tog, work in ribbing for 10 sts, repeat from * around, end p 2 tog, k 2 tog, p 1 – 84 sts. Continue in ribbing as established for 2’’.

2nd Dec Rnd: * K 5, k 2 tog, repeat from * around – 72 sts. Break off Y, join R. Work even in stockinette st (k each rnd) for 4 rnds.

Back Inc Rnd: Inc 1 st (to inc 1 st, pick up horizontal strand between st just knitted and next st, place it on left-hand needle, k 1 st in back of this strand), k to last 2 sts of rnd, inc 1 st as before, k 2 – 74 sts. K 4 rnds even, repeat back inc rnd – 76 sts.
I know what you’re thinking. “I don’t have time to knit this mask up before Halloween, I’ll just wait to next year.”

Don’t delay! The older your kids get, the harder it is to squeeze them into humiliating outfits.

Treasure these precious years when they’re still small enough that you can get away with all sorts of hilariously inappropriate and potentially unsafe costumes.

But whatever you do, don’t actually sit on the baby!
Shape Mouth: Rnd 1: K 33 sts, bind off 10 sts, k to end of rnd – 66 sts.

Rnd 2: K to bound-off sts, cast on 15 sts, mark 8th cast-on st for center st, k to end of rnd – 81 sts.

Rnd 3: K to 1 st before marked st, sl 1, k 2 tog, psso, mark last st on right-hand needle, k to end – 79 sts.

Rnd 4: Repeat back inc rnd – 81 sts.

Rnd 5: Repeat rnd 3 – 79 sts. K 1 rnd.

Rnd 7: K to marked st, sl marked st, k 1, psso, remove marker, k to end – 78 sts.

Rnd 8: Repeat back inc rnd – 80 sts.

Shape Eyes: Rnd 1: K 30 sts, bind off 20 sts, k to end – 60 sts.

Rnd 2: K to bound-off sts, cast on 20 sts, k to end – 80 sts. K 2 rnds even, repeat back inc rnd, k 4 rnds even, repeat back inc rnd – 84 sts.

Work even in R until piece measures 4 3/4’’ above ribbing when mask is measured at side of face. Break off R, join Y. Work 4 rows. Break off Y, join R. Work even in R until piece measures 6’’ above ribbing.
And if you’re the single, unemployed mother of octuplets...

At least she didn’t dress up the babies in Red Indian ski masks. That would have been offensive.
Shape Top: * Sl 1, k 1, pssp, k 10, repeat from * around. Continue to dec 7 sts every other rnd in same way having 1 st less between decs after each dec rnd 4 times more, then dec same way every rnd until 7 sts remain. Break yarn, leaving 12’’ end. Draw end through remaining sts, fasten securely on wrong side.

FINISHING: From right side, with BL, work 1 row sc around edge of mouth and eyes.

NOSE PIECE: Starting at bottom edge, cast on 6 sts. K 1 row, p 1 row. Dec 1 st each side of next row – 4 sts. P 1 row. Dec 1 st each side of next row – 2 sts. P 1 row. K 6 rows (garter st). K next row, inc 1 st each end – 4 sts. P 1 row, k 1 row. P next row, inc 1 st each side of next row – 6 sts. K 1 row, p 1 row. Bind off. Sew between eyes as pictured.

EMBROIDERY: Note: All embroidery is done in BL using duplicate st (see page 22).


Embroider a line of 8 sts 4 rows under mouth; embroider a line of 9 sts 2 rows above yellow band, centered over nose piece. Embroider “eyebrows” over eyes as pictured. Embroider “war paint” under eyes following chart.

This chart will also come in handy for the nurse stitching up your son after he goes trick-or-treating in Oka, Québec.
Steam press lightly.

FEATHERS: With R cast on 5 sts, leaving strand for sewing. K 1 row.

Pattern: Row 1: K 2 tog, yo, k 1, yo, k 2 tog.

Row 2: Purl. Repeat these 2 rows 4 times more.

Next Row: K 2 tog, k 1, k 2 tog – 3 sts. P 1 row, k 1 row, p 1 row. Next Row: K 1, yo, k 1, yo, k 1. P 1 row. Repeat rows 1 and 2 of pattern 4 times. K tog the 5 sts, end off. Run in yarn end. Thread needle with strand from cast-on edge. Run thread through cast-on sts, pull tog, fasten securely. Weave red pipe cleaner through center p st on wrong side. Make another feather same way using Y. Fold feathers in U shape. Sew on above BL line as shown.
If after all your knitting, sewing, steam pressing and feathering, your ungrateful spawn refuses to wear the ski mask, you can always pull out the big guns.

“Wear the mask, Junior, or your Dad and I will accompany you door-to-door dressed like this!”


Click here for the printable pattern.


Read more!

Wednesday, October 6, 2010

Time to Start Raking the Lawn!

Modern Needle/Craft, Fall-Winter, 1967

ON THE COVER
Jumbo Jet Knit raglan pullover and crocheted hat made of Reynolds’ Monique, Plumage and Scotch Mist yarns.

A “Scotch Mist” is a depressingly steady drizzle which accurately describes Monique’s modeling career. Just look at the desperation in her eyes!

“This is my one shot at becoming a real model. Needlecraft magazines lead to Sears catalogue gigs, and then it’s a straight shot to the cover of Vogue magazine. All I have to do is be the best darn flower I can possibly be.”

Oh yes, that crumpled up mess on her head and the crocheted over-sized cuffs are supposed to be “two-toned flowers.” Sadly, Monique’s method acting lessons haven’t done her any good. She’s not convincingly portraying a beautiful bloom so much as she’s doing an excellent impression of a pile of dead leaves.

Unfortunately for Monique, she didn’t change out of this leafy mulch sweater after the photo shoot. At lunch, its blooming sleeves knocked her food and everyone else's off the diner’s counter. Faint from hunger, Monique passed out on the way home, and met the fate that all those 1960s safety pamphlets warned us about!


That reminds me, it’s time for the kids to start raking leaves.

For the complete pattern (and more snark!):

So take a lesson from Monique’s sad tale, dear readers, and never become a model for Reynold’s yarn. After all, she’s not the only model who didn’t survive the experience.
Directions are for size 8-10. Changes for sizes 12-14 and 16-18 are in parentheses.

Materials: REYNOLDS YARNS: Basic Pullover One Combination (coral and camel): Monique, 5 (6-7) balls color No. 1706; Plumage, 4 (4-5) balls color No. 674; Scotch Mist, 3 (3-4) balls color No. 7264.
Because Camel and Coral go together so naturally. Yes, Camels are denizens of the desert, but that doesn’t stop them from loving snorkeling.
A 2nd Combination (blue and camel): Monique, 5 (6-7) balls color No. 1706; Plumage, 4 (4-5) balls color No. 631; Scotch Mist, 3 (3-4) balls color No. 7268.
Although if you’re wondering why your Camel is now combined with Blue, it may be because it drowned while snorkeling in a coral reef. Still, fear of aquatic misadventure is no reason to stop taking your Camels to the beach.

Caution: Camels can attract cads and bounders. However, as long as everyone’s swimsuit stays belted, your reputation as a good girl will be safe.
Flower Trim: Same combination as basic pullover, using on Monique, 4 (6-6) balls and Scotch Mist, 3 (5-5) balls. Hat: Same combination as basic pullover (All Sizes), using only Monique, 6 balls and Scotch Mist, 6 balls. Knitting Needles: REYNOLDS Jumbo Jets, 1 pair. Crochet Hooks: REYNOLDS Junior Jet wooden crochet hook; Aluminum hook Size J.

Gauge: 6 sts = 5’’; 3 rows = 2’’ (pullover).

Note: Before starting your sweater with Jumbo Jets, read the following carefully.

1. Use only Reynolds yarns in the color combinations and textures indicated in the instructions. NO SUBSTITUTIONS. These combinations have been carefully designed for fit, color and weight.
Reynolds doesn’t make these particular yarns any more. So feel free to write to the company and demand substitutions! The Reynolds brand is presently owned by JCA Inc., who exhort us to “Keep checking our site for weekly updates!” even though their last update was in December of 2009.
2. It is important to make a sample swatch (i.e. casting on at least 10 stitches, working in stockinette st for 6’’) using the combination of yarns for your particular garment. This is to help you get the “feel” of your new Jumbo Jets. This will also serve as a gauge.
That’s right, never use your Jumbo Jet needles twice. After each project, place them in the closest Hazardous Waste Disposal Bin.

Of course, it goes without saying that you should never share Jumbo Jet needles.
3. Always cast on stitches snugly and evenly.
As opposed to loosely and erratically. That’s right, Reynolds knows what kind of knitter you are!
4. Work the first and last stitch of every row tightly, especially when working 2 tog, as for raglan decreases. This produces a firm edge for finishing.

5. DO NOT deviate from instructions.
Or Reynolds will MESS YOU UP!
6. NEVER stop in the middle of a row.
I don’t care if your dog is feasting on the kitchen garbage, your husband is flirting with the next door neighbour, and your children are hiding in leaf piles on the road. NEVER stop in the middle of a row!
7. ALWAYS join new yarns at edge of garment (NEVER in the middle of a row – as this causes bulky sewing in of ends).

8. Bind off firmly with medium tension – NEVER bind off tightly.
Do you hear me? NEVER!
9. NO STEAMING OR PRESSING ever on Jumbo Jet Instant Fashions!
Reynolds will not be responsible for the mind-bending consequences of illicit STEAMING OR PRESSING.

10. Do not wind your 3 colors into one large ball. Keep all skeins separate. Stretch out 2 or 3 yards at a time of the combination and work with this – repeating this procedure as work progresses.
You’ll need to give away any pets or children before attempting this pattern. Husbands are optional, depending on whether or not they can be trained to stay out of the living room while you’re stretching yards of yarn across the floor.
11. Always fold jumbo knits for storage (or any knitted garment) No not Hang or stretching will result.
Reynolds, in despair over the steam-pressing, instruction-ignoring, loose-knitting Jumbo Jet knitters, has resorted to using simpler language. “No, not Hang! Not HANG! You’re stretching it, you imbecile!”

SIZING NOTE

If your knitting is tighter than gauge given for garment you wish to make, MOVE UP one sweater size.
If your knitting is looser than gauge in directions, MOVE DOWN one sweater size.
To sum up – in other knitting you change the size of the needles. With Jumbo Jets you change the size of the sweater.
Knitting with Jumbo Jets is unlike any knitting you may have done before. For example: for a medium size sweater, you cast on 20 stitches for the bottom. For the first 8 or 10 rows, it looks as if the body is only wide enough to be a sleeve. DO NOT CAST ON MORE STITCHES OR CHANGE TO A LARGER SIZE. After knitting 20 rows, you will see that the garment eases out and will fit perfectly, providing your gauge is correct.
Ironically, while the body looks “only wide enough to be a sleeve,” the sleeves are more than large enough to hide several bodies.
FINISHING

Finishing? But we haven’t gotten to the actual pattern yet!
Basic Pullover worked with 3 strands held together (Monique, Plumage and Scotch Mist). Flower Trim worked with 2 strands (Monique and Scotch Mist); some worked with 2 strands of Scotch Mist.
Yes... Finishing!


PULLOVER
Yes, we’ve finally arrived at the actual pattern. Presumably, Reynolds will stop berating us now.
Back: With Reynolds Jumbo Jet knitting needles and 1 strand of each yarn, cast on evenly 18 (20-22) sts. K 1 row in back loop of each st. Beg with a p row, work in stockinette st for 17 (18-18)’’ or desired length to underarms.

Important, keep track of rows worked.
This isn’t berating. It’s just very important to keep track of your rows.
Raglan Armholes: Bind off 2 sts at beg of next 2 rows. Dec 1 st each end every 3rd row 3 (4-4) times – 8 (8-10) sts. Bind off, working 2 sts tog each end of row.

Front: Work same as back, being sure to make same number of rows to underarm.

Sleeves: With Reynolds Jumbo Jet needles and 1 strand of each yarn, cast on 18 (20-22) sts. Row 1: K in back loop of each st. Rows 2 through 24 (25-26): Beg with a p row, work in stockinette st and dec 1 st each side on rows 11,. 19 and 24 (25-25) – 12 (14-16) sts. Keep track of rows worked.
It’s SO important, we’ll tell you again.
Raglan Shaping: Work same as raglan shaping of back – 2 (2-4) sts. Bind off.

Finishing: DO NOT STEAM OR BLOCK PULLOVER.
Or the fumes from the steamed yarn will cause hallucinations that you married Santa Claus.

Hang on, since when is Mrs. Claus forty years younger than her husband? Dear God, did Santa divorce his long-suffering wife only to take up with a teenaged trollop?

Watch out, Missy. You’ll never keep your figure ironing while sitting down and then he’ll toss you over for a new model.
With split length of Monique and back and front pieces of pullover inside out, weave side seams from “bump to bump” with loose tension. Weave sleeve seams. Weave in sleeves to front and back in same manner. Turn pullover to right side. Weave all seams together again with zigzag stitch, catching edge on either side of seams and drawing together evenly (seams almost disappear). With Size J hook and 1 strand of each yarn, work 1 row sc around neck edge. Weave in all ends separately on wrong side, never in bunches.

Flower Trim: Solid Color Flower, make 6 (8-8). With Reynolds Junior Ket hook and 2 strands Scotch Mist, ch 5 loosely. Join with sl st to form ring. Rnd 1: Ch 1. 8 sc in ring. Join tightly with sl st in starting ch-1. Rnd 2: Ch 12, sl st in first sc (loop made), ch 12, sl st in same sc, * ch 12, sl st in next sc, ch 12, sl st in same sc; repeat from * around – 16 loops. Join rnd, fasten off. Run in ends separately on wrong side.
As shouting instructions at hapless Jumbo Jet knitters hasn’t worked, Reynold’s now randomly bolding words in a desperate attempt to brainwash you.
Two Toned Flower: Make 6 (8-8). Work same as solid color flower, using 1 strand each of Scotch Mist and Monique and making ch 10 loops (instead of ch 12 loops) on rnd 2. Sew 3 (4-4) solid color flowers (sewing around centers with matching yarn) at equal intervals around each sleeve about 2’’ from lower edge. Sew 3 (4-4) two tone flowers between solid flowers on each sleeve.
Flowers, dead leaves, it doesn’t matter what they really look like. The important thing is that you’re almost done. All that’s left now is the matching hat.

What’s that? Of course, you need the hat! Everyone knows a woman cannot be stylish without a heaping pile of dead flowers and leaves on top of her head.


HAT

Starting at center back of hat with Reynolds Junior Jet hook and 1 strand Monique, ch 5 loosely. Join tightly with sl st to form ring. Rnd 1: Ch 1. 11 sc in ring. Join tightly with sl st in starting ch-1. Row 2: * Ch 5, sl st in next sc, repeat from * 6 times (leaving last 4 sc free for lower back edge) – 7 loops. Turn. Rows 3-6: * Ch 5, sl st in next loop, repeat from * across – 7 loops. Turn. Fasten off yarn at end of row 6. Put a marker on work each end of row 6 (Edges of these rows are lower edge of hat). Turn. Row 7: Join Monique in 2nd loop of last row, * ch 6, sl st in next loop, repeat from * 4 times – 5 loops. Turn. Row 8: Ch 1. Sl st in first 3 ch of first loop, * ch 6, sl st in next loop, repeat from * 3 times – 4 loops. Turn. Row 9: Repeat row 8, making 3 loops in all. End off.

Ties: With Reynolds Junior Jet hook and 1 strand each of Scotch Mist and Monique, make a 16’’ chain. Do not end off. Join this chain with sc at one marker on hat. Work sc evenly along lower edge of hat to next marker (row should measure about 12’’); make a 16’’ chain at end of row for other tie. Fasten off. Beg and ending where ties were joined, with jet hook and 1 strand each of Scotch Mist and Monique, work 1 row sc across front edge to measure about 15’’ or for desired fit around face edge.
The random bolding here is to make you sit up and pay attention. Reynolds doesn’t want you getting too comfortable. Otherwise you might relax and start knitting loosely.
Flower Trim: Make 12 solid color flowers and 10 two toned flowers. Sew 1 solid color flower at joining of each tie; one at center back edge over ring; one at center top front edge and one ½ way up each side of front. Sew one two toned flower between each solid color flower. Fill in hat with balance of flowers, tacking each flower to sc of loop sts.
Because we all know what happens to loose-knitting women!

These women definitely shared their Jumbo Jet needles.

Click here for the printable pattern.


Read more!

Tuesday, September 14, 2010

Fun is in the eye of the beholder.


Poodle Set from McCall’s Needlework Fall-Winter, 1952-53

To properly celebrate PoodleFest, it’s not enough to cover your toilet rolls and hair spray with poodles. You need to turn your children into poodles, too.

As McCall’s helpfully points out, “What makes it fun is – her crocheted hat has poodle ears, her scarf, poodle legs, and a poodle muff cuddles her pinkies.”

Yes, wearing the dismembered body parts of your favorite pet is what makes it fun!

But wait, someone in the photo is clearly not having fun.


In fact, her poodle pal looks downright depressed.

If he doesn’t turn that frown upside down pronto, he’s going to find himself turned into a cap, scarf and muff set. Just like the last poodle who failed to live up to his billing as “funniest thing”.

For the complete pattern (and more snark!):

FRENCH POODLE

Size: 9’’ x 12’’.
Materials: Columbia Knitting Worsted, 6 1 oz balls brown. Small amount of black for mouth; strand of white for teeth. Cotton for stuffing. 1 pair of glass eyes No. 14 (or 2 buttons). “Boye” steel crochet hook No. 1.
Gauge: 6 s c = 1’’; 6 rows of s c = 1’’.
Take note – you have the option of using buttons instead of glass eyes. Don’t get all giddy with your newfound sense of freedom, though. This poodle only comes in one colour – brown.

If you make it black or white, your poodle will no longer be the “funniest thing”. Instead, the poodle will be a symbol of your profound failure as a Mother.

Pink is right out.


Body: Starting at back, ch 6, join in ring with sl st.
Row 1: 8 s c in ring.
Row 2: 2 s c in each st (16 sts).
Row 3: * 2 s c in first st, 1 s c in next st, repeat from * around (24 sts).
Row 4: Same as row 3 (36 sts).
Row 5: 2 s c in every 9th st (40 sts). Work even for 30 rows. Break off yarn. Turn inside out.

Tail: Ch 6, join in ring with sl st.
Row 1: Work 8 1’’ lps in ring as follows: * With strand over first finger of left hand (1’’ from work), insert hook in ring, draw strand through ring from under the finger, then yarn over hook and through the 2 loops on hook (finishing 1 s c), repeat from * 7 times more (draw lps up to make sure they are 1’’ long and even). Continue to work around.
Row 2: 2 lps in each st (16 lps). Work 1 lp in each st around for 2 rows, then work 1 s c in each st for 9 rows.
Row 14: Work 7 s c, ch 1, turn.
Row 15: Skip 1 st, work 6 s c, ch 1, turn.
Row 16: Skip 1 st, 5 s c, ch 1, turn.
Row 17: Skip 1 st, 4 s c, break off yarn.

Stuff Tail and Body: Sew tail to body, having last row of tail at center back of body.
Just make sure to orient your poodle’s tail up, like in the McCall’s photo. You want a happy poodle, not a clinically depressed poodle who might suddenly turn around and chew on a former head of state.
Head: Starting at top, ch 8, join in ring with sl st.
Row 1: Work 10 lps in ring (as in tail).
Row 2: 2 lps in each st (20 lps).
Row 3: 2 lps in each st (40 lps).
Rows 4 and 5: 1 lp in each st.
Row 6: 1 s c in each st, increasing 6 sts around (46 sts).
Rows 7 to 9: 1 s c in each st.
Row 10 (Start face): 1 s c in each of 23 sts, ch 18 for chin and fasten with s c in first st, then work around for face as follows:
Row 1 (continue on wrong side): 1 s c in each of 4 sts, fasten eye in next st, or place marker for button, 1 s c in each of 11 sts, fasten eye in next st, 1 s c in each of 5 sts, 1 s c in each of the 18 ch (41 sts around).
Row 2: Sk 1 st, 21 s c, sk 1 st, 18 s c; 39 sts.
Row 3: Sk 1, 20 s c, sk 1, 17 s c, 37 sts.
Row 4: Sk 1, 19 s c, sk 1, 16 s c, 35 sts.
Row 5: Sk 1, 18 s c, sk 1, 15 s c, 33 sts.
Row 6: Sk 1, 17 s c, sk 1, 14 s c, 31 sts.
Row 7: Sk 1, 16 s c, sk 1, 13 s c, 29 sts.
Row 8: Sk 1, 15 s c, sk 1, 12 s c, 27 sts.
Row 9: Sk 1, 14 s c, sk 1, 11 s c, 25 sts.
Row 10: Sk 1, 13 s c, sk 1, 3 s c, work 2 lps in each of 2 sts, 1 s c at center, 2 lps in each of 2 sts, 2 s c.
Row 11: Sk 1 st, 12 s c, sk 1 st, 2 s c, 4 lps over 4 lps, 1 s c, 4 lps over 4 lps, 2 s c.
Row 12: * Sk 1 st, 1 s c in each of 2 sts, repeat from * around, break off yarn.
With black yarn, work 2 rows of s c around, break off yarn, close mouth with a few sts.
Of course, some poodles have legitimate reasons for being both depressed and homicidal.


Continuing on wrong side, join brown yarn at neck edge and work 24 s c across back of head, and 20 s c across ch (44 sts). Continue to work around, skipping 1 st each side on each of the next 6 rows (32 sts remaining). Work even for 10 rows, then work across front only as follows:
Row 1: Ch 1, turn, sk 1 st, work 14 s c, ch 1, turn.
Row 2: Sk 1 st, 13 s c, ch 1, turn.
Row 3: Sk 1 st, 12 s c, ch 1, turn. Work 4 more rows in this manner, break off yarn. With white, work 4 long sts for teeth below black nose. Cut lps at chin.
My, what sharp teeth you have, Grandma... I mean Mr. Poodle!
Stuff head firmly, shaping face. Sew body to edge of neck.

Paws and Legs (Make 4 legs the same for 8 lp rows): Starting at sole, ch 4, join in ring with a sl st.
Row 1: 6 s c in ring.
Row 2: 2 s c in each st (12 sts).
Row 3: 2 s c in each st (24 sts).
Row 4: 1 s c in each st (24 sts).
Row 5: 5 s c, 2 s c in each of 7 sts, 12 s c (31 sts).
Row 6: 8 s c, sk 1 st, 1 s c, sk 1 st, 2 s c in each of 3 sts, sk 1 st, 1 s c, sk 1 st, 14 s c (30 sts).
Row 7: 8 s c, sk 1, 3 s c, sk 1, 3 s c, sk 1, 3 s c, sk 1, 9 s c (26 sts).
Row 8: 8 s c, sk 1, 3 s c, sk 1, 3 s c, sk 1, 9 s c (23 sts).
Row 9: 8 s c, sk 1, 4 s c, sk 1, 9 s c (21 sts).
Row 10: 10 s c, sk 2, 9 s c (19 sts).
Row 11: 19 s c (ending row at center back of heel).
Row 12: 1 lp in each st (19 lps). Repeat rows 11 and 12, seven times more (8 lp rows).
Repeat row 11, then work top of legs as follows:
Poodles of the world unite! You have nothing to lose but your leashes!

And your incredibly silly hair cuts...


Right front and right back legs:
Row 1: Work 1 lp in each of 9 sts, ch 1, turn.
Row 2: 1 s c in each of 11 sts, ch 1, turn.
Row 3: 11 lps, ch 1, turn.
Row 4: 2 s c in first st, 1 s c in each of 9 sts, 2 s c in last st, ch 1, turn.
Row 5: 13 lps, ch 1, turn.
Row 6: 13 s c, break off yarn, leaving enough length to sew leg to body.

Left front and left back legs (Starting at center back): Row 1: Sl st across 10 sts, 9 lps to end of row, ch 1, turn.
Row 2: 11 s c, ch 1, turn.
Row 3: 11 lps, ch 1, turn.
Row 4: 2 s c in first st, 9 s c, 2 s c in last st, ch 1, turn.
Row 5: 13 lps, ch 1, turn.
Row 6: 13 s c, break off yarn.
Place cardboard shapes in paws, then stuff legs. Sew legs to body, paws facing front. Complete poodle by making the ears as follows:

Ears (Make 2): Ch 15, turn.
Row 1: Sk 2 ch, 13 s c, ch 2, turn.
Row 2: 1 lp in each st, ch 2, turn.
Row 3: 13 s c, ch 2, turn. Repeat rows 2 and 3 three times more, then repeat row 3 for 8 rows.
Row 18: Sk every other st, break off yarn.
Sew ears to head close to last lp row on top of head.

Leash: Use heavy cotton yarn. Cut 9 28’’ strands. Divide in 3, knot one end, braid. Knot other end. Tack one end back for 5’’ handle. For collar, cut 24 9’’ strands. Divide, braid. Sew ends and attach leash.

“POODLE” CAP, SCARF, MUFF

Materials: Knitting Worsted, 6 oz. red.
Red? Since when do poodles, or even “poodles,” come in red? Brown, black, white, even pink, sure! But never red!

Well... except for this poodle.

But why would you want your daughter to look like the day-glo spawn of Carmen Miranda and a Russian folk dancer?
“Boye” non-inflammable 5 ¾’’ crochet hook, Letter “F.” ½ yd. ¼’’ elastic.
Interesting historical tidbit: the words inflammable and flammable, both mean “this item burns like bejeezus and might spontaneously combust if you look at it sideways”, but come from entirely different Latin roots. Today flammable is the preferred term, because English speakers look at the prefix “in” and assume incorrectly (see how INcorrect is the opposite of correct?) that inflammable actually means “safe as houses, feel free to dress your children in it and allow them to play with matches”.

Unfortunately, none of this answers the real question of why our crochet hooks must be fireproof in order to safely complete this pattern.
Gauge: 4 s c = 1’’.
Knot Stitch: † * Draw up a ¾’’ lp on hook, yo and through lp, insert hook under thread at left of lp and work 1 s c, repeat from * once, s c in next ridge st, repeat from † across.

Poodle Trimming: Row 1: Attach yarn to first ridge st of first ridge row, work knot st across row. Row 2: Ch 1, work 1 knot st (turning knot st), s c in first ridge st of next row and work knot st across. Repeat row 2 for remainder of trimming.

CAP: Starting at center of head, ch 22.
Row 1: S c in 2nd ch from hook, and in each ch across (21 s c), ch 1, turn. Work s c in back lp of each s c (slipper st) and work even until piece measures desired length to top of ear, ch 1, turn.
Ear Muff: Dec 1 s c each side every row until 1 st remains. End off. Attach yarn to first st of starting ch, work 21 s c across, ch 1, turn. Finish same as first side. Work poodle trimming over each ear muff. Work 1 row knot st around edge of each ear muff.
Ties: Make six 30’’ chs; braid 3 chs tog for each tie. Knot one end, attach other end to tip of each ear muff.
Maybe the hooks need to be “non-inflammable” because of the extreme sport of speed crocheting. I sure wouldn’t be surprised to see scorch marks on Lisa Gentry’s hooks!


SCARF: Ch 11. S c in 2nd ch from hook, and in each ch across (10 s c), ch 1, turn. Work slipper st for 3’’, ch 1, turn. Dec row: * Draw up a lp in each of 2 s c, yo and through all lps on hook, repeat from * across (5 s c). Work even for 1 ½’’, ch 1, turn. Work 2 s c in each s c across (10 s c), ch 1, turn.
Neck Piece: Work slipper st until neck piece measures 12 ½’’ or desired length around neck. Repeat dec row (5 sts remain), ch 1, turn.
Slit: Work slipper st for 2’’. End off. Attach yarn to first row of slit and work another piece across same 5 sts for 2’’, do not end off.
Join Slit Section: * S c in first s c of first piece, s c in first s c of 2nd piece, repeat from * across (10 s c), ch 1, turn. Work slipper st for 3’’. End off. Work poodle trimming over first and last 3’’ of scarf.

MUFF: Ch 26. Row 1: S c in 2nd ch from hook and in each ch across (25 s c), ch 1, turn. Work slipper st for 12’’ or desired length. End off. Work poodle trimming over entire piece. Sl st tog first and last row of muff. Work 4 rows s c around side openings (facings). Turn under and hem facings. Insert elastic in facings, cut to wrist measurement.
Handle: Make one tie as for cap, fold in half and sew in place.
There! Your child is now securely encased in bright red “Poodle” wear, with Prozac the Clinically Depressed Poodle to keep her company. You are officially a Good Mother.

But don’t rest on your laurels, even if they’re inflammable! There’s more poodles to come...

Click here for the printable pattern.


Read more!

Wednesday, March 24, 2010

Don’t panic!

Mittens and hat patterns from “at the drop of a hat” by Lady Galt, 1968

Because there’s absolutely nothing terrifying about these guillotined gals.

After all, it’s not like these decapitated mannequins are going to come to life and wreak vengeance upon us for incinerating their relations at nuclear test sites.


I’m sure they’re willing to let bygones be bygones. Why just look at their blood red smiles of homicidal happiness...

Oh dear.

For the complete pattern (and more terror!):


Basic Two-Needle Mitts
Childrens size (fits ages 6 to 10). Adult size (fits all adults).

I’m not convinced by the claim that the adult size fits all adults. That purple mitten looks like it barely fits over Mother Mary’s wrists. So, there’s no way they would’ve fit Super Sandy.


MATERIAL: Lady Galt machine launderable Medallion (Group E) (1 strand) – Children: 1 ball; Adult 2 balls.
1 pair needles size 8 (for ribbing); 1 pair needles size 6, OR THE SIZE NEEDLES YOU REQUIRE TO KNIT TO THE TENSION GIVEN BELOW.

TENSION: 3 ½ sts = 1 inch in Stockinette Stitch.

NOTE: Instructions are for Childrens Mitts. Changes for adults are in parentheses. As the finished size of garment is determined by the tension you achieve, be sure to check your tension carefully before beginning to knit.
What do you mean, where are the mannequin head hats? Just let me start out slowly with the mittens. Nice, safe, non-homicidal mittens.
RIGHT MITT: With smaller needles cast on 24 (28) sts. Work in rib of k 1, p 1 for 1 ½ (2 ½) inches. Change to larger needles and work even in stockinette for 1 ½ (2) inches, ending with a knit row. Thumb: Purl first 19 (22) sts and place on a holder, purl to end of row and cast on 4 (6) sts. Work even in stockinette on these 9 (12) thumb sts for 1 ½ (2) inches or ½ inch less than desired length, ending with a purl row. First Dec Row: * K 1, k 2 tog; repeat from * to end. Purl one row. 2nd Dec Row: K 2 tog across row. Break yarn, leaving a 10-inch end, draw through remaining sts, fasten securely and sew thumb seam. Place sts from holder on needle, pick up 5 (6) sts at base of thumb. Work even in stockinette as before for 3 (4 ¼) inches, or 1 inch less than desired length. Shape Top: First Dec Row: * K 2, k 2 tog; repeat from * to end. Purl 1 row. 2nd Dec Row: * K 1, k 2 tog; repeat from * to end. Purl 1 row. 3rd Dec Row: K 2 tog across row. Purl 1 row. Break yarn, leaving an 18’’ end. Draw through remaining sts, fasten securely and sew seam. Darn in ends. DO NOT BLOCK.

LEFT MITT: Work to correspond with Right Mitt reversing all shaping by beginning first row after cuff with a purl row and casting on for thumb on a knit row.
Oh, all right, I’ll pander to your obsession with mannequin millinery.

Here. Look upon the pony-tailed face of doom!


Fashionscene
(One size fits all adults)

I’m fairly certain wearing a flower pot upended on your head was never the “fashion scene” at any point in history.
MATERIAL: 3 balls Lady Galt machine launderable Medallion (Group E) (3 strands).
1 pair 3/4 inch jumbo needles.

TENSION: 1 ½ sts = 1 inch.

BODY OF HAT: Cast on 12 sts. Work in Stockinette Stitch (knitting in back of knit sts) for 20 ins. Cast off.
Besides, if you’re going to wear a flowerpot as a hat, you’ve got to do it to the max.


Top: With right side toward you, pick up and knit 36 sts along one side of strip. Continue to work in stockinette, work 2 sts tog across row for next 3 rows, ending k 1 on last row. Break yarn, leaving a 25 inch end, draw through remaining sts and fasten securely.

FINISHING: Sew seam. DO NOT BLOCK.


Militaire
(One size fits all adults)

Frankly, Fashionscene Gal doesn’t worry me half as much as Miss Militaire. That itchy rope under her chin is keeping her in a constant killing rage.
MATERIAL: Lady Galt machine launderable Medallion (Group E) (3 strands).
Colour A: 2 balls. Colour B: 2 balls. Colour C: 1 ball. 1 pair 3/4 inch jumbo needles. 2 buttons.

TENSION: 2 sts = 1 inch.

PATTERN STITCH: Row 1: * Knit in 2nd st on left needle, slipping off needle over first st, k first st; repeat from * to end. Row 2: P 1, * purl in 2nd st on left needle, slipping off needle over first st, p first st; repeat from * to last st, p 1.

BODY OF HAT: With one strand each of Colours A, B, and C cast on 14 sts. Work in Pattern Stitch for 22 ins. Cast off.
Just be thankful she’s only a disembodied head. Everyone knows once a villain has been beheaded, they’re totally harmless!

Well, mostly harmless.
Top: With Colour A and right side toward you, pick up and knit 22 sts along one side of strip. Working in Reverse Stockinette (purl on right side, knit on wrong side) and starting with a knit row, work one row even. First Dec Row: P 1, * p 2 tog, p 1; repeat from * to end. Knit 1 row even. 2nd Dec Row: P 2 tog to last 3 sts, p 3 tog. Break yarn, leaving a 25 inch end, draw through remaining sts and fasten securely.

Peak: With Colour A and right side toward you, pick up and knit 16 sts in centre of opposite edge of hat. Working in Reverse Stockinette starting with a knit row, dec 1 st each end, every row until 8 sts remain. Place on holder.

FINISHING: Across outer edge of peak pick up and cast off 16 sts (including those on holder). Sew seam. For a firmer peak run a length of millinery wire around the outer edge of peak. Make a twisted or braided cord 28 inches long. Trim hat as illustrated, placing buttons on sides of hat at ends of peak. DO NOT BLOCK.
Hear that? DO NOT BLOCK! Or else Miss Militaire will command her army of headless robots to hunt you down and fling you into a fiery pit.

Or your majorette friends will mock you.

Either way, you’ll pay dearly for your disobedience.

Click here for the printable pattern.

Read more!

Friday, March 12, 2010

It’s a two-in-one post for a two-in-one Jaunty cap!


Here is thirteen year old Jamie modeling his Handmade-by-his-own-Mother Jaunty cap, in a take-no-prisoners shade of emergency orange. I think he’s got a certain Harry Callahan air about him. “Do ya feel jaunty? Well, do ya, punk?”

Faithful readers may be wondering if they’ve missed the jaunty post for this DIY. However fear not, the pattern for this sixties stocking cap hasn’t been mocked...yet!

But thanks to Jamie’s talented and generous mother, Lisa, we can all make Jaunty caps of our own.

Read on for the complete pattern (and more commentary from the peanut gallery!):


Jaunty Cap pattern from Beehive Family Headwear & Scarves, c. 1965
Though I’ve been calling this a Jaunty cap, technically it’s also a Jaunty scarf. This space age Sixties design makes it possible to simultaneously wear it on your head and wrap it around your neck.

Which is why this Beehive pattern is simply named...
Jaunty

MATERIALS: Patons Canadiana Superwash Wool or Patons Candiana Sayelle (50 g): 3 balls main colour 8. 2 balls contrasting colour A. Two 3 14 mm (No. 10) and two 4 mm (No. 8) Milward knitting needles or whichever needles you require to produce the tension given below.

TENSION: 5 1/4 sts and 6 1/2 rows – 1 inch (2.5 cm) with 4 mm (No. 8) needles in stocking st.

SIZE: To fit 21-22 inch (53-56 cm) head size.
The pattern designer wants you to believe that wrapping this long, winding hat around your neck will prevent you from getting a sore throat. However, if you’re not careful, you could end up with a permanent sore throat à la Isadora Duncan.
Beginning at cuff with B and 3 1/4 mm (No. 10) needles, cast on 108 sts.
Work 6 ins (15 cm) in (K2, P2) ribbing. Break B.

Note: Hat is worked in alternating stripes of 4 ins (10 cm) colour A and 4 ins (10 cm) colour B, joining and breaking colours as required.

Change to 4 mm (No. 8) needles and work 2 1/2 ins (6 cm) stocking st ending with purl row.
Of course, tough guys laugh in the face of danger!


1st decreasing row: (K16. K2tog) 6 times. Work 7 rows even.
2nd decreasing row: (K2tog. K15) 6 times. Work 7 rows even.
3rd decreasing row: (K14. K2tog) 6 times. Work 7 rows even. (90 sts on needle).
4th decreasing row: (K2tog. K7) 10 times. Work 7 rows even.
5th decreasing row: (K6. K2tog) 10 times. Work 9 rows even.
6th decreasing row: (K2tog. K5) 10 times. (60 sts on needle). Work 19 rows even.
Lisa also knitted another version of this cap for a friend of hers using the original stripe pattern. I really like how she substituted a tassel for the pompon with both hats.

She wrote, “How great would it look if you were to put an edging on it along the seam to make it look like a dinosaur's tail ... hmmm ... Lots of ways to make this one look unique!”
7th decreasing row: (K2tog. K10) 5 times. Work 19 rows even.
8th decreasing row: (K9. K2tog) 5 times. Work 19 rows even.
9th decreasing row: (K2tog. K8) 5 times. Work 19 rows even.
10th decreasing row: (K7. K2tog) 5 times. Work 19 rows even.
11th decreasing row: (K2tog. K6) 5 times. Work 19 rows even.
12th decreasing row: (K5. K2tog) 5 times. Work 19 rows even.
13th decreasing row: (K2tog. K4) 5 times. Work 19 rows even.
14th decreasing row: (K3. K2tog) 5 times. (20 sts on needle). Work 9 rows even.
I agree! For instance, if you happen to know a tough guy who’s also a Harry Potter fan, you can always knit a striped hat in his Hogwarts house colours.

For the record: Gryffindor is red and gold, Slytherin is green and silver, Hufflepuff is black and yellow, and Ravenclaw is blue and bronze.
Proceed:–
1st row: (K2tog. K2) 5 times. Work 9 rows even.
11th row: (K1. K2tog) 5 times. Work 9 rows even.
21st row: (K2tog) 5 times. Break yarn. Thread end through remaining sts. Draw up and fasten securely. Sew back seam. Make pompon as given on page 6. Sew to point of hat.
Yes, I know the movies depicted Ravenclaw colours as blue and silver. The movieverse is wrong, okay? Only the books are CANON!
Pompon

Wind yarn around 3 fingers approx. 75 times, depending on desired thickness of pompon. Remove fingers and tie yarn tightly in centre. Cut through each side of loops. Trim to a smooth round shape.
Ahem. When you’re done making a totally-not-geeky Harry Potter stocking cap (with or without pompon!) for yourself, you can also make one for your jaunty cat.

Trust me, that’s gratitude in his eyes.
Click here for the printable pattern.


Read more!