Showing posts with label crochet patterns. Show all posts

Wednesday, April 18, 2012

Back to the Future

Tabby Tabard Pattern from Tabards, designs by Carole Rutter, Leisure Arts, Leaflet 94, 1977

Tabards were originally cloths worn by medieval knights over their armour, in a desperate attempt to differentiate one chainmail-encased man from another.


This knight’s tabard is giving him the bravery to fight on despite being cut off at the knees. Methinks he’s a relative of the Black Knight.

In any case, modern tabards are almost exclusively worn by professional cleaning staff.


Don’t be deceived by her mild mannered appearance. She could easily take out that stubby-legged knight. Just look at her smile. She’ll mop the floor with him!

However, between our distant, somewhat height-challenged past, and our terrifyingly clean dystopian present, there were the Sixties and Seventies. When, for one brief moment, we dared dream of a bright, shining future when absolutely everyone would wear tabards.


Even for the manliest of villains, tabards are the perfect sparkly accessory for the annual tribble hunt!

To make your own sexy, warrior tabard:

This woman and child are either space colonists or members of an oppressive cult. Or both!
TABBY

Size: See General Instructions

Note that this particular space cult allowed its members to use “personal preference” in placement of the ties. That’s why it didn’t survive past the Seventies. Allow cultists to make any decisions for themselves, and it’s only a matter of time before they decide to place the ties around the Supreme Alien Leader’s neck.
Materials: Worsted wt yarn, (6-8-10) [14-16-18] oz gold, (1-1-1) [2-2-2] oz each copper, dk brown and med brown heather; aluminum crochet hook sizes E and J (Canadian sizes 9 and 3) or sizes needed for gauge.

Gauge: With larger hook, in patt, 10 sts = 3’’; 7 rows = 2’’

Pattern Stitch
Row 1: Sc in first sc, * ch 1, sk next st, sc in next st; rep from * across; ch 1, turn. Row 2: Sc in first sc, * dc in skipped st 2 rows below, sc in next st; rep from * across; ch 1, turn. Rep Rows 1 and 2 for patt.

INSTRUCTIONS
Back : With larger hook and gold, ch (30-38-42) [48-54-62].
Foundation Row: Sc in 2nd ch from hook, * ch 1, sk next ch, sc in next ch; rep from * across; ch 1, turn. Next Row: (Mark this side as right side of work.) Sc in first sc, * dc in skipped ch of foundation ch, sc in next sc; rep from * across; ch 1, turn. Now work Patt Rows 1 and 2 until you have completed (3-5-5) [9-9-9] rows in gold, ending by working Row 1. Now work established patt in the following color sequence:

However, if you’re fortunate enough to escape the clutch of space cults obsessed with earth tones, this tabard will still be useful if you accidentally become Lost in Space.

Sure, you’ll have to put up with your annoyingly nice parents, your obnoxious siblings, an anxiety-ridden robot and a drippy old dude trying to take over the world. But at least you’ll be able to moon over the handsome Space Corps Major while rocking your groovy geometric tabard!

And let’s face facts, when it comes to the future, there’s a lot worse things that can happen to you than having to wear a tabard.


You have worked a total of (36-48-62) [86-90-100] rows. Neck and Shoulder Shaping: Continuing in patt with gold, work across (3-5-5-) [7-9-11] sts for 2 more rows; finish off. Skip center (23-27-31) [33-35-39] sts for neck opening. Join gold with a sl st in next st; beg in same st as joining and work in patt across rem sts for 2 rows; finish off. Front: Work same as back until you have completed a total of (34-44-58) [80-84-94] rows. Neck and Shoulder Shaping: Continuing in patt with gold, work across (3-5-5) [7-9-11] sts for (4-6-6) [8-8-8] rows; finish off. Skip center (23-27-31) [33-35-39] sts for neck opening. Join gold with a sl st in next st; beg in same st as joining and work in patt across rem sts for (4-6-6) [8-8-8] rows; finish off.

Finishing: Sew shoulder seams. Edging: With right side facing and smaller hook, join gold with a sl st in any st at outside edge of tabard, ch 1, work 1 rnd in sc around entire edge, working 3 sc in each of 4 corners, join with a sl st in beg ch-1; finish off. With right side facing and larger hook, join gold with a sl st in any st at neck edge, ch 1, work 1 rnd of sc loosely around neck edge, join with a sl st in beg ch-1; finish off.
Worse things like having your home planets destroyed by terrifying automatons, then being forced to join a rag-tag fleet, fleeing oppression and poor ratings across the stars. But you can happily survive it all so long as you’re wearing a stylish tabard.


Ties: With smaller hook, make 2 ties with copper and 2 ties with med brown heather; see General Instructions.
So crochet yourself a Tabby Tabard, and this simple medieval garb will ensure you’ll be gleefully fashionable wherever or whenever you travel in space and time.

Except the Eighties…


Click here for the printable pattern.


Read more!

Monday, January 30, 2012

Crochet is the Opium of the Masses

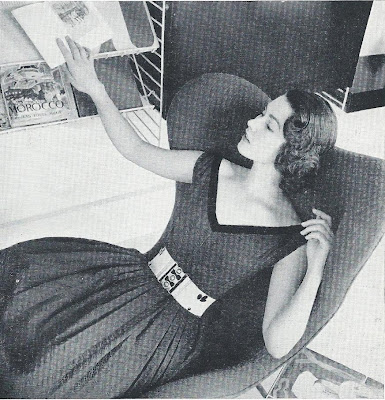
Double Crochet Belt from “Learn to Crochet,” 1963

This belt is the very first project in “Learn to Crochet”. The method of instruction, the reader is assured, is most “pleasant”, although one is warned to always keep in mind the importance of neatness of execution. In other words, if your finished work is not lovely, it’s your own damn fault and your time would be better spent pursuing messier hobbies like pottery or bog snorkelling.

Observe the young lady in the picture above. She clearly understands the necessity for neatness as she’s shellacked her hair in place. There’s no arguing with results, her crocheted belt is lovely. True, she also has the pale complexion and lethargic poise of an opium addict, barely able to lift her arm toward her books.

Looks like she’s been reading Morocco by Jean-Louis Miège, an historian so obscure he only rates three sentences in the French language Wikipedia. I’m not sure what this tells us about our crochet model. Has she visited Morocco? Is she planning to? Is her opium supplier Moroccan?


Look, there he is! Seconds after this photo was taken, the fellow opened his robe, and asked historian Jean-Louis, “Say, wanna buy some opium? Primo stuff. Fell off the back of a truck. Would I lie to you?”

Or possibly our model can’t breathe and really needs to loosen her double crochet belt before she passes out.

For the complete pattern (and more snark!):

Double Crochet Belt

Coats Mercer-Crochet No. 10 (20 grm.): 2 balls.

There’s a strange symbol directly after Coats. Exhaustive internet research reveals that sadly it’s not a secret symbol used by opium smugglers. It’s actually just an older version of the modern Coats logo.

This model is worked in White, but any shade of Mercer-Crochet maybe be used. No. 10 is available in White, 610, (Dk Ecru), 609 (Ecru), 442 (Mid Buttercup), 621 (Lt. French Blue), 623 (Spring Green) and Spec. 8918 (Lt. Coral).
Lots of choice, so long as you stick to bland, inoffensive shades. No Ravishing Reds or Sex-Kitten Sapphires for you! Even Light Coral has to be special ordered, as a mere glimpse of a colour approaching pink will upset your opium-addled, ahem, delicate sensibilities.

And don’t even think about using any crochet thread other than Coats. Page six of the instructions, which you’ve memorized to ensure the loveliness of your work, decrees: “Coats Mercer-Crochet possesses qualities which are of the utmost importance to the work. It washed beautifully, never loses its colour or becomes ‘stringy’… it is the ideal crochet thread.”

Heaven help you if your thread becomes stringy! Your neighbours will accuse you of being strung-out.
Beads and sequins. 1 buckle.

¾ yd. corded silk ribbon for lining.

Milwards Steel Crochet Hook No. 2 ½. (Slack workers could use a No. 3 hook and tight workers a No. 2.

Slack workers lack proper motivation. This being the early sixties, tight workers simply need a strong sedative.

Of course, even the slack workers will need Nervine, a dry martini, or just plain ol’ opium, as the very first project in this book involves teeny tiny needles and thread.

Welcome to crochet! Please enjoy the complimentary eye-strain.
Tension: 12 rows = 1 in.

Measurements: 3 ½ in. deep x 22 in. long.


Commence with 33 ch.
You can tell this is a classy pattern by the way the designer invites you to “commence” instead of “begin”.
1st Row: 1 dc (double crochet) into 2nd (second) ch (chain) from hook, 1 dc into each of remaining ch, 1 ch, turn.

2nd Row: 1 dc into each dc, 1 ch, turn.

Repeat 2nd row until belt measures 23 in. (or 1 in. longer than waist measurement), omitting turning ch at end of last row.
Or until you have a nervous breakdown from row after row of nothing but double crochet. No wonder the model for this pattern was dreaming of escaping to Morocco!

This also explains why she quit crocheting her belt despite it being clearly several inches too small.
Fasten off.

Damp and press.

Sew on buckle. Then sew on beads and sequins as shown in illustration or as desired. Line inside of belt with corded ribbon.


Don’t go wild with the beads and sequins. Three beads and two sequins is all you can handle as a beginner crocheter and a social opium smoker.

Of course, if you believe that after this pattern you’re ready for the hard stuff, I won’t warn you to just say no. However, if the police show up at your door, you didn’t get this from me.


Click here for the printable pattern.

Read more!

Saturday, January 7, 2012

Oh, the Weather Outside is Frightful...

Ladies’ Ski Mask from “Easy to Make Fashions for the North, South, East, West”, c. 1960

So, clearly it’s time to fight back by frightening the heck out of Jack Frost.

Those who remember the 1960s speak fondly of the Summer of Love, but they never mention the Winter of Rabid Hate. But now I understand why so many hippies fled to San Francisco in 1967 and overindulged in free love and inexpensive marijuana. How else could they block out childhood memories of their mothers wearing this terrifying mask as she hunted them down like so many snowshoe bunnies? Yes, thousands of baby boom youngsters huddled behind snow banks in their urine-soaked snowsuits praying that this terrifying visage wouldn’t find them and make them come indoors to massage Mommy’s hammer toe.

Don’t believe me? Then explain this: George R.R. Martin, the infamous fantasy author, was but a tender twelve years old in 1960, and he believes to this day the most ominous phrase for all of humankind is...


I rest my case.

For the complete pattern (and more snark!):

Ski Masks

Materials Required:
AMERICAN THREAD COMPANY “DAWN” KNITTING WORSTED
I do believe this calls for another sign...


4 ounces Buff Heather
1/3 ounce each Red, Tangerine and Black
Red sequins, Red and Black felt, 2 large bone rings for Ladies’ Mask
1 pr. knitting needles No. 8
Aluminum crochet hook size F
I’ve complained in the past about the creepiness of so-called skin toned ski masks, but Buff Heather will make you look even less like a ski bunny and more like a bog body that’s been dug up at the 2014 Winter Olympics’ site.

Now, even though dead Soviets have turned up in bogs, I want to make it very clear I’m not accusing the Russians of anything. Especially Vladimir Putin.
LADIES’ MASK: Work Basic Mask.

BASIC MASK:
Cast on 82 stitches (sts) and work in Knit (K) 2, Purl (P) 2 ribbing for 2 inches ending last row with P 2.
NEXT ROW: K 2, P 2 for 28 sts, K 26, P 2, K 2 for 28 sts (Right side).
NEXT ROW: P 2, K 2 for 28 sts, P 26, K 2, P 2. Repeat last two rows for 1 inch ending with K 2, P 2.
NEXT ROW: K 2, P 2 for 28 sts, K 12, increase (inc) 1 st in each of the next 2 sts, K 12, P 2, K 2 for 28 sts.
NEXT ROW: K 2, P 2 for 28 sts, P 12, inc in next st, P 2, inc in next st, P 12, K 2, P 2 for 28 sts.
NEXT ROW: K 2, P 2 for 28 sts, K 12, inc in next st, K 4, inc in next st, K 12, P 2, K 2 for 28 sts.
NEXT ROW: P2, K 2 for 28 sts, P 12, inc in next st, P 6, inc in next st, P 12, K 2, P 2 for 28 sts. Continue in same manner until there are 12 sts between increasing points (94 sts).
The helpful definitions of common short forms, along with the pedantically spelled out instructions and the enthusiastically shouted NEXT ROWS, all imply that this basic ski mask is an ideal first project for a beginner.

Of course, it’ll be your first and last knitting venture after your family sees the finished hat and locks you away as a danger to yourself and others.
NEXT ROW: K 2, P 2 for 28 sts, K 38, P 2, K 2 for 28 sts.
NEXT ROW: P 2, K 2 for 28 sts, P 38, K 2, P 2 for 28 sts. Repeat last 2 rows 4 more times ending with K 2, P 2.
NEXT ROW: K 2, P 2 for 28 sts, K 11, bind off 16 sts for Mouth, K 10, P 2, K 2 to end of row.
NEXT ROW: P 2, K 2 for 28 sts, P 11, drop yarn. Attach new skein of yarn on the other side of Mouth, P 11, K 2, P 2 for 28 sts.
NEXT ROW: K 2, P 2 for 28 sts, K 11, drop yarn, pick up 1st skein of yarn, K 11, P 2 K 2 for 28 sts.
NEXT ROW: P 2, K 2 for 28 sts, P 11, cast on 18 sts, P 11 on other side of Mouth, K 2, P 2 for 28 sts, cut yarn of 2nd skein.

It’s not clear at this point how the Ski Mask will end up looking like a Sock Monkey who died of lock jaw.
NEXT ROW: K 2, P 2 for 28 sts, K 40, P 2, K 2 for 28 sts.
NEXT ROW: P 2, K 2 for 28 sts, P40, K 2, P 2 for 28 sts. Repeat last 2 rows twice.
NEXT ROW: K 2, P 2 for 28 sts, K 16, bind off 8 sts for Nose, K 15 P 2, K 2 for 28 sts.
NEXT ROW: P 2, K 2 for 28 sts, P 16, cast on 17 sts, P 16, K 2, P 2 for 28 sts.
NEXT ROW: K 2, P 2 for 28 sts, K 16, P 8, K 1, P 8, turn. Working across Nose sts only, K 8, P 1, K 8, turn, P 8, K 1, P 8, K 16, P 2, K 2 for 28 sts.
NEXT ROW: P 2, K 2 for 28 sts, P 16, K 2 together (tog), K 6, P 1, K 6, K 2 tog, P 16, K2, P 2 for 28 sts.
NEXT ROW: K 2, P 2 for 28 sts, K 16, P 2 tog, P 5, K 1, P 5, P 2 tog, K 16, P 2, K 2 for 28 sts.
NEXT ROW: P 2, K 2 for 28 sts, P 16, K 2 tog, K 4, P 1, K 4, K 2 tog, P 16, K 2, P 2 for 28 sts.
NEXT ROW: K 2, P 2 for 28 sts, K 16, P 2 tog, P 3, K 1, P 3, P 2 tog, K 16, P 2, K 2 for 28 sts.
NEXT ROW: P 2, K 2 for 28 sts, P 16, K 4, P 1, K 4, P 16, K 2, P 2 for 28 sts.
NEXT ROW: K 2, P 2 for 28 sts, K 17, P 3, K 1, P 3, K 17, P 2, K 2 for 28 sts.
NEXT ROW: P 2, K 2 for 28 sts, P 18, K 2, P 1, K 2, P 18, K 2, P 2 for 28 sts.
NEXT ROW: K 2, P 2 for 28 sts, K 19, P 1, K 1, P 1, K 19, P 2, K 2 for 28 sts.

Normally, I don’t recommend nose jobs for ski masks, but a knitted schnoz really shouldn’t look like it was on the losing end of an argument with a garden hoe.
NEXT ROW: P 2, K 2 for 28 sts, P 7, bind off 12 sts for Eye, P 2, bind off 12 sts for other Eye, P 6, K 2, P 2 for 28 sts.
NEXT ROW: K 2, P 2 for 28 sts, K 7, drop yarn, attach about 1 yd. of yarn at Nose and K 3, drop yarn, attach another skein of yarn at other side of other Eye and K 7, P 2, K 2 for 28 sts.
NEXT ROW: P 2, K 2 for 28 sts, P 7, drop yarn, pick up other yarn, P 3, drop yarn, pick up other yarn at other side of Eye, P 7, K 2, P 2 for 28 sts.
NEXT ROW: K 2, P 2 for 28 sts, K 7, drop yarn, pick up other yarn, K 3, drop yarn, pick up other yarn at other side of Eye, K 7, P 2, K 2 for 28 sts.
NEXT ROW: P 2, K 2 for 28 sts, P 7, cast on 12 sts, P 3, cast on 12 sts, P 7, K 2, P 2 for 28 sts.
NEXT ROW: K 2, P 2 for 28 sts, K 41, P 2, K 2 for 28 sts.
Unkind people might comment that the eyes look a tad close together...

...and they’d be right. However, keep in mind that the field of Ski Mask Physiognomy has been debunked, so we cannot conclude that only the criminal class would be caught dead or alive in this mask.

Although, it’s true that the last lady wearing this mask was seen in the company of this fellow ski enthusiast.

NEXT ROW: P 2, K 2 for 28 sts, P 41, K 2, P2 for 28 sts. Repeat last 2 rows once, then P 1 row, K 3 rows.
Work next 35 rows in stockinette stitch (K 1 row, P 1 row), decreasing 4 sts evenly spaced every other row but do not work decreases directly over decreases of previous row until 25 sts remain, cut yarn leaving an end. Thread yarn into needle and draw sts tog, sew seam.

Cut a section of Red felt for lower Lip and stitch in place. Cut a section Red felt for upper lip and stitch in place taking care to keep corners of Mouth neat. Cut two sections of Black felt for Eyes and stitch in place. Outline Eyes with red sequins and also stitch a few sequins on each Cheek.
Only a few sequins on those cheeks, mind you! Whether bog ladies were sacrificial victims or young misses with a poor sense of direction, they did NOT make themselves up to look like whores.

Of course, if you use too few, you risk creating sparkly duelling scars.
Embroider Nostrils in red. Cover 2 bone rings with single Crochet using Tangerine yarn and stitch in place for Earrings.
Go big or go home.
HAIR: Starting at ridge as illustrated and with Tangerine, join yarn over a K st. Working toward top of Mask, * skip 1 K st, wind yarn around index finger to form a 1 inch loop, insert hook through both loops of next K st and complete sc. Repeat from * in same row of K sts to top of mask, skip 1 row of K sts and repeat from 1st * until top of Mask is covered with loops.
Why Tangerine hair? Because you won’t win first prize at the Bog Body Costume Party if you forget that the acids in peat bogs eventually turn everyone into gingers. (Warning: only click the link if you’re a fan of graphic forensic content!)

Of course, the red sequins on your mask may disqualify you anyway, as no bog body has been discovered in sparkly disco wear.

Yet.

Click here for the Printable Pattern

Read more!

Saturday, December 31, 2011

Happy New Year!

The Workbasket, December, 1983

Elegance for Evening

Perfect for the holidays! The black sport weight yarn creates skyscrapers against a sparkling sky of metallic yarn.
Ah, the eighties! When the smoggy sky literally sparkled with volatile organic compounds. Every New Year was greeted with the festive sound of Grandpa’s emphysema acting up as he tried to sing Auld Lang Syne with the family. After Grandpa’s oxygen treatment, everyone would run outside to dance gaily in the acid rain until the hairspray in Mom’s hair caught fire.

Yes, hearken back to that halcyon yesteryear with an elegant sweater depicting a pollution-blackened cityscape.

For the complete pattern (and more snark!):

Directions are given for small (finished bust measurement: 36 inches) with changes for medium (38 inches) and large (40 inches) in parentheses. You will need 3 (4,5) ounces sport yarn, 3 ounces metallic yarn and a size G crochet hook (or size required for gauge). Use double strand of metallic throughout.
Shoulder pads are highly recommended, unless you’re into having your shoulders rubbed raw by metallic thread. Yes, looking like a linebacker really did have a practical purpose in that synthetic era.
Gauge: 9 sts equal 2 inches
5 rows equal 2 inches
Five rows of sport weight yarn every two inches? If you want to complete this project before the December 2012 apocalypse, you’d best start now. Don’t you want a sweater that will match the burning ruins of your hometown?
TO SAVE TIME, TAKE TIME TO CHECK GAUGE.
Ooh… catchy phrasing! So much better than the usual all-caps gauge warnings. This needs to be part of a poster campaign.


Note: Sweater is worked sideways. Rows are worked back and forth from waist to neckline.

FRONT: With black, ch 81 (87, 93).
Row 1: Dc in 4th ch from hook and in each of next 35 (41, 47) ch, join metallic, dc in next 42 ch, ch 3, turn – 78 (84, 90) sts.
Sweater is worked entirely in dc, with no shaping. Directions will be for number of sts and color only. Diagram will further clarify. Ch 3 and turn at end of each row. Ch 3 at end of row always counts as first dc of next row.
A fetish for counting stitches helps!

Count von Count makes all his own clothes.
Row 2: 42 Metallic, 36 (42, 48) black.
Row 3: 46 (52, 58) Black, 32 metallic.

Note: All even rows are worked with same number of stitches in same color as preceding row.
Row 5: 42 (48, 54) Black, 36 metallic.
Row 7: 32 (38, 44) Black, 46 metallic.
Row 9: 55 (61, 67) Black, 23 metallic.
Row 11: 37 (43, 49) Black, 41 metallic.
Row 13: 52 (58, 64) Black, 26 metallic.
Row 15: 35 (41, 47) Black, 43 metallic.
Row 17: 29 (35, 41) Black, 49 metallic.
Row 19: 43 (49, 55) Black, 35 metallic.
Row 21: 62 (68, 74) Black, 16 metallic.
Row 23: 37 (43, 49) Black, 41 metallic.
Row 25: 48 (54, 60) Black, 30 metallic.
Row 27: 36 (42, 48) Black, 42 metallic.
Row 29: 54 (60, 66) Black, 24 metallic.
Row 31: 32 (38, 44) Black, 46 metallic.
Row 33: 27 (33, 39) Black, 51 metallic.
Row 35: 43 (49, 55) Black, 35 metallic.
Row 37: 50 (56, 62) Black, 28 metallic.
Row 39: 39 (45, 51) Black, 39 metallic.
Row 41: 33 (39, 45) Black, 45 metallic.
Row 43: 59 (65, 71) Black, 19 metallic.
Row 45: 44 (60, 66) Black, 34 metallic.
Hopefully you haven’t sunk too far into a haze of “Vun, two, tree, ha-ha-ha!” because there’s a mistake in the forty-fifth row. Do you see it? Here’s a hint… all the other rows add up to 78 (84, 90) sts across. You’ll be fine if you’re crocheting a small size sweater, but you’re going to run into trouble if you’re trying to make a medium or large size.

I suspect it’s not a mistake, but instead a diabolical plot to make us all regret overindulging this holiday season. Only small sized people and muppets get a pass as they can’t hold their eggnog anyway.


Fasten off for small size. For medium, repeat rows 1 through 4. For large, repeat rows 1 through 8. Back is worked exactly the same as front. Sew 3 ½ inch shoulder seams. Sew side seams leaving 7 (7 ½, 8) inch opening for arms. Work 2 rnds dc around sleeve openings, join, fasten off. At waist, beginning at side seams, work 4 rnds dc, join, fasten off.
And tah-dah! You are now the proud owner of an authentic Eighties sweater. Add a bottle of hairspray and some legwarmers, and you’ll be all set to party hardy until the Police show up.


Click here for the Printable Pattern.

Read more!

Monday, October 31, 2011

Happy Halloween!

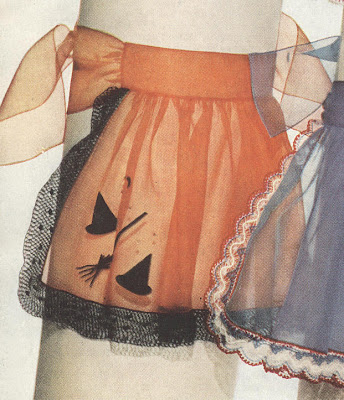
Halloween Apron from Coats & Clark’s Edgings Book No. 305, 1954

At last the truth is revealed! Halloween isn’t about eating candy until you puke, or watching scary movies involving an excessive amount of projectile vomiting. Halloween is all about preserving your femininity.

So, there’s no better way to celebrate Halloween than to don a ladylike apron you made with your very own little ladylike hands. However, don’t confess your plans ahead of time to your husband, or he may try to persuade you to make a sexy French Maid apron instead! Men just don’t understand that only fallen women oppressed by the Patriarchy wear French Maid costumes.


Unlike the poor, downtrodden woman pictured above, you are no victim of depraved male fantasies. Your Halloween apron will celebrate radical feminism! It will proclaim a liberated woman’s inalienable right to choose … to spend Halloween in the kitchen!

Besides your new apron will come in real handy once the inevitable Halloween barfing begins.

For the complete pattern (and more snark!):

How to Make Aprons

Each apron requires 1 yard of organdy, 36 inches wide, and 1 spool of Coats and Clark’s Mercerized Sewing Thread, Art. C. 3, in a matching color. Aprons are made identically: Cut a piece of organdy 12 ½ x 36 inches and roll a ¼ inch hem around three sides. Slip stitch hem. Cut a piece of organdy 6 ½ x 15 ½ inches for waistband. Cut two pieces of organdy 6 x 36 inches for ties, roll and sew a ¼ inch hem around three sides. Gather top of apron to measure 15 inches. Fold waistband in half lengthwise, turn in ¼ inch hem on raw edges and sew across top of apron.

Gather raw ends of ties to measure 3 inches, insert in ends of waistband and sew in place.
I’m actually hopeless at sewing, so I won’t tell if you sneak off to Wall-Mart and buy a pre-made apron. Or if you’re low on cash, just mug a Wall-Mart greeter for their vest.

Wall-Mart vests make great Halloween costumes.

Just don't try this right after a snowstorm!
Halloween Apron: Appliqué hats and 1 strip of felt ¼ x 4 ¼ inches for handle of broom. Use bugle beads for bristles and decorate hats with sequins.
Sadly, bugle beads are long tube-shaped beads, not Mardi Gras beads you get from flashing boogie woogie bugle boys.

This picture is provided just in case you don't know what a witch's hat looks like. You wouldn't want to accidentally applique top hats all over your apron instead.

I'm not sure what this apron means ("I cook with style"? "I killed Fred Astaire and served him for dinner"?), but I do know it definitely doesn't say, "Happy Halloween"!

Halloween Apron Edging . . . S-532

COATS & CLARK’S O>N>T> TATTING-CROCHET, Art. C. 21, Size 70: 3 balls of No. 12 Black.

Milwards Steel Crochet Hook No. 14.

Orange organdy apron.

Make a chain 6 inches longer than outer edge of apron. 1st row: Sc in 2nd ch from hook, * ch 5, skip next 2 ch, sc in next ch. Repeat from * across until piece measures 4 inches longer than outer edge of apron, having number of loops divisible by 8 and 7 more at end of row.
Show your kids this pattern to prove they will have to use math in every day life.

Better yet, have them make the apron for you. It's educational! And then no one will ever have to know that you can't divide correctly by eight.
Ch 3, turn. 2nd row: * Draw loop on hook out to measure ¼ inch, thread over and draw loop through, insert hook between single and double loops and draw a loop through, thread over and draw through two loops on hook, (knot st made), sc in next loop. Repeat from * across, ending with sc in last loop, dc in last sc. Ch 3, turn. 3rd row: * (Make a knot st, sc under double loop of next knot st) 7 times; ch 3, make 9 dc under double loop of next knot st (shell made), ch 3, sc under double loop of next knot st. Repeat from * across, ending with sc in last knot st, dc in top of turning chain. Ch 3, turn. 4th row: * Make a knot st, ** sc in next knot st. Repeat from * across, ending with sc in knot st preceeding next shell; make a knot st, sc in center dc of shell, make a knot st, sc in next ch-3 loop, make a knot st. Repeat from ** across, ending with sc in last knot st, dc in top of turning chain. Ch 3, turn.
The insistence on repeating from * or ** across leads me to believe there will be dire consequences if you attempt to repeat up-and-down.

Of course, if you read this Halloween pattern backwards, you will discover the hidden satanic messages.
5th row: (Make a knot st, sc in next knot st) 3 times; * ch 3, make a shell in next knot st, ch 3, sc in next knot st, (make a knot st, sc in next knot st) 7 times. Repeat from * across, ending with sc in last knot st, dc in top of turning chain. Ch 3, turn. 6th row: Work as for 4th row. 7th row: Work as for 3rd row. 8th row: Work as for 4th row, ch 5 at end of row. 9th row: * Sc in next knot st, ch 5. Repeat from * across. Ch 1, turn. 10th row: Sl st in first loop, sc in same loop, * make 2 knot sts, sc in next loop. Repeat from * across. Ch 5, turn. 11th row: Sc in center of first knot st loop, * ch 5, sc in center of next knot st loop. Repeat from * across. Break off. Sew edging neatly in place, gathering 2 inches at each corner.
And naturally, there are also dire consequences to NOT sewing edging neatly!

Like… um… social stigma? That’s right! Just think of the horrible shame you will feel if you’re seen in public wearing a slovenly Halloween apron. Nothing could be more humiliating!

Oh dear.

Click here for the printable pattern.


Read more!

Monday, September 26, 2011

Puff the Magic Parsley!

Potholder patterns and Parsley Puffs recipe from Star Potholders, c. 1955
Your eyes do not deceive you – the good people at Star Potholders combined recipes with crochet patterns. After all, everyone who loves to crochet must also love to cook, right? And vice versa, naturally. Just such a versatile lady is pictured above, barefoot but not visibly pregnant in the Star Potholder kitchen.

Don’t get me wrong. I greatly admire multitaskers who can cook and crochet simultaneously without setting the house on fire. The fact that these people do so despite being only three inches tall is especially admirable. When was the last time you crocheted two blanket-sized potholders, then stirred a pot twice your size all the while ignoring enormous vegetables bent on revenging their cooked kin?

Indeed, this Parsley Puff Potholder pattern recipe combination – or pattipe, if you prefer – is a testament to perseverance in the face of overwhelming adversity.

Either that, or its evidence that the designers of this book were on heavy medication.
Parsley Puffs

1 bunch of parsley
1 egg
2 teaspoons flour
1 tablespoon water
1 teaspoon salt
1/8 teaspoon pepper

Wash parsley and break into small sprigs and put in ice water to crisp. Separate egg: to the beaten yolk, add flour, water, and seasonings...
Yes, this recipe calls for “seasonings”. I’ve been told such ingredients may be purchased from congenial vendors on street corners.
... and beat until thoroughly mixed. Then fold in egg whites beaten stiff. Dip the parsley sprigs into this batter and fry in deep fat at 390 degrees F until golden brown. Drain and serve hot. This is a tempting garnish for meats.
The terrifying implications of a three-inch tall housewife operating a deep-fryer aside, I’m of the opinion that restaurants exist so I may pay other people to do my deep frying for me.

However, if you’re brave enough to attempt this recipe, why stop at the garnish? After all, you’ve got a whole pot of boiling oil, just waiting for you to dump the entire entree into it.

Yum?

For the actual potholder patterns (and more snark!):

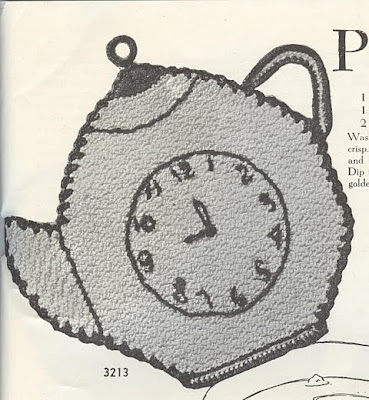
I don’t know what teapots have to do with deep-fried vegetation.

For that matter, I really don’t know why there’s a clock face on this teapot. And I really, really don’t know why there’s a world full of teapot-shaped clocks – or t-pocks, as they’re known to the kids these days.

The point is, these t-pocks can’t be used to make tea, or if they can, then they’re not functional clocks.

Plus, when you invite your mother-in-law to tea, you’re humiliated when you discover fairies are humping your t-pock. Again.
No. 3213

Materials Required–
AMERICAN THREAD COMPANY
“PURITAN” MERCERIZED CROCHET
AND KNITTING COTTON


150 yds. White.

“STAR” PEARL COTTON, SIZE 5.

25 yds. Red.

Steel Crochet Hook No. 7.

With White, ch 28, turn and work 27 s c on ch, ch 1, turn.
2nd Row– 1 s c in each s c, ch 2, turn.
3rd Row– Skip 1 s c, 1 s c in each of the next 2 s c, * ch 1, skip 1 s c, 1 s c in each of the next 2 s c, repeat from * across row, ch 2, turn.
4th Row– 2 s c in 1st s c, ch 1, 2 s c in next s c, (an increase) * ch 1, skip 1 s c, 2 s c in next s c, repeat from * across row, ch 1, 2 s c in end ch, ch 2, turn.
5th Row– Skip 1 s c, 2 s c in next s c, * ch 1, skip 1 s c, 2 s c in next s c, repeat from * across row, ch 2, turn.
Repeat the 4th row.
7th, 8th & 9th Rows– Same as 5th row.
10th Row– Increase 1 pattern at beginning of row and 1 pattern at end of row then work 2 rows even in pattern.
And then pattern the pattern using the pattern until the entire pattern is patterned.

Wait, what was the pattern again?
Repeat the last 3 rows.
16th Row– Increase 1 pattern at beginning and end of row, then work 20 rows even in pattern.
37th Row– Decrease 1 pattern each end of row, then work 3 rows even.
Repeat the last 4 rows.
45th Row– Decrease 1 pattern each end then work 2 rows even.
48th Row– Decrease 1 pattern each end then work 3 rows even.
52nd Row– Decrease 1 pattern each end then work 2 rows even.
55th Row– Decrease 1 pattern each end then work 1 row even, break thread.
57th Row– With Red, skip 2 sts, 1 s c in each of the next 10 s c, ch 1, turn.
Next Row– 1 s c in each s c, ch 1, turn, skip 1 st, 1 s c in next st, 1 s d c in next st, (s d c; thread over, insert in st, pull through and work off all loops at one time) 1 d c in each of the next 4 sts, 1 s d c in next st, 1 s c in next st, break thread.
In the olden days, pattern books often had to invent their own abbreviations. These days “s d c” is more commonly known as “hdc” or a “half double crochet”.

Despite my usual preference for vintage things, I find hdc, rather less confusing than s d c which I can only presume translates as “single double crochet”. But you can’t be a single in a double unless you’re Barbara Mandrell.
SPOUT. With White, attach thread in first st at straight edge and working toward lower edge work 9 patterns across straight edge, ch 2, turn, work a pattern in each pattern increasing 1 pattern at end of row, ch 2, turn.
Next Row– Decrease one pattern at end of row then work 1 row even.
Next Row– Decrease one pattern at end of row.
I heard that the Star Potholder test crocheter was found dead in a locked room with “decrease one pattern at end of row” written over and over on all the walls – in blood. But I’m sure that was just a coincidence.
Next Row– Decrease one pattern at beginning of row.
Next Row– Decrease one pattern at end of row, break thread.
Work another section in the same manner.
Fortunately for the longevity of their dear readers, the Star Potholder editor has opted to eschew any further line-by-line instructions.
With Red, crochet the 2 sections together, starting at lower edge, work 1 s c in each s c across bottom, * ch 3, d c in same space, skip 1/8 inch space, s c in next st, repeat from * all around, break thread.
Thread Red into needle and work a row of outline st about 1 inch down from Red top. Work another outline st ¼ inch from lower edge and across side to separate the spout from the body. Draw a 3 ½ inch circle in center and work numerals on it as illustrated. Work a small solid circle in center of clock and work 2 hands using the lazy daisy st.
You do know how to embroider, correct? You wouldn’t be at this point in the pattern (which, of course, you read all the way through before embarking upon), if you didn’t know how to embroider.

Is that weeping I hear? I know what’ll cheer you up. A nice cup of tea!

Please be patient while I scrape the bird poo out of this upcycled t-pock.
HANDLE. With White, ch 37, and work 36 s c on ch, break thread.
Attach Red and work 1 s c in each s c working 3 s c at end, turn and working on other side of s c, work 1 s c in each of the next 7 s c, * skip 1 s c, s c in next s c, repeat from * 6 times, 1 s c in each remaining st, break thread leaving an end to sew.
Sew to potholder as illustrated.
LOOP. Wrap Red around small finger 3 times, remove from finger and work 20 s c over loop. Attach to top of potholder.

Faces, unlike clocks, actually make a certain amount of sense here. Who doesn’t love anthropomorphizing household objects? “How may I serve you?” we can imagine our teapot asking, in a hilarious British accent.

Of course, if teapots really could speak, it’d be more likely they’d shriek, “Why are you pouring out my BRAINNNNS?” Which would definitely put a damper on your next tea party.


No. 3214

AMERICAN THREAD COMPANY
“DE LUXE: MERCERIZED CROCHET
AND KNITTING COTTON


155 yds. White. 35 yds. Red.

“STAR” SIX STRAND MERCERIZED
EMBROIDERY COTTON


3 yds. Black.

Steel Crochet Hook No. 7 or 8.

With White, ch 37 and work 36 s c on ch. (Turn each row.)
2nd Row– Ch 3, 2 d c in first s c, 1 d c in each s c, with 2 d c in last s c.
3rd Row– 2 d c in first d c, 1 d c in each remaining d c, with 2 d c in last d c.
Repeat 3rd row 10 more times.
14th to 17th Rows– 1 d c in each d c.
Unless it’s a zombie tea party!


18th to 22nd Rows– Decrease 1 st at the beginning and end of each row, remaining sts even. (Decrease; insert needle in first d c, pull thread through, insert needle in next d c, pull thread through, thread over and pull through 2 loops on needle, thread over and pull through remaining loops.)
23rd to 28th Rows– Decrease 2 sts at beginning and end of each row.
29th Row– Ch 1, decrease 1 st, 1 s c in next d c, 1 s d c in each of the next 3 d c, (s d c; thread over, insert in st, pull through and work off all loops at one time) 1 d c in each d c to within the last 6 d c, 1 s d c in each of the next 3 d c, 1 s c in next d c, then decrease 1 st.
Working down side of kettle, work 2 s c in each d c row, across lower edge work over entire st, 3 s c over first and last s c, 1 s c over each remaining st. Up opposite side work 2 s c in each d c row, 1 s c in each st across top, break thread.
With Red, work 1 row of s c all around, break thread. Work another section to correspond.
With Red, crochet the two sections together, ch 3, thread over, insert needle in same space with ch 3, pull thread through, thread over, insert needle in same space, pull thread through, thread over and pull through all loops on needle, * thread over, insert needle in next st, pull thread through, thread over, insert in same st, pull thread through, thread over and pull through all loops on needle, repeat from * all around, break thread.
HANDLES. With White, ch 32 and work 31 s c on ch. Attach Red and work 1 s c in each s c, ch 2, turn and work a row of puffs same as on kettle, break thread.
Is that what all that interminable threading over and inserting business was about? We were making “puffs”?

I just hope there’s no deep-frying involved as there was in making the parsley puffs. I refused to deep-fry my crochet, no matter how effective a batter-delivery system cotton yarn might be.
With Red, work an outline st for lid, starting at about the 5th row from top and working down to about the 8th row, then back to 5th on opposite side, then over the outline st work 1 row of s c, break thread.
Work s c over a small bone ring and attach to top of lid.
Embroider face as illustrated.
Wait a t-pock minute! The lid of the clock potholder didn’t require a bone ring, but this one does? But it’s not even included in the materials list.

That tears it! Who edited this rag, and where do they live?

Well, that explains a lot.

Click here for the printable pattern.
Click here for the parsley puffs recipe.

Read more!

Saturday, July 16, 2011

The Boys of Summer!

By the He Sea and Ripple Poncho patterns from Aunt Lydia’s Rug Yarn Collection, c. 1970

You won’t find the “He Sea” on any map, but Aunt Lydia assures me that you’ll find these handsome beach bums right by it. And who am I to doubt Aunt Lydia? Sure, she wants to cover up our menfolk in heavy rug yarn for the summer, but that doesn’t mean she’s completely delusional.

I think this He Sea is totally worth checking out. The photo above proves that it’s packed with hot (especially in that poncho), sweaty (very sweaty in polyester beachwear), clean cut gentlemen who are on the lookout for lady friends.

Why else would they book a vacation at the He Sea? They took one look at the name and knew it would be the perfect place to play beach volleyball and just hang out with other macho men in sexy rippled ponchos… er, before picking up bikini-clad babes.

Just like the Lords South Beach Hotel in Miami Beach, another resort with a manly name, I bet the He Sea also attracts the ladies men with stay-naked dining service and bonfire disco parties.


Aunt Lydia assures me that they’re discussing their new girlfriends.

For the complete patterns – yes, all three of them (and three times the snark!):


SLIP OVER
Wow, I had no idea that spray tanning was popular in 1970.
SIZES: Small, Medium, Large

Materials Required:
AMERICAN THREAD “AUNT LYDIA’S” HEAVY RUG YARN
4 (5, 5) – 70 Yd. skeins Spice
Because he’s spicy!
5 (6, 6) – 70 Yd. skeins White
1 Pr. Knitting Needles No. 10 ½ OR ANY SIZE NEEDLES WHICH WILL RESULT IN STITCH GAUGE BELOW

GAUGE: 3 sts = 1 inch
Directions are given for Small size. Changes for Medium and Large sizes are given in parentheses.

MEASUREMENTS: Width across front or back at underarm 21’’, 22 ½’’, 23 ½’’.

BACK: With Spice, cast on 42 (45, 48) sts. (Work in stripes of 6 rows Spice and 4 rows White.) Starting with a P row work in stockinette st (P 1 row, K 1 row) inc 2 sts at the beg and end of every K row 5 times, 62 (65, 68) sts. Work even until there are 9 complete White stripes. Work 1 row Spice.
His skin tone certainly resembles my Aunt’s Pumpkin Spice Cake.
SHAPE ARMHOLES: Bind off 4 sts at beg of next 2 rows. Dec 1 st at beg of next 3 rows (this completes Spice stripe), cut Spice. NEXT ROW: Attach White and use for entire yoke. Dec 1 st at beg of row. NEXT 2 ROWS: Dec 1 st at beg of each row. Work even until armholes measure 9 (9 ½, 10) inches. SHAPE SHOULDERS AND NECK: Bind off 7 (8, 8) sts, work across 9 (9, 10) sts and place on holder. Bind off next 16 (17, 18) sts for neck, work across remaining 16 (17, 18) sts. Working one shoulder at a time. Bind off 7 (8, 8) sts, work across row. NEXT ROW Dec 1 st at neck edge, work across. Bind off remaining 8 (8, 9) sts. Attach yarn at neck edge, dec 1 st, work across row. NEXT ROW: Bind off remaining sts.

FRONT: Work same as Back until armholes measure 5 ¼ (5 ½, 6) inches. SHAPE NECK: Work across 18 (19, 20) sts and place on holder, bind off next 12 (13, 14) sts for neck, work across remaining 18 (19, 20) sts. Working one shoulder at a time, dec 1 st at neck every other row twice; 16 (17, 18) sts. Work even until armhole measures same as back. SHAPE SHOULDER: Bind off 7 (8, 8) sts at armhole edge, work across. NEXT ROW: Dec 1 st at neck edge, work across. Bind off remaining stitches. Work other shoulder to correspond.
Gondor has no pants. Gondor needs no pants!


Viking helmet optional, but if you’re going to wear a mini and slather on the pumpkin spice bronzer, you might as well go full Boromir.
FINISHING: Steam and block sections. Weave 1 shoulder seam. With wrong side facing, attach White at neck opening, pick up and K 1 st in each st all around neck. K 1 row, bind off loosely. Weave other shoulder. With White and wrong side facing, work edge around each armhole same as neck. Weave 1 side seam. With White and wrong side facing, attach yarn at opening and complete lower edge same as neck. Weave other side seams. Turn all edges to right side and tack in place. Steam edges.
Tack and steam those edges all you want, they’re still going to roll up and expose your man’s tushie.

You’ll have to decide for yourself if that’s a bad thing.


LACED TANK TOP
Because the medieval page look suits middle-aged men so well.
SIZES: Small, Medium, Large

Materials Required:
AMERICAN THREAD “AUNT LYDIA’S” HEAVY RUG YARN
4 (4, 5) – 70 yd. skeins Bongo – Color B
Hey, it’s our old friend Bongo again!In 1965, Aunt Lydia believed that the colour of African antelopes and Disney circus bears was best suited to placemats. By 1970, she was recommending it for beach attire. Granted, this top looks like a bunch of placemats stitched together, but still I suspect that Aunt Lydia was in the pay of Big Bongo.
3 (3, 3) – 70 yd. skeins Orange – Color C
2 (2, 3) – 70 yd. skeins Antique – Color A
1 Pr. Knitting Needles No. 10 ½ OR ANY SIZE NEEDLES WHICH WILL RESULT IN STITCH GAUGE BELOW
Plastic Crochet Hook Size H

GAUGE: 3 sts = 1 inch

MEASUREMENTS: Width across front or back at underarm: 20’’, 21’’, 22’’ (each section)

Directions are given for small size. Changes for medium and large sizes are given in parentheses.
Word of advice: Have safe search on before attempting to do internet research on Big Bongos.
NOTE: When changing colors always pick up yarn from under 1st color thus crossing yarn to prevent a hole.

BACK: With color A, cast on 40 (44, 48) sts. K 3 rows. NEXT ROW: With Color A K 4 (border), with color B, K 32 (36, 40) sts, attach another skein of color A (for other border), K 4. NEXT ROW: K 4 color A, P 32 (36, 40) color B, K 4 color A. NEXT ROW: K 4 color A, with color B inc 1 st in next st (to inc: K 1 in usual manner, then K in back of same K st), K to within last st of color B; inc as follows: K 1 st in row below, K last st (the inc on the right will slant to right, the inc on left will slant left), K 4 color A. Repeat last 2 rows until there are 56 (60, 64) color B sts.
Don’t overlook the instructions to make the stitches slant off in different directions. Otherwise, your stylish Bongo Babe Magnet top will end up resembling a piece of African Antelope poop.
NEXT 2 ROWS: K 2 border sts tog at each end before and after color B. Continue in established pattern having only 2 A border sts at each end until section measures 10 inches above lower border on wrong side, cut color B. NEXT 4 ROWS: With color A K across all sts. NEXT ROW: K 2 color A, attach color C and K to within 2 sts, K 2 color A. Continue in established border sts and stockinette st (P 1 row, K 1 row) for 10 inches, ending on wrong side, cut color C. NEXT 3 ROWS: With Color A K across all sts. ARMHOLE SHAPING: Bind off 4 sts at beg of next row, K across row. NEXT ROW: Bind off 4 sts, K 4 sts (border), attach color B, K 44 (48, 52) sts, attach color A, K 4 sts (border); 52 (56, 60) sts on needle. NEXT ROW: K 4 color A, P 44 (48, 52) sts color B, K 4 color A. NEXT ROW: (Dec): K 4, K 2 tog, K to within last 6 sts, K 2 tog, K 4; 50 (54, 58) sts. Repeat last 2 rows twice; 46 (50, 54) sts. Work even in established colors until armhole measures 9 (9 ½, 10) inches from 1st armhole bind off, ending on wrong side of work. SHAPE SHOULDER: Work across 12 (12, 12) sts, turn; work back. Repeat last 2 rows once. NEXT ROW: Bind off 6 sts in matching colors, cut A, K to end of row. NEXT ROW: P 6, bind off. NECK BAND: With right side facing, attach color A and K across row to within last 12 sts (all sizes), turn. NEXT 5 ROWS: K across these neck sts only, bind off, cut A. 2nd SHOULDER: Attach color B in 1st st of other shoulder and work to correspond, reversing shaping. With blunt needle, weave neck band at each side to shoulder edges.
Word of advice: Have safe search on before attempting to do internet research on African Antelope po—Actually, don’t. Just don’t research it.
FRONT: Work same as back to armhole shaping, ending with 3 rows of color A. ARMHOLE SHAPING: Bind off 4 sts at beg of next row, K to end of row. NEXT ROW: Bind off 4 sts, K 4 color A, K 20 (22, 24) color B, attach A and K 2 for center border. Leave remaining sts on needle to be worked later, turn. Working in established colors, dec 1 st at armhole edge every other row same as back; at the same time work 1st eyelet for front lacing on 5th row (eyelet: Work across row to within last 4 sts of center, K 2 tog, YO, K 2). Work 2 more eyelets in same manner every 2 inches. Work even until section measures 6 inches from 1st armhole bind off, ending on wrong side.
Besides the colour of this beach top more closely resembles Blue Whale poop. No, seriously.

Don’t ever say you haven’t learned anything from this blog.
NEXT ROW: K 4 color A, K 11 color B (all sizes), cut color A. At center, attach color A to color B and work remaining 8 (10, 12) sts of neck band and border, ending at front edge. NEXT ROW: K across 8 (10, 12) color A sts, with color B, P 2 tog, P across to border, K 4. Repeat last 2 rows twice; at the same time when there are 3 ridges at neck edge bind off 4 (6, 8) sts at neck edge. Then work 4 border sts at each end with color A and 8 center sts in color B. Work in established pattern until armhole measures same as back. SHAPE SHOULDERS: With matching colors, bind off 8 sts at beg of armhole edge, turn. Attach color A at center front and work other side to correspond reversing shaping and eyelets.
Clearly, the pattern editor is too grossed out by the Bongo/Whale Poop resemblance to instruct you on how to bind off the remaining stitches.
FINISHING: Block each section to size. Weave shoulder and side seams matching stripes. With color C make a chain about 30 inches long and lace through eyelets as illustrated.


Ripple Poncho
This is the Rippled Poncho Ted Bundy would wear.
One size fits all
Serial killers.
Materials Required:
AMERICAN THREAD “AUNT LYDIA’S” HEAVY RUG YARN
1 – 180 yd. skein each of any 5 colors or
3 – 70 yd. skeins each of any 5 colors
Aluminum Crochet Hook Size K OR ANY SIZE HOOK WHICH WILL RESULT IN STITCH GAUGE BELOW
All that shouting is just to distract you from the promise that you can use “any 5 colors”. Spoiler alert: It’s a lie.
GAUGE: 2 sts = 1 inch; 2 rows = 1 inch

1st ROW: With Rust ch 119, s c in 2nd st from hook, 1 s c in each of the next 5 sts, * 3 s c in next st, 1 s c in each of the next 6 sts, skip 2 sts, 1 s c in each of the next 6 sts, repeat from * 6 times, 3 s c in next st, 1 s c in remaining 6 sts, ch 1 to turn all rows.
See? I told you it was a filthy lie! You’re to begin with Rust, and only Rust!
2nd ROW: Working in back loop of all sts throughout skip 1 s c, 1 s c in each of the next 6 s c, * 3 s c in next s c, 1 s c in each of the next 6 s c, skip 2 s c, 1 s c in each of the next 6 s c, repeat from * 6 times, 3 s c in next s c, 1 s c in each of the next 5 s c, skip 1 s c, working in both loops of st, 1 s c in last s c, ch 1, turn. Repeat last row throughout working 2 rows each Rust, Brown, Bongo, Antique and Yellow, cutting all colors at end of each 2nd row. (When changing colors always complete last half of st with next color). Repeat last 10 rows once more (20 rows in all).
Long story short, you can use any five colours so long as they are Rust, Brown, Bongo, Antique and Yellow.

Although to be fair, these were the only five colours people were allowed to wear in 1970.

Solid, baby!
NECK OPENING: Work in established pattern and colors across 4 points only, ch 1, turn. Work across these 4 points for 20 rows. Attach yarn at center and work across the remaining 4 points in same manner until there are 20 rows; then work across all 8 points for 20 more rows in colors as established, cut yarn.

COLLAR: Attach Yellow at neck edge in last of short rows, work 1 s c in each row increasing 1 st every 4th row (50 s c) around neck, join and ch 1 to turn each row. Working in back loop of remaining sts work 2 rows Yellow, 2 rows Antique, 2 rows 2 Rows Bongo, and 2 rows Brown, join, cut yarn.
Now drape your criminal in this rug yarn poncho, so he’ll be too overheated to outrun the fuzz.

You may also want to crochet up some matching hand-cuffs.

Because revenge is a dish best served cold, but Justice should always be warm and fuzzy.

Click here for the printable pattern.

Read more!