Showing posts with label accessories. Show all posts

Monday, January 30, 2012

Crochet is the Opium of the Masses

Double Crochet Belt from “Learn to Crochet,” 1963

This belt is the very first project in “Learn to Crochet”. The method of instruction, the reader is assured, is most “pleasant”, although one is warned to always keep in mind the importance of neatness of execution. In other words, if your finished work is not lovely, it’s your own damn fault and your time would be better spent pursuing messier hobbies like pottery or bog snorkelling.

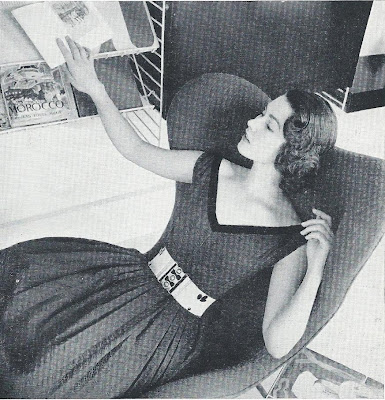
Observe the young lady in the picture above. She clearly understands the necessity for neatness as she’s shellacked her hair in place. There’s no arguing with results, her crocheted belt is lovely. True, she also has the pale complexion and lethargic poise of an opium addict, barely able to lift her arm toward her books.

Looks like she’s been reading Morocco by Jean-Louis Miège, an historian so obscure he only rates three sentences in the French language Wikipedia. I’m not sure what this tells us about our crochet model. Has she visited Morocco? Is she planning to? Is her opium supplier Moroccan?


Look, there he is! Seconds after this photo was taken, the fellow opened his robe, and asked historian Jean-Louis, “Say, wanna buy some opium? Primo stuff. Fell off the back of a truck. Would I lie to you?”

Or possibly our model can’t breathe and really needs to loosen her double crochet belt before she passes out.

For the complete pattern (and more snark!):

Double Crochet Belt

Coats Mercer-Crochet No. 10 (20 grm.): 2 balls.

There’s a strange symbol directly after Coats. Exhaustive internet research reveals that sadly it’s not a secret symbol used by opium smugglers. It’s actually just an older version of the modern Coats logo.

This model is worked in White, but any shade of Mercer-Crochet maybe be used. No. 10 is available in White, 610, (Dk Ecru), 609 (Ecru), 442 (Mid Buttercup), 621 (Lt. French Blue), 623 (Spring Green) and Spec. 8918 (Lt. Coral).
Lots of choice, so long as you stick to bland, inoffensive shades. No Ravishing Reds or Sex-Kitten Sapphires for you! Even Light Coral has to be special ordered, as a mere glimpse of a colour approaching pink will upset your opium-addled, ahem, delicate sensibilities.

And don’t even think about using any crochet thread other than Coats. Page six of the instructions, which you’ve memorized to ensure the loveliness of your work, decrees: “Coats Mercer-Crochet possesses qualities which are of the utmost importance to the work. It washed beautifully, never loses its colour or becomes ‘stringy’… it is the ideal crochet thread.”

Heaven help you if your thread becomes stringy! Your neighbours will accuse you of being strung-out.
Beads and sequins. 1 buckle.

¾ yd. corded silk ribbon for lining.

Milwards Steel Crochet Hook No. 2 ½. (Slack workers could use a No. 3 hook and tight workers a No. 2.

Slack workers lack proper motivation. This being the early sixties, tight workers simply need a strong sedative.

Of course, even the slack workers will need Nervine, a dry martini, or just plain ol’ opium, as the very first project in this book involves teeny tiny needles and thread.

Welcome to crochet! Please enjoy the complimentary eye-strain.
Tension: 12 rows = 1 in.

Measurements: 3 ½ in. deep x 22 in. long.


Commence with 33 ch.
You can tell this is a classy pattern by the way the designer invites you to “commence” instead of “begin”.
1st Row: 1 dc (double crochet) into 2nd (second) ch (chain) from hook, 1 dc into each of remaining ch, 1 ch, turn.

2nd Row: 1 dc into each dc, 1 ch, turn.

Repeat 2nd row until belt measures 23 in. (or 1 in. longer than waist measurement), omitting turning ch at end of last row.
Or until you have a nervous breakdown from row after row of nothing but double crochet. No wonder the model for this pattern was dreaming of escaping to Morocco!

This also explains why she quit crocheting her belt despite it being clearly several inches too small.
Fasten off.

Damp and press.

Sew on buckle. Then sew on beads and sequins as shown in illustration or as desired. Line inside of belt with corded ribbon.


Don’t go wild with the beads and sequins. Three beads and two sequins is all you can handle as a beginner crocheter and a social opium smoker.

Of course, if you believe that after this pattern you’re ready for the hard stuff, I won’t warn you to just say no. However, if the police show up at your door, you didn’t get this from me.


Click here for the printable pattern.

Read more!

Monday, October 31, 2011

Happy Halloween!

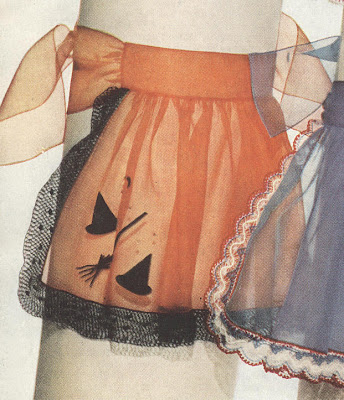
Halloween Apron from Coats & Clark’s Edgings Book No. 305, 1954

At last the truth is revealed! Halloween isn’t about eating candy until you puke, or watching scary movies involving an excessive amount of projectile vomiting. Halloween is all about preserving your femininity.

So, there’s no better way to celebrate Halloween than to don a ladylike apron you made with your very own little ladylike hands. However, don’t confess your plans ahead of time to your husband, or he may try to persuade you to make a sexy French Maid apron instead! Men just don’t understand that only fallen women oppressed by the Patriarchy wear French Maid costumes.


Unlike the poor, downtrodden woman pictured above, you are no victim of depraved male fantasies. Your Halloween apron will celebrate radical feminism! It will proclaim a liberated woman’s inalienable right to choose … to spend Halloween in the kitchen!

Besides your new apron will come in real handy once the inevitable Halloween barfing begins.

For the complete pattern (and more snark!):

How to Make Aprons

Each apron requires 1 yard of organdy, 36 inches wide, and 1 spool of Coats and Clark’s Mercerized Sewing Thread, Art. C. 3, in a matching color. Aprons are made identically: Cut a piece of organdy 12 ½ x 36 inches and roll a ¼ inch hem around three sides. Slip stitch hem. Cut a piece of organdy 6 ½ x 15 ½ inches for waistband. Cut two pieces of organdy 6 x 36 inches for ties, roll and sew a ¼ inch hem around three sides. Gather top of apron to measure 15 inches. Fold waistband in half lengthwise, turn in ¼ inch hem on raw edges and sew across top of apron.

Gather raw ends of ties to measure 3 inches, insert in ends of waistband and sew in place.
I’m actually hopeless at sewing, so I won’t tell if you sneak off to Wall-Mart and buy a pre-made apron. Or if you’re low on cash, just mug a Wall-Mart greeter for their vest.

Wall-Mart vests make great Halloween costumes.

Just don't try this right after a snowstorm!
Halloween Apron: Appliqué hats and 1 strip of felt ¼ x 4 ¼ inches for handle of broom. Use bugle beads for bristles and decorate hats with sequins.
Sadly, bugle beads are long tube-shaped beads, not Mardi Gras beads you get from flashing boogie woogie bugle boys.

This picture is provided just in case you don't know what a witch's hat looks like. You wouldn't want to accidentally applique top hats all over your apron instead.

I'm not sure what this apron means ("I cook with style"? "I killed Fred Astaire and served him for dinner"?), but I do know it definitely doesn't say, "Happy Halloween"!

Halloween Apron Edging . . . S-532

COATS & CLARK’S O>N>T> TATTING-CROCHET, Art. C. 21, Size 70: 3 balls of No. 12 Black.

Milwards Steel Crochet Hook No. 14.

Orange organdy apron.

Make a chain 6 inches longer than outer edge of apron. 1st row: Sc in 2nd ch from hook, * ch 5, skip next 2 ch, sc in next ch. Repeat from * across until piece measures 4 inches longer than outer edge of apron, having number of loops divisible by 8 and 7 more at end of row.
Show your kids this pattern to prove they will have to use math in every day life.

Better yet, have them make the apron for you. It's educational! And then no one will ever have to know that you can't divide correctly by eight.
Ch 3, turn. 2nd row: * Draw loop on hook out to measure ¼ inch, thread over and draw loop through, insert hook between single and double loops and draw a loop through, thread over and draw through two loops on hook, (knot st made), sc in next loop. Repeat from * across, ending with sc in last loop, dc in last sc. Ch 3, turn. 3rd row: * (Make a knot st, sc under double loop of next knot st) 7 times; ch 3, make 9 dc under double loop of next knot st (shell made), ch 3, sc under double loop of next knot st. Repeat from * across, ending with sc in last knot st, dc in top of turning chain. Ch 3, turn. 4th row: * Make a knot st, ** sc in next knot st. Repeat from * across, ending with sc in knot st preceeding next shell; make a knot st, sc in center dc of shell, make a knot st, sc in next ch-3 loop, make a knot st. Repeat from ** across, ending with sc in last knot st, dc in top of turning chain. Ch 3, turn.
The insistence on repeating from * or ** across leads me to believe there will be dire consequences if you attempt to repeat up-and-down.

Of course, if you read this Halloween pattern backwards, you will discover the hidden satanic messages.
5th row: (Make a knot st, sc in next knot st) 3 times; * ch 3, make a shell in next knot st, ch 3, sc in next knot st, (make a knot st, sc in next knot st) 7 times. Repeat from * across, ending with sc in last knot st, dc in top of turning chain. Ch 3, turn. 6th row: Work as for 4th row. 7th row: Work as for 3rd row. 8th row: Work as for 4th row, ch 5 at end of row. 9th row: * Sc in next knot st, ch 5. Repeat from * across. Ch 1, turn. 10th row: Sl st in first loop, sc in same loop, * make 2 knot sts, sc in next loop. Repeat from * across. Ch 5, turn. 11th row: Sc in center of first knot st loop, * ch 5, sc in center of next knot st loop. Repeat from * across. Break off. Sew edging neatly in place, gathering 2 inches at each corner.
And naturally, there are also dire consequences to NOT sewing edging neatly!

Like… um… social stigma? That’s right! Just think of the horrible shame you will feel if you’re seen in public wearing a slovenly Halloween apron. Nothing could be more humiliating!

Oh dear.

Click here for the printable pattern.


Read more!
Friday, April 1, 2011

The World is Going to Hell in a Handbag!

Initial Knitting Bag from Star Variety Show, 1942

And this is the only purse that’s Hellspawn approved for carrying damned souls into the fiery pit.

Yes, you’d think demons would have more attractive accessories for the Apocalypse. But even the most ignorant imp knows that one glimpse of that big fuzzy H will cause the hardiest housewife to abandon all hope.

Now, I’m no theologian, so I don’t know why Satan’s spawn would want a handbag that doubles as a dust mop. I suppose paving the road to Hell with good intentions can be dusty work. However, everyone knows that Swiffers are the preferred cleaning tool of the dark side.


April Fools! It’s actually a prank knitting bag not a demonic purse!

Of course, this pattern’s a prank. No one would seriously want to dust their home with a knitting bag.

For the complete pattern (and more snark!):

INITIAL KNITTING BAG – No. 2116

Materials Required – AMERICAN THREAD COMPANY “GEM” COTTON YARN.

6 Skeins Light Henna or any Color desired.
As long as that colour is bland. Attractive knitting bags are just asking to be stolen. And personalizing it with your initial will not protect you from every Helen, Hazel and Harriet with a police record.
Bone Crochet Hook Number 4 or 5.

Front. Ch 45 and work 44 s c on ch, ch 1, turn and work 23 more rows of s c.
The irony of a crocheted knitting bag is not lost on me. However, it all makes perfect sense as long as you remember this rubric:

Rock smashes scissors
Scissors cut paper
Paper disproves Spock
Spock sells Crochet
Crochet smothers Knitting
Knitting yarn bombs Rock
25th Row. Decrease 1 st at both ends and work 1 row even. Repeat the last 2 rows 7 times, break yarn and work a second section.

Gusset. Ch 4 and work 3 s c on ch, ch 1, turn. Work 8 more rows of s c even.

Next Row. * Increase 1 st and work 8 rows even. Repeat from * twice.

Next Row. Increase 1 st and work 30 rows even. Next row. Decrease 1 st, then decrease 1 st every 9th row 3 times.
In 1942, the bigger the knitting bag the better. No undersized knitting bag/dust mop was going to defeat Hitler.
Tufting. Cut strands 2 inches long, take 24 strands for each tuft and tie about 1 inch apart around edges of both sides of bag.

Initial. Outline with a basting thread the letter desired. Cut strands 1½ inches long, take 24 strands for each tuft and place about ½ inch apart.
Tufting is natural. Tufting is good. Not everybody tufts, but everybody should.
Shoulder Cord. Ch 5, 1 s c in each ch. Next row, 1 s c in each s c. Without joining rows, repeat this row until cord measures 35 inches or is length desired.
Is length desired? Probably, but don’t crochet a long enough rope to hang yourself.


Sew gusset in position. Sew shoulder cord to each side at gusset. Make ten 5 ch loops leaving an end to sew to bag for drawstring. Sew loops starting in second row about 3 inches apart.

Drawstring. Make a ch about 26 inches long, lace through loops and finish with a knot at each end.
That’s right, no zippers. All metal was needed for the war effort. And no lining either, because our brave boys at the front need silky underwear.

Yes, that meant the knitting needles stuck out the sides of the bag. Which made it an excellent weapon for beating up Nazis.

In wartime, every little bit helps!


Click here for the printable pattern.


Read more!

Wednesday, January 12, 2011

Recession Chic!

Cotton jewelry from Star Variety Show of Knitted and Crocheted Models, 1942

Cotton jewelry – nothing gayer, nothing newer, nothing more talk-provoking.
The United States had just entered the war the previous December. What else could there be to talk about, other than cotton jewelry?

Although to be fair, the designers are trying to support their boys overseas. Why waste metal in foolish frippery, when it could be better used in munitions?

Yarn munitions don’t work nearly as well.

Thankfully, nowadays supporting our troops doesn’t require us to sacrifice our metal jewelry. Still, diamonds are too high maintenance to be a girl’s best friend during a recession, so it’s time again to start talking about cotton jewelry!

Um… er… it could be worse?
For ONE complete pattern (and a full serving of snark!):


SHELL NCKLACE AND BRACELET – No. 2107

Materials Required – AMERICAN THREAD COMPANY “GEM” COTTON YARN.

26 Yards Peach or any Color desired.

I do like a pattern that gives me a little choice, just in case I can’t find peach yarn.

Choice is important during hard economic times, whether it’s the 1940s or today. Like how women are choosing to spend their money on food and shelter, while the menfolk are choosing hip-hop bling!
11 Yards Green.

Bone Crochet Hook Number 4 or 5.

Four OR five, take your pick. It doesn’t really matter. There’s no gauge for this pattern. It’s footloose and fancy-free!

But before you reach for your size Q rug hooks, remember that bigger isn’t always better for cotton jewelry.


Leaving 8 inches of yarn free...
Yarn free! As free as the wind blows, as free as the grass grows, yarn free to follow...

... any other pattern!

Why stick with this one? Like your last home loan, you know it’s not going to end well.
...* ch 6, slip st to 5th st from hook for ring, (shell) ch 3, 1 d c, 1 s d c, 1 s c, 1 sl st in ring, repeat from * 25 times for necklace about 18 inches long. Ch 1 after last shell. Break yarn leaving about an 8 inch length. Attach Green in last s c leaving an 8 inch length free. * Yarn over needle 3 times, insert needle in loop of s c above shell, yarn over, pull through, yarn over, pull through, yarn over, pull through, 2 loops, yarn over, through 2 loops, yarn over, pull through all loops on needle. Slip st in s c between shells, repeat from * across shells. Chain the Green and Peach ends together for ties.
And now you’re the proud owner of this!

I guarantee that if you wear a shell bracelet to your next shindig, it will be talk-provoking!

“Look at poor Sally, she had to sell all her jewelry after she got laid off at the factory. Oh well, I suppose it could be worse!”

Click here for the printable pattern.


Read more!

Tuesday, December 21, 2010

Have a Swanky Solstice!

Ribbon Art, c. 1920

Ribbon Art: How to make Hundreds of Dainty and Practical things of Ribbons Illustrated in Colors with detailed instructions
Detailed instructions -- that’s very promising. Just imagine all the authentically Dainty and Practical 1920s accessories we can make! We’ll be the cat’s meow!
Fashion and Ribbon

MORE and more, the important costume designers and smart interior decorators employ the ever adaptable and colorful ribbon.

TO the return of simple classic lines in dress, we may attribute the increasing appearance of ribbon in fashion.”
1920s fashion was much more than just a return to simple classic lines. Dames divested themselves of their confining costumes and flung themselves into blatantly pagan partying.

Notice how the gentleman in the second picture can’t take his eyes off her arrow-shaped, bawdy bow. 1920s gold diggers were well aware of the hypnotic properties of ribbon, using its satiny sheen to ensnare unwary men and bind them to their will.

In fact, see the doll face on Ribbon Art’s cover? Not the kid, I mean the full-grown tomato. Sure, she’s sitting demurely in her wicker chair, sorting her craft supplies. But get an eyeful of her strappy heels and her plunging neckline. She’s no matronly Mrs. Grundy. This Sheba’s a sorceress, wrapping men around her finger with as much ease as she wraps that ribbon.

I bet we’ll discover all her pagan beauty secrets inside...

For more ribbony magic:

In accessories to the costume – by way of adding a necessary color note and hint of frivolity, ribbon fills a most important need.”
You better believe that ribbon fills the most important needs of life. Why without ribbon, life is just not worth living.

But ditch the beret and don some ribbon with a note of colour and a hint of frivolity, and you’ll soon turn that bow-like frown upside down.
You will find in this book, over a dozen pages of cocardes and trimmings – easily and inexpensively made – which will lend a picturesque quality to the smart gown. And of girdles and corsages there is a wide variety. With a few, simple dark dresses and a half dozen or so of these new accessories, the clever woman can make her costume seem always interesting and different.
Are you a clever woman or a dumb Dora?

Actually the real question is: Do you have a clue what a cocarde is?

Cocardes are those ribbony things at the bottom of the page. You stick these things on other things, and your crown is instantly glorified. Or something.

Suffice to say, your friends will think you’re the cat’s pajamas if you go to the Solstice party with a giant cocarde stuck to your hat.

Yes, that’s a good thing! Would I lie to you?
For hat trimmings, we are picturing a host of ideas featured by the advance models just now shown in Paris.

These trimmings are essentially simple and therein lies their charm. For a woman with but a slight knack with the needle can make them successfully. And many women will make several trimmings for the one hat – each trimming entirely changing its character.

On page 29 are shown five ways to trim one hat. And you could multiply the five ways five times without exhausting the ribbon trimming possibilities.

The last design is called The Princess Leia.
Purses – bandeaus – hair ornaments – scarfs – shoe cocardes – all have been executed for costume effect.
As opposed to executed for comedic effect.
We have endeavored in this book to feature only those that can be made without difficulty and that have definite claims to lasting smartness. It is by such accessories as these that the widely dressed woman wins and holds her reputation for smartness.

In baby things...

Babies in the 1920s were made of sterner stuff than today’s tots. Mothers back then didn’t have to worry about choking hazards, and could safely drape them in ribbon and tiny cocardes from head to toe.

Whereas, babies today have to be watched constantly as they’re apparently determined to kill themselves with anything they can get their hands on, even dog hair!
... in boudoir luxuries, and in lingerie, ribbon is more than a fashion. The newest ideas which the exclusive ships are continually originating – the clever, unusual thoughts – we are illustrating here in great profusion. They make charming gifts and proud possessions.

For the lamp shades and cushions and various articles of home decoration features in the following pages, we sought out the smartest interior decorators. It is their opinion that ribbon because of its color value and texture sympathy is the most artistic medium in which to develop the accessories which give a personal touch to the home.
While ribbon certainly has its place in pagan celebrations, I believe it makes for very impractical home decorations.

Plus dancing around a maypole indoors is clearly as much fun as a stock market crash.
To women who want color and interest in their apparel and clothing, who wish to influence their children’s lives by tasteful surroundings, this book is dedicated.”
But never mind the dust. Never mind the strangling hazards inherent in hanging ribbons around your house. If you don’t buy this book you are a BAD MOTHER and your children will grow up to be uncultured BARBARIANS.
“It is published with the hope that it may prove to be a practical help and inspiration to those in the quest of beauty.”
That, and they hoped to get very rich by starting a ribbon publishing empire.

But let’s take a look at what actual ribbon art patterns we can make.

OMG, it’s a BRA made of RIBBON! I want one! I want one now!

Now let’s read the detailed instructions we were promised...
The brassiere illustrated above is essentially practical and one can easily afford several if one makes them at home of ribbon. The yardage depends on the bust measure. For the shoulder straps and the binding on the top and bottom edges 1-inch satin ribbon is used.
Well, that was... less than enlightening.

There is no indication what the bottom strap of the bra attaches to. Although from the illustrations on the next page we can deduce that a 1920s woman’s boudoir was the place where she played dress-up. So I suspect the strap attaches to something salacious.

Oh look, I’ve finally found a page of instructions!

None of which apply to bra-making.

Oh well, it’s not as if a 1920s flapper needed a well-engineered bra – or any bra at all.

Is she wearing a bra? Only one thing is certain, this hotsy-totsy isn’t wearing a corset.

So, there will not be a printable pattern this time around as there are NO ACTUAL PATTERNS.

Not that I’m bitter, or anything... But if the saps who created this flat tire of a book were still around, I’d ask my hard-boiled pals to give them the bum’s rush.

I mean, Happy Solstice!

Read more!

Sunday, October 31, 2010

Happy Halloween AKA a Taste of ClownFests to Come!

Clown Mask from Crochet World, Special Issue No. 6, 1984

“Awww... what a cute kitty. And who’s that holding the Trick-or-treat bag?

Oh my god! KILL IT! Kill the EVIL CLOWN!

Oh wait, it’s just Justin. Sorry kid, I didn’t mean to bludgeon you with my broom. Just take that darn mask off. It’s not safe. The next person who sees you might grab a shotgun, and then you’ll have a lot more to cry over than a concussion.

Next time, trust your instincts and go be Superman in your Underoos instead.”


Clearly, Justin’s crafty mother has decided she wants him dead. After all, we all know that clowns are the most terrifyingly loathsome creatures in all of Halloween lore.

You think I’m exaggerating?

Consider the horrifying evidence...

For the complete pattern (and more snark):

CLOWM MASK
By Joy M. Nore
Don’t let the name of the pattern designer fool you! Her name may look like “More Joy” but that’s just an evil plan to lull you into a false sense of security.
MATERIALS:
Worsted weight yarn: 2 ozs white, 1 oz black, 1 oz red
Crochet hook size G
½’’ wide elastic

MASK
With white, ch 31.
ROW 1: Sc in 2nd ch from hook and in each ch across, ch 1, turn.
ROWS 2 – 6: Sc in each st across, ch 1, turn.

EYEHOLES:
Be sure to make the eye holes as small as possible. You don’t want your child accidentally glimpsing themselves in a mirror.

Charlie Chaplin glimpsed himself in the dressing room mirror while making his 1952 film “Limelight” and was immediately possessed by the spirit of a murderous clown. In fact, that was the real reason his American visa was revoked and he was barred from re-entering the U.S.A.. The story about his alleged “communist sympathies” was just a cover, designed to prevent mass panic in the face of a Charlie Chaplin clown on a killing spree.

Yes, clowns are scarier than communists. They’re THAT scary.
ROWS 7 – 9: Sc in next 8 st, ch 1, turn. Fasten off.
Sk 4 st on Row 6, join in next st, ch 1, sc in same place, sc in next 5 st, ch 1, turn.
Work 2 more rows on these st in sc, ch 1, turn each row. Fasten off.
Sk next 4 st, join in next sc, ch 1, sc in same place, sc in next 8 st, ch 1, turn.
Work 2 more rows on these st in sc, ch 1, turn each row.
ROW 10: Sc in next 8 st, ch 4, sc in next 6 st, ch 4, sc in next 8 st, ch 1, turn. Eyeholes completed.
ROWS 11 & 12: Sc in each st across, ch 1, turn.
ROW 13: (1st Point) Sc in 1st 14 st, sl st in next st.
Justin’s clown mask comes complete with demonic horns. Clearly, it was inspired by the Sparr Fruit Co. Clown Brand advertising campaign:

Buy Sparr Fruit, or the Sparr Fruit Clown will come to your house and slice you open with his pointy hair and eat your heart, all the while giggling maniacally.

It was a surprisingly effective campaign.
ROW 14: Sl st in 1st st, sc in each st across, ch 1, turn. (13 st)
ROWS 15 – 20: Sc in each st across to sl st; sl st or ch 1, at same end of each row, having 1 less st in each row. (7 sc in Row 20)
ROW 21: Sl st in 1st st, sc in next 4 st, sk 1 st, sl st in last st.
ROW 22: Sc in next 2 st, sl st in next st. Fasten off.
Second Point: Join yarn in next st on Row 13. Rep Rows 13 – 22, reversing shaping.

EYE DIAMONDS:
The eye diamonds are more proof that Justin’s mother wants him dead. After all, if Justin’s vision is completely obscured by his mask, he’s likely to wander into the street and get mowed down by a car.
With black, ch 2.
ROW 1: Sc in 2nd ch from hook, ch 1, turn.
ROW 2: 2 sc in 1st st, ch 1, turn.
ROW 3: 2 sc in 1st st, 2 sc in last st, ch 1, turn.
ROW 4: Sc in each st across, ch 1, turn.
ROW 5: 2 sc in 1st st, sc in next 2 st, 2 sc in last st, ch 1, turn.
ROW 6: Sc in 1st st, ch 1, turn.
ROWS 7 – 9: (EYEHOLES) Sc in 1st st, ch 1, turn. Fasten off after Row 9. At the other end of Row 6, join yarn in 5th st, Rep Row 6: 4 times.
Do not Fasten off.
ROW 10: Sc in 1st st, ch 4, sc in last st, ch 1, turn.
ROW 11: Sc in each st and ch across, ch 1, turn.
ROW 12: Sk 1st st, sc in next 4 st, sl st in last st.
ROW 13: Sl st in 1st st, sc in next 2 st, sl st in last st.
ROW 14: Sc in next 2 st, sl st in last st.
ROW 15: Dec over next 2 st. Fasten off, leaving length for sewing. Sew in place.

NOSE: Make 2’’ pompon with red yarn. Sew as shown in photograph.

FINISHING: With black, sc all around Mask, putting 2 sc in each corner. With red yarn, make straight st outward from Eyes. Cut elastic to fit around head; and sew on each side.
You might believe that being terrified of clowns is a modern phenomenon. Surely, you say, there was a far less sensible time when clowns were considered loveable. Why just look at this adorable little scamp in this vintage card!

Ignoring minor details such as that girl is far too young to be playing with fire let alone worrying about future lovers, the cat is clearly possessed by demons or it would have ripped that collar off, and the boy in the clown costume is so psychotic he’s just smashed his head through a mirror and has jagged shards of glass pointing right at his throat...

Where was I? Oh yes, ignoring all the above, the fact remains that this is just a drawing which in no way conveys the abiding horror of clowns throughout history.

Allow me to present Actual Photographic Evidence.

Some of these children are frozen in terror, while others, like the boy in the wheelchair, are resigned to their fate. The clown has them all in his corpse-white grasp, and there’s no escape. Maybe, thinks the littlest one, we’ll be allowed to live and get to be his evil minions. All I have to do is kill the photographer to prove my loyalty.

He’s wrong, of course. It’s the little girl who gets to be the killer clown’s acolyte. Yes, that’s Justin’s mother, Joy!

So have a Happy Halloween! Steer clear of the sweet old lady next door who offers to crochet costumes for you, and watch out for clowns!

Click here for the printable pattern.

Read more!

Tuesday, September 14, 2010

Fun is in the eye of the beholder.


Poodle Set from McCall’s Needlework Fall-Winter, 1952-53

To properly celebrate PoodleFest, it’s not enough to cover your toilet rolls and hair spray with poodles. You need to turn your children into poodles, too.

As McCall’s helpfully points out, “What makes it fun is – her crocheted hat has poodle ears, her scarf, poodle legs, and a poodle muff cuddles her pinkies.”

Yes, wearing the dismembered body parts of your favorite pet is what makes it fun!

But wait, someone in the photo is clearly not having fun.


In fact, her poodle pal looks downright depressed.

If he doesn’t turn that frown upside down pronto, he’s going to find himself turned into a cap, scarf and muff set. Just like the last poodle who failed to live up to his billing as “funniest thing”.

For the complete pattern (and more snark!):

FRENCH POODLE

Size: 9’’ x 12’’.
Materials: Columbia Knitting Worsted, 6 1 oz balls brown. Small amount of black for mouth; strand of white for teeth. Cotton for stuffing. 1 pair of glass eyes No. 14 (or 2 buttons). “Boye” steel crochet hook No. 1.
Gauge: 6 s c = 1’’; 6 rows of s c = 1’’.
Take note – you have the option of using buttons instead of glass eyes. Don’t get all giddy with your newfound sense of freedom, though. This poodle only comes in one colour – brown.

If you make it black or white, your poodle will no longer be the “funniest thing”. Instead, the poodle will be a symbol of your profound failure as a Mother.

Pink is right out.


Body: Starting at back, ch 6, join in ring with sl st.
Row 1: 8 s c in ring.
Row 2: 2 s c in each st (16 sts).
Row 3: * 2 s c in first st, 1 s c in next st, repeat from * around (24 sts).
Row 4: Same as row 3 (36 sts).
Row 5: 2 s c in every 9th st (40 sts). Work even for 30 rows. Break off yarn. Turn inside out.

Tail: Ch 6, join in ring with sl st.
Row 1: Work 8 1’’ lps in ring as follows: * With strand over first finger of left hand (1’’ from work), insert hook in ring, draw strand through ring from under the finger, then yarn over hook and through the 2 loops on hook (finishing 1 s c), repeat from * 7 times more (draw lps up to make sure they are 1’’ long and even). Continue to work around.
Row 2: 2 lps in each st (16 lps). Work 1 lp in each st around for 2 rows, then work 1 s c in each st for 9 rows.
Row 14: Work 7 s c, ch 1, turn.
Row 15: Skip 1 st, work 6 s c, ch 1, turn.
Row 16: Skip 1 st, 5 s c, ch 1, turn.
Row 17: Skip 1 st, 4 s c, break off yarn.

Stuff Tail and Body: Sew tail to body, having last row of tail at center back of body.
Just make sure to orient your poodle’s tail up, like in the McCall’s photo. You want a happy poodle, not a clinically depressed poodle who might suddenly turn around and chew on a former head of state.
Head: Starting at top, ch 8, join in ring with sl st.
Row 1: Work 10 lps in ring (as in tail).
Row 2: 2 lps in each st (20 lps).
Row 3: 2 lps in each st (40 lps).
Rows 4 and 5: 1 lp in each st.
Row 6: 1 s c in each st, increasing 6 sts around (46 sts).
Rows 7 to 9: 1 s c in each st.
Row 10 (Start face): 1 s c in each of 23 sts, ch 18 for chin and fasten with s c in first st, then work around for face as follows:
Row 1 (continue on wrong side): 1 s c in each of 4 sts, fasten eye in next st, or place marker for button, 1 s c in each of 11 sts, fasten eye in next st, 1 s c in each of 5 sts, 1 s c in each of the 18 ch (41 sts around).
Row 2: Sk 1 st, 21 s c, sk 1 st, 18 s c; 39 sts.
Row 3: Sk 1, 20 s c, sk 1, 17 s c, 37 sts.
Row 4: Sk 1, 19 s c, sk 1, 16 s c, 35 sts.
Row 5: Sk 1, 18 s c, sk 1, 15 s c, 33 sts.
Row 6: Sk 1, 17 s c, sk 1, 14 s c, 31 sts.
Row 7: Sk 1, 16 s c, sk 1, 13 s c, 29 sts.
Row 8: Sk 1, 15 s c, sk 1, 12 s c, 27 sts.
Row 9: Sk 1, 14 s c, sk 1, 11 s c, 25 sts.
Row 10: Sk 1, 13 s c, sk 1, 3 s c, work 2 lps in each of 2 sts, 1 s c at center, 2 lps in each of 2 sts, 2 s c.
Row 11: Sk 1 st, 12 s c, sk 1 st, 2 s c, 4 lps over 4 lps, 1 s c, 4 lps over 4 lps, 2 s c.
Row 12: * Sk 1 st, 1 s c in each of 2 sts, repeat from * around, break off yarn.
With black yarn, work 2 rows of s c around, break off yarn, close mouth with a few sts.
Of course, some poodles have legitimate reasons for being both depressed and homicidal.


Continuing on wrong side, join brown yarn at neck edge and work 24 s c across back of head, and 20 s c across ch (44 sts). Continue to work around, skipping 1 st each side on each of the next 6 rows (32 sts remaining). Work even for 10 rows, then work across front only as follows:
Row 1: Ch 1, turn, sk 1 st, work 14 s c, ch 1, turn.
Row 2: Sk 1 st, 13 s c, ch 1, turn.
Row 3: Sk 1 st, 12 s c, ch 1, turn. Work 4 more rows in this manner, break off yarn. With white, work 4 long sts for teeth below black nose. Cut lps at chin.
My, what sharp teeth you have, Grandma... I mean Mr. Poodle!
Stuff head firmly, shaping face. Sew body to edge of neck.

Paws and Legs (Make 4 legs the same for 8 lp rows): Starting at sole, ch 4, join in ring with a sl st.
Row 1: 6 s c in ring.
Row 2: 2 s c in each st (12 sts).
Row 3: 2 s c in each st (24 sts).
Row 4: 1 s c in each st (24 sts).
Row 5: 5 s c, 2 s c in each of 7 sts, 12 s c (31 sts).
Row 6: 8 s c, sk 1 st, 1 s c, sk 1 st, 2 s c in each of 3 sts, sk 1 st, 1 s c, sk 1 st, 14 s c (30 sts).
Row 7: 8 s c, sk 1, 3 s c, sk 1, 3 s c, sk 1, 3 s c, sk 1, 9 s c (26 sts).
Row 8: 8 s c, sk 1, 3 s c, sk 1, 3 s c, sk 1, 9 s c (23 sts).
Row 9: 8 s c, sk 1, 4 s c, sk 1, 9 s c (21 sts).
Row 10: 10 s c, sk 2, 9 s c (19 sts).
Row 11: 19 s c (ending row at center back of heel).
Row 12: 1 lp in each st (19 lps). Repeat rows 11 and 12, seven times more (8 lp rows).
Repeat row 11, then work top of legs as follows:
Poodles of the world unite! You have nothing to lose but your leashes!

And your incredibly silly hair cuts...


Right front and right back legs:
Row 1: Work 1 lp in each of 9 sts, ch 1, turn.
Row 2: 1 s c in each of 11 sts, ch 1, turn.
Row 3: 11 lps, ch 1, turn.
Row 4: 2 s c in first st, 1 s c in each of 9 sts, 2 s c in last st, ch 1, turn.
Row 5: 13 lps, ch 1, turn.
Row 6: 13 s c, break off yarn, leaving enough length to sew leg to body.

Left front and left back legs (Starting at center back): Row 1: Sl st across 10 sts, 9 lps to end of row, ch 1, turn.
Row 2: 11 s c, ch 1, turn.
Row 3: 11 lps, ch 1, turn.
Row 4: 2 s c in first st, 9 s c, 2 s c in last st, ch 1, turn.
Row 5: 13 lps, ch 1, turn.
Row 6: 13 s c, break off yarn.
Place cardboard shapes in paws, then stuff legs. Sew legs to body, paws facing front. Complete poodle by making the ears as follows:

Ears (Make 2): Ch 15, turn.
Row 1: Sk 2 ch, 13 s c, ch 2, turn.
Row 2: 1 lp in each st, ch 2, turn.
Row 3: 13 s c, ch 2, turn. Repeat rows 2 and 3 three times more, then repeat row 3 for 8 rows.
Row 18: Sk every other st, break off yarn.
Sew ears to head close to last lp row on top of head.

Leash: Use heavy cotton yarn. Cut 9 28’’ strands. Divide in 3, knot one end, braid. Knot other end. Tack one end back for 5’’ handle. For collar, cut 24 9’’ strands. Divide, braid. Sew ends and attach leash.

“POODLE” CAP, SCARF, MUFF

Materials: Knitting Worsted, 6 oz. red.
Red? Since when do poodles, or even “poodles,” come in red? Brown, black, white, even pink, sure! But never red!

Well... except for this poodle.

But why would you want your daughter to look like the day-glo spawn of Carmen Miranda and a Russian folk dancer?
“Boye” non-inflammable 5 ¾’’ crochet hook, Letter “F.” ½ yd. ¼’’ elastic.
Interesting historical tidbit: the words inflammable and flammable, both mean “this item burns like bejeezus and might spontaneously combust if you look at it sideways”, but come from entirely different Latin roots. Today flammable is the preferred term, because English speakers look at the prefix “in” and assume incorrectly (see how INcorrect is the opposite of correct?) that inflammable actually means “safe as houses, feel free to dress your children in it and allow them to play with matches”.

Unfortunately, none of this answers the real question of why our crochet hooks must be fireproof in order to safely complete this pattern.
Gauge: 4 s c = 1’’.
Knot Stitch: † * Draw up a ¾’’ lp on hook, yo and through lp, insert hook under thread at left of lp and work 1 s c, repeat from * once, s c in next ridge st, repeat from † across.

Poodle Trimming: Row 1: Attach yarn to first ridge st of first ridge row, work knot st across row. Row 2: Ch 1, work 1 knot st (turning knot st), s c in first ridge st of next row and work knot st across. Repeat row 2 for remainder of trimming.

CAP: Starting at center of head, ch 22.
Row 1: S c in 2nd ch from hook, and in each ch across (21 s c), ch 1, turn. Work s c in back lp of each s c (slipper st) and work even until piece measures desired length to top of ear, ch 1, turn.
Ear Muff: Dec 1 s c each side every row until 1 st remains. End off. Attach yarn to first st of starting ch, work 21 s c across, ch 1, turn. Finish same as first side. Work poodle trimming over each ear muff. Work 1 row knot st around edge of each ear muff.
Ties: Make six 30’’ chs; braid 3 chs tog for each tie. Knot one end, attach other end to tip of each ear muff.
Maybe the hooks need to be “non-inflammable” because of the extreme sport of speed crocheting. I sure wouldn’t be surprised to see scorch marks on Lisa Gentry’s hooks!


SCARF: Ch 11. S c in 2nd ch from hook, and in each ch across (10 s c), ch 1, turn. Work slipper st for 3’’, ch 1, turn. Dec row: * Draw up a lp in each of 2 s c, yo and through all lps on hook, repeat from * across (5 s c). Work even for 1 ½’’, ch 1, turn. Work 2 s c in each s c across (10 s c), ch 1, turn.
Neck Piece: Work slipper st until neck piece measures 12 ½’’ or desired length around neck. Repeat dec row (5 sts remain), ch 1, turn.
Slit: Work slipper st for 2’’. End off. Attach yarn to first row of slit and work another piece across same 5 sts for 2’’, do not end off.
Join Slit Section: * S c in first s c of first piece, s c in first s c of 2nd piece, repeat from * across (10 s c), ch 1, turn. Work slipper st for 3’’. End off. Work poodle trimming over first and last 3’’ of scarf.

MUFF: Ch 26. Row 1: S c in 2nd ch from hook and in each ch across (25 s c), ch 1, turn. Work slipper st for 12’’ or desired length. End off. Work poodle trimming over entire piece. Sl st tog first and last row of muff. Work 4 rows s c around side openings (facings). Turn under and hem facings. Insert elastic in facings, cut to wrist measurement.
Handle: Make one tie as for cap, fold in half and sew in place.
There! Your child is now securely encased in bright red “Poodle” wear, with Prozac the Clinically Depressed Poodle to keep her company. You are officially a Good Mother.

But don’t rest on your laurels, even if they’re inflammable! There’s more poodles to come...

Click here for the printable pattern.


Read more!

Thursday, May 27, 2010

Happy Blogiversary!

Peter Pan collar from “Fluffy Ruffles”, 1951

Poor Sandy. All year, she was a good girl. She obeyed her parents, thought of others before herself, was only seen and never heard.

And this was the thanks she got on her birthday. A cupcake instead of a birthday cake. One lousy candle instead of seven (with one more to grow on). And a hand-me-down velveteen dress that used to belong to her odious big sister, Jane.

“Don’t sulk, Sandy,” Mother scolded. “I crocheted that Peter Pan collar so the dress would be like new. It’s what my mother did when I was growing up. I thought a good girl like you would understand.”

Sandy understood, all right. Unlike her mother, she understood that the privations of the Great Depression and the War Years were over. What’s more, she understood that doing the whole good girl routine from becoming a Brownie to becoming a housewife was for saps. Mom and Jane could go ahead and be patsies, but Sandy wouldn’t be conned anymore.

And when she grew up, she’d never wear Peter Pan collars again!


For the complete pattern (and more snark!):

Peter Pan

MATERIALS:

Clark’s O.N.T. Best Six Cord Mercerized Crochet, Art. B.4, Size 50: 2 balls of White . . . Milwards Steel Crochet Hook No. 12.

Starting at inner edge of collar, ch 203 to measure 12 inches.

1st row: Sc in 3rd ch from hook (picot made), ch 5, skip 3 ch, sc in next ch, * ch 1, picot, ch 5, skip 3 ch, sc in next ch. Repeat from * across. Turn.
Hang on, since when do you make a picot by single crocheting in a chain? Where’s the slip stitching? I was raised to believe you can’t make a picot without slip stitching!
2nd to 11th rows incl: Sl st to center of first loop, sc in same loop, * ch 1, picot, ch 5, sc in next loop. Repeat from * across. Turn. Break off at end of 11th row.
It’s bad enough Sandy got a fake birthday cake and gift, but she also got a fake picot?
EDGING . . . 1st row: Attach thread to end of first row on collar, sc in same place, * ch 5, sc in next loop. Repeat from * across to opposite end of first row. Ch 1, turn.

2nd row: Cut 6 strands of thread slightly longer than outer edge of collar. Working over these strands, make 6 sc in each sp. Cut off remaining strands. Ch 1, turn.

3rd row: * Picot, ch 5, skip 4 sc, sc in next sc, ch 1. Repeat from * across, ending with sc in last sc. Ch 5, turn.
Yeah, you keep telling yourself that your daughter won’t notice it’s not a real picot. One day, she’ll be surfing the interwebs and discover it’s a FAKE!
4th row: * Sc in next loop, ch 5. Repeat from * across. Ch 1, turn.

5th row: Repeat 2nd row.

6th row: * Picot, ch 5, skip 2 sc, sc in next sc, ch 1. Repeat from * across, ending with sc in last sc. Ch 1, turn.
Your daughter will never trust you again. Next thing you know, she won’t listen to your warning not to mix Pop Rocks and Coca Cola and when her stomach explodes, it’ll be all your fault!
7th and 8th rows: * Picot, ch 5, sc in next loop, ch 1. Repeat from * across. Ch 1, turn. Break off at end of 8th row. Attach thread to inner edge of collar and sc closely across. Break off.

Starch lightly and press.
Because everybody knows what will happen if you don’t starch lightly...

But what is absolutely, 100% true is how much fun Handmade by Mother has been over the past year. I’m grateful to every single DIYer, commenter, linker, and reader for supporting this labour of sick and twisted love. I look forward to a future filled with frightful knits and crochets.

Click here for the printable pattern.


Read more!

Wednesday, April 14, 2010

Happy Leper Day!

Leper Bandage from Quick Tricks, Book 188, 1968

Actually, today is when Hawaiians honour the heroic life of Father Damien, who vastly improved the lives of lepers banished to Molokai Island during the 1800s. Who cares about some 19th century leper priest, you ask? I’ll have you know that Saint Damien of Molokai’s fans include Robert Louis Stevenson, Mahatma Gandhi, and the people of Belgium who recently voted him De Grootste Belg AKA The Greatest Belgian!


Eep! Hang on, let me find a picture that makes him look less like a Cyberman from Doctor Who.


Ah, that’s better. I suspect Father Damien was also in the running for the cutest Belgian!

Now, I confess everything I know about leprosy, I learned from Stephen R. Donaldson’s whiny longsuffering leper protagonist Thomas Covenant and the heartbreaking scene in Ben Hur when John Candy discovers his mother and sister have become leopards lepers.

Thankfully, the editor of Quick Tricks decided to encourage the 1968 housewife to make something more useful than a clown to store mothballs (I kid you not). So, now I’ve learned that leprosy isn’t the highly communicable scourge that people feared for thousands of years. In fact, 95% of the world’s population is immune to leprosy and effective treatments for the disease have been available since 1982. Which means Thomas Covenant owes Lord Foul an apology for the events of White Gold Wielder – I mean, today is a day to celebrate the end of ignorance and a brighter future for those afflicted with the disease.

For the complete pattern (and more leprous commentary!):

Leper Bandage A-745

The approved bandage that church groups make to send to leper colonies.
Accept no substitutes!
CLARK’S ANCHOR CRONITA: 2 balls of No. 1 White.

Millard “Disc” Knit Needles 1 pair No. 12 (2.50mm.).

Cast on 25 sts.

1st row: Sl first st as if to purl, knit to end of row.

Repeat first row until only 1 yard of thread remains on second ball. Bind off.
Now, it’s true that leper colonies are mostly a thing of the past, but Father Damien is also the patron saint of AIDS and HIV patients and all other outcasts. Which means the endangered April Fish of Antwerp counts.

So, you’ve got plenty of time to knit or crochet up something for charity to mark Father Damien’s worldwide feast day on May 15th.

Just don’t make anyone a Mothball Clown, or Father Cyberman will make you pay!


Click here for the printable pattern.

Read more!