Monday, January 30, 2012

Crochet is the Opium of the Masses

Double Crochet Belt from “Learn to Crochet,” 1963

This belt is the very first project in “Learn to Crochet”. The method of instruction, the reader is assured, is most “pleasant”, although one is warned to always keep in mind the importance of neatness of execution. In other words, if your finished work is not lovely, it’s your own damn fault and your time would be better spent pursuing messier hobbies like pottery or bog snorkelling.

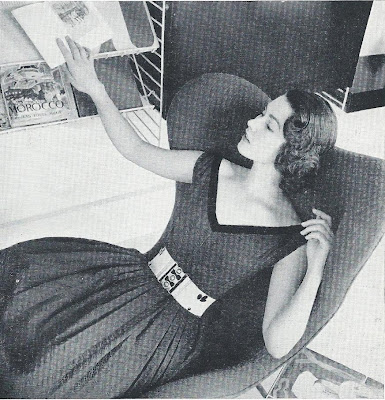
Observe the young lady in the picture above. She clearly understands the necessity for neatness as she’s shellacked her hair in place. There’s no arguing with results, her crocheted belt is lovely. True, she also has the pale complexion and lethargic poise of an opium addict, barely able to lift her arm toward her books.

Looks like she’s been reading Morocco by Jean-Louis Miège, an historian so obscure he only rates three sentences in the French language Wikipedia. I’m not sure what this tells us about our crochet model. Has she visited Morocco? Is she planning to? Is her opium supplier Moroccan?


Look, there he is! Seconds after this photo was taken, the fellow opened his robe, and asked historian Jean-Louis, “Say, wanna buy some opium? Primo stuff. Fell off the back of a truck. Would I lie to you?”

Or possibly our model can’t breathe and really needs to loosen her double crochet belt before she passes out.

For the complete pattern (and more snark!):

Double Crochet Belt

Coats Mercer-Crochet No. 10 (20 grm.): 2 balls.

There’s a strange symbol directly after Coats. Exhaustive internet research reveals that sadly it’s not a secret symbol used by opium smugglers. It’s actually just an older version of the modern Coats logo.

This model is worked in White, but any shade of Mercer-Crochet maybe be used. No. 10 is available in White, 610, (Dk Ecru), 609 (Ecru), 442 (Mid Buttercup), 621 (Lt. French Blue), 623 (Spring Green) and Spec. 8918 (Lt. Coral).
Lots of choice, so long as you stick to bland, inoffensive shades. No Ravishing Reds or Sex-Kitten Sapphires for you! Even Light Coral has to be special ordered, as a mere glimpse of a colour approaching pink will upset your opium-addled, ahem, delicate sensibilities.

And don’t even think about using any crochet thread other than Coats. Page six of the instructions, which you’ve memorized to ensure the loveliness of your work, decrees: “Coats Mercer-Crochet possesses qualities which are of the utmost importance to the work. It washed beautifully, never loses its colour or becomes ‘stringy’… it is the ideal crochet thread.”

Heaven help you if your thread becomes stringy! Your neighbours will accuse you of being strung-out.
Beads and sequins. 1 buckle.

¾ yd. corded silk ribbon for lining.

Milwards Steel Crochet Hook No. 2 ½. (Slack workers could use a No. 3 hook and tight workers a No. 2.

Slack workers lack proper motivation. This being the early sixties, tight workers simply need a strong sedative.

Of course, even the slack workers will need Nervine, a dry martini, or just plain ol’ opium, as the very first project in this book involves teeny tiny needles and thread.

Welcome to crochet! Please enjoy the complimentary eye-strain.
Tension: 12 rows = 1 in.

Measurements: 3 ½ in. deep x 22 in. long.


Commence with 33 ch.
You can tell this is a classy pattern by the way the designer invites you to “commence” instead of “begin”.
1st Row: 1 dc (double crochet) into 2nd (second) ch (chain) from hook, 1 dc into each of remaining ch, 1 ch, turn.

2nd Row: 1 dc into each dc, 1 ch, turn.

Repeat 2nd row until belt measures 23 in. (or 1 in. longer than waist measurement), omitting turning ch at end of last row.
Or until you have a nervous breakdown from row after row of nothing but double crochet. No wonder the model for this pattern was dreaming of escaping to Morocco!

This also explains why she quit crocheting her belt despite it being clearly several inches too small.
Fasten off.

Damp and press.

Sew on buckle. Then sew on beads and sequins as shown in illustration or as desired. Line inside of belt with corded ribbon.


Don’t go wild with the beads and sequins. Three beads and two sequins is all you can handle as a beginner crocheter and a social opium smoker.

Of course, if you believe that after this pattern you’re ready for the hard stuff, I won’t warn you to just say no. However, if the police show up at your door, you didn’t get this from me.


Click here for the printable pattern.

Read more!

Saturday, January 7, 2012

Oh, the Weather Outside is Frightful...

Ladies’ Ski Mask from “Easy to Make Fashions for the North, South, East, West”, c. 1960

So, clearly it’s time to fight back by frightening the heck out of Jack Frost.

Those who remember the 1960s speak fondly of the Summer of Love, but they never mention the Winter of Rabid Hate. But now I understand why so many hippies fled to San Francisco in 1967 and overindulged in free love and inexpensive marijuana. How else could they block out childhood memories of their mothers wearing this terrifying mask as she hunted them down like so many snowshoe bunnies? Yes, thousands of baby boom youngsters huddled behind snow banks in their urine-soaked snowsuits praying that this terrifying visage wouldn’t find them and make them come indoors to massage Mommy’s hammer toe.

Don’t believe me? Then explain this: George R.R. Martin, the infamous fantasy author, was but a tender twelve years old in 1960, and he believes to this day the most ominous phrase for all of humankind is...


I rest my case.

For the complete pattern (and more snark!):

Ski Masks

Materials Required:
AMERICAN THREAD COMPANY “DAWN” KNITTING WORSTED
I do believe this calls for another sign...


4 ounces Buff Heather
1/3 ounce each Red, Tangerine and Black
Red sequins, Red and Black felt, 2 large bone rings for Ladies’ Mask
1 pr. knitting needles No. 8
Aluminum crochet hook size F
I’ve complained in the past about the creepiness of so-called skin toned ski masks, but Buff Heather will make you look even less like a ski bunny and more like a bog body that’s been dug up at the 2014 Winter Olympics’ site.

Now, even though dead Soviets have turned up in bogs, I want to make it very clear I’m not accusing the Russians of anything. Especially Vladimir Putin.
LADIES’ MASK: Work Basic Mask.

BASIC MASK:
Cast on 82 stitches (sts) and work in Knit (K) 2, Purl (P) 2 ribbing for 2 inches ending last row with P 2.
NEXT ROW: K 2, P 2 for 28 sts, K 26, P 2, K 2 for 28 sts (Right side).
NEXT ROW: P 2, K 2 for 28 sts, P 26, K 2, P 2. Repeat last two rows for 1 inch ending with K 2, P 2.
NEXT ROW: K 2, P 2 for 28 sts, K 12, increase (inc) 1 st in each of the next 2 sts, K 12, P 2, K 2 for 28 sts.
NEXT ROW: K 2, P 2 for 28 sts, P 12, inc in next st, P 2, inc in next st, P 12, K 2, P 2 for 28 sts.
NEXT ROW: K 2, P 2 for 28 sts, K 12, inc in next st, K 4, inc in next st, K 12, P 2, K 2 for 28 sts.
NEXT ROW: P2, K 2 for 28 sts, P 12, inc in next st, P 6, inc in next st, P 12, K 2, P 2 for 28 sts. Continue in same manner until there are 12 sts between increasing points (94 sts).
The helpful definitions of common short forms, along with the pedantically spelled out instructions and the enthusiastically shouted NEXT ROWS, all imply that this basic ski mask is an ideal first project for a beginner.

Of course, it’ll be your first and last knitting venture after your family sees the finished hat and locks you away as a danger to yourself and others.
NEXT ROW: K 2, P 2 for 28 sts, K 38, P 2, K 2 for 28 sts.
NEXT ROW: P 2, K 2 for 28 sts, P 38, K 2, P 2 for 28 sts. Repeat last 2 rows 4 more times ending with K 2, P 2.
NEXT ROW: K 2, P 2 for 28 sts, K 11, bind off 16 sts for Mouth, K 10, P 2, K 2 to end of row.
NEXT ROW: P 2, K 2 for 28 sts, P 11, drop yarn. Attach new skein of yarn on the other side of Mouth, P 11, K 2, P 2 for 28 sts.
NEXT ROW: K 2, P 2 for 28 sts, K 11, drop yarn, pick up 1st skein of yarn, K 11, P 2 K 2 for 28 sts.
NEXT ROW: P 2, K 2 for 28 sts, P 11, cast on 18 sts, P 11 on other side of Mouth, K 2, P 2 for 28 sts, cut yarn of 2nd skein.

It’s not clear at this point how the Ski Mask will end up looking like a Sock Monkey who died of lock jaw.
NEXT ROW: K 2, P 2 for 28 sts, K 40, P 2, K 2 for 28 sts.
NEXT ROW: P 2, K 2 for 28 sts, P40, K 2, P 2 for 28 sts. Repeat last 2 rows twice.
NEXT ROW: K 2, P 2 for 28 sts, K 16, bind off 8 sts for Nose, K 15 P 2, K 2 for 28 sts.
NEXT ROW: P 2, K 2 for 28 sts, P 16, cast on 17 sts, P 16, K 2, P 2 for 28 sts.
NEXT ROW: K 2, P 2 for 28 sts, K 16, P 8, K 1, P 8, turn. Working across Nose sts only, K 8, P 1, K 8, turn, P 8, K 1, P 8, K 16, P 2, K 2 for 28 sts.
NEXT ROW: P 2, K 2 for 28 sts, P 16, K 2 together (tog), K 6, P 1, K 6, K 2 tog, P 16, K2, P 2 for 28 sts.
NEXT ROW: K 2, P 2 for 28 sts, K 16, P 2 tog, P 5, K 1, P 5, P 2 tog, K 16, P 2, K 2 for 28 sts.
NEXT ROW: P 2, K 2 for 28 sts, P 16, K 2 tog, K 4, P 1, K 4, K 2 tog, P 16, K 2, P 2 for 28 sts.
NEXT ROW: K 2, P 2 for 28 sts, K 16, P 2 tog, P 3, K 1, P 3, P 2 tog, K 16, P 2, K 2 for 28 sts.
NEXT ROW: P 2, K 2 for 28 sts, P 16, K 4, P 1, K 4, P 16, K 2, P 2 for 28 sts.
NEXT ROW: K 2, P 2 for 28 sts, K 17, P 3, K 1, P 3, K 17, P 2, K 2 for 28 sts.
NEXT ROW: P 2, K 2 for 28 sts, P 18, K 2, P 1, K 2, P 18, K 2, P 2 for 28 sts.
NEXT ROW: K 2, P 2 for 28 sts, K 19, P 1, K 1, P 1, K 19, P 2, K 2 for 28 sts.

Normally, I don’t recommend nose jobs for ski masks, but a knitted schnoz really shouldn’t look like it was on the losing end of an argument with a garden hoe.
NEXT ROW: P 2, K 2 for 28 sts, P 7, bind off 12 sts for Eye, P 2, bind off 12 sts for other Eye, P 6, K 2, P 2 for 28 sts.
NEXT ROW: K 2, P 2 for 28 sts, K 7, drop yarn, attach about 1 yd. of yarn at Nose and K 3, drop yarn, attach another skein of yarn at other side of other Eye and K 7, P 2, K 2 for 28 sts.
NEXT ROW: P 2, K 2 for 28 sts, P 7, drop yarn, pick up other yarn, P 3, drop yarn, pick up other yarn at other side of Eye, P 7, K 2, P 2 for 28 sts.
NEXT ROW: K 2, P 2 for 28 sts, K 7, drop yarn, pick up other yarn, K 3, drop yarn, pick up other yarn at other side of Eye, K 7, P 2, K 2 for 28 sts.
NEXT ROW: P 2, K 2 for 28 sts, P 7, cast on 12 sts, P 3, cast on 12 sts, P 7, K 2, P 2 for 28 sts.
NEXT ROW: K 2, P 2 for 28 sts, K 41, P 2, K 2 for 28 sts.
Unkind people might comment that the eyes look a tad close together...

...and they’d be right. However, keep in mind that the field of Ski Mask Physiognomy has been debunked, so we cannot conclude that only the criminal class would be caught dead or alive in this mask.

Although, it’s true that the last lady wearing this mask was seen in the company of this fellow ski enthusiast.

NEXT ROW: P 2, K 2 for 28 sts, P 41, K 2, P2 for 28 sts. Repeat last 2 rows once, then P 1 row, K 3 rows.
Work next 35 rows in stockinette stitch (K 1 row, P 1 row), decreasing 4 sts evenly spaced every other row but do not work decreases directly over decreases of previous row until 25 sts remain, cut yarn leaving an end. Thread yarn into needle and draw sts tog, sew seam.

Cut a section of Red felt for lower Lip and stitch in place. Cut a section Red felt for upper lip and stitch in place taking care to keep corners of Mouth neat. Cut two sections of Black felt for Eyes and stitch in place. Outline Eyes with red sequins and also stitch a few sequins on each Cheek.
Only a few sequins on those cheeks, mind you! Whether bog ladies were sacrificial victims or young misses with a poor sense of direction, they did NOT make themselves up to look like whores.

Of course, if you use too few, you risk creating sparkly duelling scars.
Embroider Nostrils in red. Cover 2 bone rings with single Crochet using Tangerine yarn and stitch in place for Earrings.
Go big or go home.
HAIR: Starting at ridge as illustrated and with Tangerine, join yarn over a K st. Working toward top of Mask, * skip 1 K st, wind yarn around index finger to form a 1 inch loop, insert hook through both loops of next K st and complete sc. Repeat from * in same row of K sts to top of mask, skip 1 row of K sts and repeat from 1st * until top of Mask is covered with loops.
Why Tangerine hair? Because you won’t win first prize at the Bog Body Costume Party if you forget that the acids in peat bogs eventually turn everyone into gingers. (Warning: only click the link if you’re a fan of graphic forensic content!)

Of course, the red sequins on your mask may disqualify you anyway, as no bog body has been discovered in sparkly disco wear.

Yet.

Click here for the Printable Pattern

Read more!

Saturday, December 31, 2011

Happy New Year!

The Workbasket, December, 1983

Elegance for Evening

Perfect for the holidays! The black sport weight yarn creates skyscrapers against a sparkling sky of metallic yarn.
Ah, the eighties! When the smoggy sky literally sparkled with volatile organic compounds. Every New Year was greeted with the festive sound of Grandpa’s emphysema acting up as he tried to sing Auld Lang Syne with the family. After Grandpa’s oxygen treatment, everyone would run outside to dance gaily in the acid rain until the hairspray in Mom’s hair caught fire.

Yes, hearken back to that halcyon yesteryear with an elegant sweater depicting a pollution-blackened cityscape.

For the complete pattern (and more snark!):

Directions are given for small (finished bust measurement: 36 inches) with changes for medium (38 inches) and large (40 inches) in parentheses. You will need 3 (4,5) ounces sport yarn, 3 ounces metallic yarn and a size G crochet hook (or size required for gauge). Use double strand of metallic throughout.
Shoulder pads are highly recommended, unless you’re into having your shoulders rubbed raw by metallic thread. Yes, looking like a linebacker really did have a practical purpose in that synthetic era.
Gauge: 9 sts equal 2 inches
5 rows equal 2 inches
Five rows of sport weight yarn every two inches? If you want to complete this project before the December 2012 apocalypse, you’d best start now. Don’t you want a sweater that will match the burning ruins of your hometown?
TO SAVE TIME, TAKE TIME TO CHECK GAUGE.
Ooh… catchy phrasing! So much better than the usual all-caps gauge warnings. This needs to be part of a poster campaign.


Note: Sweater is worked sideways. Rows are worked back and forth from waist to neckline.

FRONT: With black, ch 81 (87, 93).
Row 1: Dc in 4th ch from hook and in each of next 35 (41, 47) ch, join metallic, dc in next 42 ch, ch 3, turn – 78 (84, 90) sts.
Sweater is worked entirely in dc, with no shaping. Directions will be for number of sts and color only. Diagram will further clarify. Ch 3 and turn at end of each row. Ch 3 at end of row always counts as first dc of next row.
A fetish for counting stitches helps!

Count von Count makes all his own clothes.
Row 2: 42 Metallic, 36 (42, 48) black.
Row 3: 46 (52, 58) Black, 32 metallic.

Note: All even rows are worked with same number of stitches in same color as preceding row.
Row 5: 42 (48, 54) Black, 36 metallic.
Row 7: 32 (38, 44) Black, 46 metallic.
Row 9: 55 (61, 67) Black, 23 metallic.
Row 11: 37 (43, 49) Black, 41 metallic.
Row 13: 52 (58, 64) Black, 26 metallic.
Row 15: 35 (41, 47) Black, 43 metallic.
Row 17: 29 (35, 41) Black, 49 metallic.
Row 19: 43 (49, 55) Black, 35 metallic.
Row 21: 62 (68, 74) Black, 16 metallic.
Row 23: 37 (43, 49) Black, 41 metallic.
Row 25: 48 (54, 60) Black, 30 metallic.
Row 27: 36 (42, 48) Black, 42 metallic.
Row 29: 54 (60, 66) Black, 24 metallic.
Row 31: 32 (38, 44) Black, 46 metallic.
Row 33: 27 (33, 39) Black, 51 metallic.
Row 35: 43 (49, 55) Black, 35 metallic.
Row 37: 50 (56, 62) Black, 28 metallic.
Row 39: 39 (45, 51) Black, 39 metallic.
Row 41: 33 (39, 45) Black, 45 metallic.
Row 43: 59 (65, 71) Black, 19 metallic.
Row 45: 44 (60, 66) Black, 34 metallic.
Hopefully you haven’t sunk too far into a haze of “Vun, two, tree, ha-ha-ha!” because there’s a mistake in the forty-fifth row. Do you see it? Here’s a hint… all the other rows add up to 78 (84, 90) sts across. You’ll be fine if you’re crocheting a small size sweater, but you’re going to run into trouble if you’re trying to make a medium or large size.

I suspect it’s not a mistake, but instead a diabolical plot to make us all regret overindulging this holiday season. Only small sized people and muppets get a pass as they can’t hold their eggnog anyway.


Fasten off for small size. For medium, repeat rows 1 through 4. For large, repeat rows 1 through 8. Back is worked exactly the same as front. Sew 3 ½ inch shoulder seams. Sew side seams leaving 7 (7 ½, 8) inch opening for arms. Work 2 rnds dc around sleeve openings, join, fasten off. At waist, beginning at side seams, work 4 rnds dc, join, fasten off.
And tah-dah! You are now the proud owner of an authentic Eighties sweater. Add a bottle of hairspray and some legwarmers, and you’ll be all set to party hardy until the Police show up.


Click here for the Printable Pattern.

Read more!

Tuesday, December 20, 2011

Silent Night, Deadly Night

The Workbasket, December 1983

Create a chorus of pine cone carolers for “singing” around your Christmas tree.
“Singing” is in quotes because clearly this caroller is “screaming”. Because nothing says Winter Solstice like terrifying crafts.

This merry masterpiece was inspired by the ancient pagan tradition of sacrificing frozen carollers to ensure the return of the sun. Revellers would then impale the decapitated heads on pine cones, and hang them on their Solstice tree!

No, it’s true, I read all about it on the interwebs.
For the complete pattern (and more horror!):

For each caroler you will need scraps of red and green felt, a medium sized cotton ball, a pipe cleaner, a pine cone of any size, 2 blue sequins for eyes and 1 red for mouth, a small gold pearl, small pins, white glue and a polystyrene ball. Be sure to select a pine cone that is flat on bottom so that caroler isn’t wobbly.
Carollers should only be wobbly after they’ve drunk all your wassail, not before.


Using given pattern, cut hat and shawl from felt. Glue cotton ball to hat, let dry.
Trust me, cotton balls glued onto circles of green felt look exactly like Victorian top hats.

If you can’t see the clear resemblance, you clearly haven’t eaten enough delicious Rum Balls.
The size of the polystyrene ball selected for head should be chosen according to pine cone size. Using small pins, position sequins and gold pearl for face. Set aside.
The ceremonial importance of the nose being gold has been lost in the mists of time. Nevertheless, do not mess with tradition! One slip up, and you’ll be condemned to twelve months of flood, famine, and ill-fitting thermal underwear.
Wrap pipe cleaner around small end of pine cone, forming arms.
See photo to ensure that the arms are properly positioned to illustrate the caroller’s terrified supplication to the merciless Elder Gods.


With straight end of crochet hook make small hole in center of bottom of polystyrene ball. Fill hole with white glue and press onto center part of pine cone. Glue felt hat to ball, leaving a brim.
All good pagans own a crochet hook. It doesn’t need to be included in the materials list.


Finally, attach shawl by wrapping around pine cone and drawing one end through slit, pull up tight. Let dry for about 2 hours.
One man’s shawl is another man’s scarf. Be sure to make it of red fabric as it symbolizes the ritual beheading of the carollers at midnight. Then, cookies and milk for everyone!
If desired, cut songbook from gold or silver cardboard using pattern. Position in carolers’ arms.
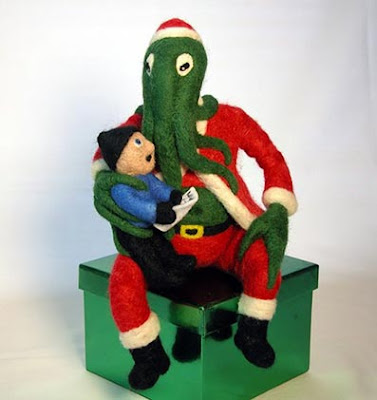
Now kick back and enjoy your new decorations, while munching on a gingerbread man. Be sure to leave his head for last, so Gingy’s screams will drown out those annoying carollers who’ve temporarily escaped Cthulhu’s grasping tentacles.


Click here for the Printable Pattern.


Read more!

Friday, December 16, 2011

DIY – Ripple Socks for Superheros!

While I’ve been neglecting this blog (but for very good reason, which I promise I’ll reveal with great fanfare soon), faithful reader Jenny has been busily crocheting up a storm. She’s even made the famous Ripple Socks!


Jenny writes: “Pay no mind to the fact that these socks are worn through...”

Keep reading for her hilarious explanation of the sad state of her ripple socks.
I wear my socks hard. No, really! Sometimes, on my long treks to the store (literally: a mile.5 to get to the shopping center, who knows how much walking in & between stores, then the mile.5 back carrying, for example, 10 pounds of flour, 5 pounds of sugar, a can of coffee, some yarn perhaps, 4 pounds of dry beans, a 2 liter of soda water...), I take my shoes off because my feet have been warmly squeezed into my shoes for so long, I just gotta relieve the pressure. [edit, my feet are only squeezed in when wearing thick socks such as these] [edit 2: i only wear the socks when it's cold out] Walking on the concrete sidewalks, and sometimes in the rain, has led to the demise of these poor socks. Most of the time, though, they are house socks--worn over my sock socks.
I’m sure our gentle reader can’t help but notice that Jenny is a superhero. And clearly these socks were not designed to stand up to the rigors of a life battling crime while toting 25 lbs of groceries around. I would suggest Jenny knit her next pair out of unstable molecules (yarn available for purchase at the Baxter Building, at the corner of 42nd and Madison in NYC).


Also, you will notice that I have demonstrated in the second photo that the socks do not stay put--as exampled by the left sock. The picture with the pattern had me all excited about big tall socks that would stay up--obviously the photo is either doctored or carefully setup then quickly shot because the slightest ant fart brings them down. Not to worry though--they're just socks, after all...and they're worn through anyway. When they first started showing signs of hole making, I thought to myself, I can just seam that back together with my handy dandy, uh, fixing things skills. More time passed and there were more long treks to the store with more concrete walkin' in my stockin's, and the holes just blew out irrationally.
I suspect supervillains were involved.
Don't know if I'll ever fix them, but boy do I enjoy wearing them! I made them! They're the first I've made in the sock-genre, so I'm sure there will be others.

One thing I will say as a note to others who may wish to produce these fine foot clothings is that the pattern only leads you up to the ankle. They say to repeat the last round until 18 somethings have been made or to desired length. Once again, the picture to accompany is misleading, and I think that's filthy. Not as filthy as making people believe the socks will stay up though. No hard feelings, honest. I did have a little, "whaaat?" about the heel, but I was new at crochet in general, and obviously I got through it :)
Jenny also included this important disclaimer.
p.s. there have not been any recorded incidents of seizures induced by my wearing of these socks.......for the record.
That would be for the official record, I’m sure. Those in the know are well aware zigzags (AKA ripples) were standard issue for super heroines in the sixties.


This “Vintage Super Hero Dress” will go beautifully with Jenny’s Ripple Socks, sending villains into helpless convulsions for miles around!


Read more!

Monday, October 31, 2011

Happy Halloween!

Halloween Apron from Coats & Clark’s Edgings Book No. 305, 1954

At last the truth is revealed! Halloween isn’t about eating candy until you puke, or watching scary movies involving an excessive amount of projectile vomiting. Halloween is all about preserving your femininity.

So, there’s no better way to celebrate Halloween than to don a ladylike apron you made with your very own little ladylike hands. However, don’t confess your plans ahead of time to your husband, or he may try to persuade you to make a sexy French Maid apron instead! Men just don’t understand that only fallen women oppressed by the Patriarchy wear French Maid costumes.


Unlike the poor, downtrodden woman pictured above, you are no victim of depraved male fantasies. Your Halloween apron will celebrate radical feminism! It will proclaim a liberated woman’s inalienable right to choose … to spend Halloween in the kitchen!

Besides your new apron will come in real handy once the inevitable Halloween barfing begins.

For the complete pattern (and more snark!):

How to Make Aprons

Each apron requires 1 yard of organdy, 36 inches wide, and 1 spool of Coats and Clark’s Mercerized Sewing Thread, Art. C. 3, in a matching color. Aprons are made identically: Cut a piece of organdy 12 ½ x 36 inches and roll a ¼ inch hem around three sides. Slip stitch hem. Cut a piece of organdy 6 ½ x 15 ½ inches for waistband. Cut two pieces of organdy 6 x 36 inches for ties, roll and sew a ¼ inch hem around three sides. Gather top of apron to measure 15 inches. Fold waistband in half lengthwise, turn in ¼ inch hem on raw edges and sew across top of apron.

Gather raw ends of ties to measure 3 inches, insert in ends of waistband and sew in place.
I’m actually hopeless at sewing, so I won’t tell if you sneak off to Wall-Mart and buy a pre-made apron. Or if you’re low on cash, just mug a Wall-Mart greeter for their vest.

Wall-Mart vests make great Halloween costumes.

Just don't try this right after a snowstorm!
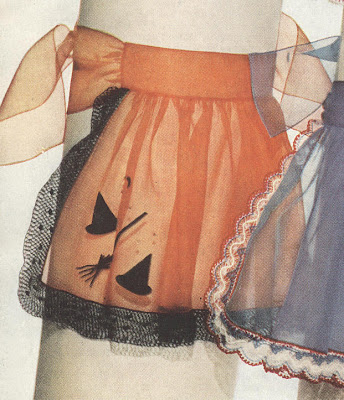
Halloween Apron: Appliqué hats and 1 strip of felt ¼ x 4 ¼ inches for handle of broom. Use bugle beads for bristles and decorate hats with sequins.
Sadly, bugle beads are long tube-shaped beads, not Mardi Gras beads you get from flashing boogie woogie bugle boys.

This picture is provided just in case you don't know what a witch's hat looks like. You wouldn't want to accidentally applique top hats all over your apron instead.

I'm not sure what this apron means ("I cook with style"? "I killed Fred Astaire and served him for dinner"?), but I do know it definitely doesn't say, "Happy Halloween"!

Halloween Apron Edging . . . S-532

COATS & CLARK’S O>N>T> TATTING-CROCHET, Art. C. 21, Size 70: 3 balls of No. 12 Black.

Milwards Steel Crochet Hook No. 14.

Orange organdy apron.

Make a chain 6 inches longer than outer edge of apron. 1st row: Sc in 2nd ch from hook, * ch 5, skip next 2 ch, sc in next ch. Repeat from * across until piece measures 4 inches longer than outer edge of apron, having number of loops divisible by 8 and 7 more at end of row.
Show your kids this pattern to prove they will have to use math in every day life.

Better yet, have them make the apron for you. It's educational! And then no one will ever have to know that you can't divide correctly by eight.
Ch 3, turn. 2nd row: * Draw loop on hook out to measure ¼ inch, thread over and draw loop through, insert hook between single and double loops and draw a loop through, thread over and draw through two loops on hook, (knot st made), sc in next loop. Repeat from * across, ending with sc in last loop, dc in last sc. Ch 3, turn. 3rd row: * (Make a knot st, sc under double loop of next knot st) 7 times; ch 3, make 9 dc under double loop of next knot st (shell made), ch 3, sc under double loop of next knot st. Repeat from * across, ending with sc in last knot st, dc in top of turning chain. Ch 3, turn. 4th row: * Make a knot st, ** sc in next knot st. Repeat from * across, ending with sc in knot st preceeding next shell; make a knot st, sc in center dc of shell, make a knot st, sc in next ch-3 loop, make a knot st. Repeat from ** across, ending with sc in last knot st, dc in top of turning chain. Ch 3, turn.
The insistence on repeating from * or ** across leads me to believe there will be dire consequences if you attempt to repeat up-and-down.

Of course, if you read this Halloween pattern backwards, you will discover the hidden satanic messages.
5th row: (Make a knot st, sc in next knot st) 3 times; * ch 3, make a shell in next knot st, ch 3, sc in next knot st, (make a knot st, sc in next knot st) 7 times. Repeat from * across, ending with sc in last knot st, dc in top of turning chain. Ch 3, turn. 6th row: Work as for 4th row. 7th row: Work as for 3rd row. 8th row: Work as for 4th row, ch 5 at end of row. 9th row: * Sc in next knot st, ch 5. Repeat from * across. Ch 1, turn. 10th row: Sl st in first loop, sc in same loop, * make 2 knot sts, sc in next loop. Repeat from * across. Ch 5, turn. 11th row: Sc in center of first knot st loop, * ch 5, sc in center of next knot st loop. Repeat from * across. Break off. Sew edging neatly in place, gathering 2 inches at each corner.
And naturally, there are also dire consequences to NOT sewing edging neatly!

Like… um… social stigma? That’s right! Just think of the horrible shame you will feel if you’re seen in public wearing a slovenly Halloween apron. Nothing could be more humiliating!

Oh dear.

Click here for the printable pattern.


Read more!
Friday, October 14, 2011

Don’t You Dare Use Your New Potholders in Your Old Kitchen!

Planning & Remodeling Kitchens, c. 1975

Now that you’ve crocheted up some new anthropomorphic, tea-partying potholders, you need a new kitchen to show them off. Besides, you probably burned down your old kitchen attempting to simultaneously crochet and deep fry parsley.

But you don’t need just any old kitchen. You need a seventies kitchen. Bright, modern, spacious... Wait, what’s that ominous figure in the corner of the room?


Aaaugh, aliens!

Your new seventies kitchen will also help you welcome our new alien overlords.

For more seventies scullery snark:

Despite the cheery cover on this home remodeling book, the seventies were not really about modernity or spaciousness. They were about Authenticity. Rip off that drywall! Expose those beams and brickwork! And if you can’t, then at least cover everything in sight with wood paneling. Lies will not be tolerated. It’s about Keeping it Real.

It was also about keeping Mom in her place.


Seventies kitchen designers loved “pass-throughs”. These handy-dandy holes in the wall allowed Mom to stay in the kitchen and pass food out to her family on the other side, like a short-order cook or a prison cafeteria.

The one above is particularly well designed as the family can use the sliding door to seal Mom off from sight, when they get tired of her showing off her prison tats.


Whereas in this kitchen, dinner orders can be conveniently shouted at Mom from above. If Mom attempts to ignore him, Dad can always tip a fern over on her head.

Yes, the war of the sexes was alive and well in the seventies. And really, keeping Mom segregated from the rest of the family was probably for the best.


Any moment now this woman is going to turn around and bury a butcher knife in her husband’s chest. “Don’t tell ME how to cook, you micro-managing S.O.B.!”

One the plus side, no one will mess with her in the prison cafeteria.


Only in the seventies could hanging your antique kitchen tools from a row of flimsy screw-in hooks seem like a terrific idea.


Many an unfortunate seventies-era housewife was brained by falling mallets and skewered by BBQ forks as she cooked up hot dog casseroles for the family. But concussions and kitchen lobotomies were a small price to pay for the convenience (and authenticity!) of having all her kitchen implements ready at hand.

I advise that you invest in kitchen hard-hats before installing your very own kitchen utensils of Damocles.


Of course, some kitchen implements are just a little too pointy to dangle directly overhead. A Mom needs to be able to reach out, grab a knife and stab it into... dinner, of course. And that’s what the handy-dandy magnetic strip is for!

These days, not only can you use that magnetic strip to hold your assorted implements of culinary death, you can also use it to wipe your credit cards. Unfortunately, demagnetizing the stripe on your Visa card will not erase the debt on it.

In the seventies, however, a kitchen knife was not as dangerous as a tin of Campbell’s Soup.


Yes, Junior is about to learn a valuable lesson that gravity is a heartless kitchen witch.


Seventies Do It Yourself Furniture! The perfect way for a seventies guy to demonstrate his commitment to recycling. After all, getting back to the Earth is far more important than any petty concerns about his wife wasting hours of her life cleaning encrusted food and grime off chicken wire.

Rumour has it that the above photo was Exhibit A in the infamous Seventies divorce case Kramer vs. Kramer.


How convenient, you have to stand on the table to water your plants! And if your guests complain about baby spider plants landing in their food, just assure them they’re extra roughage. After all, spider plants are non-toxic, not like that English Ivy... Yeah, you might not want to put your chair right under that one.


Still, despite the risk of poisonous plants in my food, knives dangling overhead and the sheer impossibility of ever adequately cleaning exposed brickwork and stucco, I can’t help but want a seventies kitchen of my very own.

My breakfast nook needs a fireman’s pole!


Read more!