

To the excitement of film enthusiasts everywhere a long-lost film of Hitchcock’s has recently been unearthed. Twelve years before Hitchcock filmed his horror masterpiece The Birds, he had directed a strikingly similar film...
The Butterflies!
Regrettably, the film was quickly relegated to obscurity by an audience unwilling to accept that butterflies could be deadly killers. This may have been due to Hitchcock’s inability to find skilled Butterfly Wranglers, and his subsequent decision to rely on crocheted butterflies instead. The film’s climatic scene of the beautiful blonde heroine stranded on top of the Lincoln Memorial was universally panned by critics due to a lack of convincing special effects and an overabundance of cotton butterflies pelted at the starlet by the film crew.
Today, however, Hitchcock is seen as a prophetic visionary, vainly attempting to warn people about the real life menace of killer butterflies. To help raise awareness of this little recognized threat to our place in the food chain, you can now crochet Hitchcockian butterflies for your hat and gloves. Remember, just because it’s the apocalypse, doesn’t mean you shouldn’t dress like a lady.
For the complete pattern (and more snark!):
BUTTERFLIES in crochet...
All sizes and shapes of brilliant butterflies in a blaze of colors – a gay note of surprising beauty to glamorize your wardrobe and dramatize your home.
Oh yes, Hitchcock definitely enjoyed using gay notes to glamorize and dramatize his films.To change the size of a butterfly, use any J. & P. Coats or Clark’s O.N.T. Thread other than the one specified; consult chart for size of hook to use with each thread.

Hat and Gloves S-36
MATERIALS:
J. & P. Coats or Clark’s O.N.T. Best Six Cord Mercerized Crochet, Size 30:
SMALL BALL:
J. & P. COATS – 3 balls of White or Ecru, or 4 balls of any color, or
CLARK’S O.N.T. – 4 balls of White or Ecru, or 6 balls of any color, or
BIG BALL:
J. & P. COATS – 2 balls of White or Ecru, or 3 balls of any color.
The real horror of this pattern is just how many choices we’re given. White or Ecru? Balls of any colour? I can’t take the stress!Milwards Steel Crochet Hook No. 10.
A black velvet cloche.
GLOVES
Sizes: Small (Medium, Large)
LEFT GLOVE – Little Finger . . . Starting at tip, ch 4. 1st rnd: Make 11 (12, 13) dc in 4th ch from hook. Join with sl st to top of starting chain. 2nd rnd: Ch 4, * dc in next dc, ch 1. Repeat from * around. Join last ch-1 to 3rd ch of ch-4. 3rd rnd: Sl st in next sp, ch 4, * dc in next sp, ch 1. Repeat from * around. Join. Repeat 3rd rnd until 12 (13, 14) rnds are completed. Join and break off.
RING FINGER . . . Starting at tip, ch 4. 1st rnd: Make 12 (13, 14) dc in 4th ch from hook. Join. Work as for Little Finger until 14 (15, 16) rnds are completed. Break off.
Film critics have long speculated on Hitchcock’s use of only white butterflies. While Mr. A. McGuffin of the New York Times asserted that Hitch’s use of white symbolically represented death, the truth is much simpler. Professional Film Crocheter Mrs. Danvers wrote in her journal at the time, “If we buy all the thread in white, we don’t have to worry about how many of balls of this or that we need. And seriously, who in their right mind would crochet an Ecru butterfly?”
However, Hitchcock must not have been impressed with the final results, based on his lavish use of crows in The Birds.

MIDDLE FINGER . . . Starting at tip, ch 4. 1st rnd: Make 13 (14, 15) dc in 4th ch from hook. Join. Work as for Little Finger until 16 (17, 18) rnds are completed. Break off.
INDEX FINGER . . . Work exactly as for Ring Finger.
THUMB . . . Starting at tip, ch 4. 1st rnd: Make 16 (17, 18) dc in 4th ch from hook. Join. Work as for Little Finger until 12 (13, 14) rnds are completed. Break off.
Joining of Fingers: Sew the Ring Finger, the Middle Finger and the Index Finger together at base, joining a dc to a sp on following finger and leaving the same amount of sps free on both sides of joining.
PALM AND BACK . . . 1st rnd: Attach thread to first free sp on inside edge of Index Finger and work in sp pattern across each finger; now continue working in pattern across Back and join to first sp. There should be 40 (43, 46) sps. 2nd rnd: Work in pattern around. Join. Now sew Little Finger as for other fingers. There should be 52 (56, 60) sps. Work in pattern for 5 (6, 7) more rnds. Sew thumb in place and continue to work in sp pattern over Thumb sps. Next rnd: Mark the 2 sps directly above joining of Thumb on both sides of glove. Work in pattern to within the 2 marked sps, ch 1, holding back on hook the last loop of each dc, make dc in each of next 2 sps, thread over and draw through all loops on hook (1 sp decreased). Complete rnd, decreasing 1 sp over next 2 marked sps (this starts thumb gore). Now work in pattern for 2 more rnds, decreasing 1 sp directly over each previous decrease made. Next rnd: Makr the 2 sps directly between Thumb decreases and the 2 sps on outer edge of Little Finger side of glove. Continue to work in pattern, decreasing 1 sp over each dec and over the marked sps as before. Continue to work in pattern, making decreases over the 4 established points until 9 rnds are completed from first dec rnd. Break off. Now shape lower edge as follows: 1st row: Mark the center sp of last rnd st back of glove. Attach thread to 7th sp to the left of marked sp, ch 4 and work in pattern to within 6 sps preceding marked sp. Turn. 2nd row: Sl st in next sp, ch 4, * dc in next sp, ch 1. Repeat from * across, ending with dc in last sp. Turn. Repeat 2nd row 3 (4, 5) more times.
EDGING . . . * 2 sc in next sp, ch 3, sc in 3rd ch from hook (picot made). Repeat from * around entire lower edge. Join and break off.
If you are not as sensible as Mrs. Danvers, and would prefer to make your butterflies more terrifyingly realistic, then the cover of this pattern book provides you with all the source material you’ll need.
As you can see below, several varieties of butterflies are massing in the sky, just prior to their attack on small, helpless school children.

BUTTERFLY – Large Wing (Make 2) . . . Starting at center, ch 13. 1st row: Dc in 4th ch from hook and in each of next 7 ch, half dc in next ch, in next ch make sc, ch 3 and sc. Now, working across opposite side of starting chain, make half dc in next ch, dc in each remaining chain across. Ch 3, turn. 2nd row: Skip first dc, dc in each st to ch-3 loop at tip, in ch-3 loop make 3 dc, ch 3 and 3 dc; dc in each remaining st across and in top of turning chain. Ch 1, turn. 3rd row: Sc in each dc across, making 2 sc, ch 3 and 2 sc in sp at tip. Ch 4, turn. 4th row: * Skip 1 sc, dc in next sc, ch 1. Repeat from * across, making dc, ch 1, dc, ch 3, dc, ch 1 and dc in loop at tip. Ch 1, turn. 5th row: 2 sc in each sp across, making 2 sc, ch 3 and 2 sc in sp at tip. Ch 5, turn. 6th row: * Skip 1 sc, dc in next sc, ch 2. Repeat from * across, making dc, ch 2, dc, ch 3, dc, ch 2 and dc in loop at tip. Ch 1, turn. 7th row: 3 sc in each sp across, making 3 sc, ch 3 and 3 sc in sp at tip. Ch 5, turn. 8th row: Repeat 6th row. 9th row: * Make 3 sc in next sp, ch 3, sc in 3rd ch from hook (picot made). Repeat from * across, ending with 3 sc in last sp. Break off.
SMALL WING (Make 2) . . . Work as for Large Wing until 6 rows are completed. 7th row: Repeat 9th row of Large Wing.
Just inside the front cover, you will find a helpful identification guide, which will undoubtedly prove very useful when the butterflies are sucking out all your blood with their needle sharp proboscises.
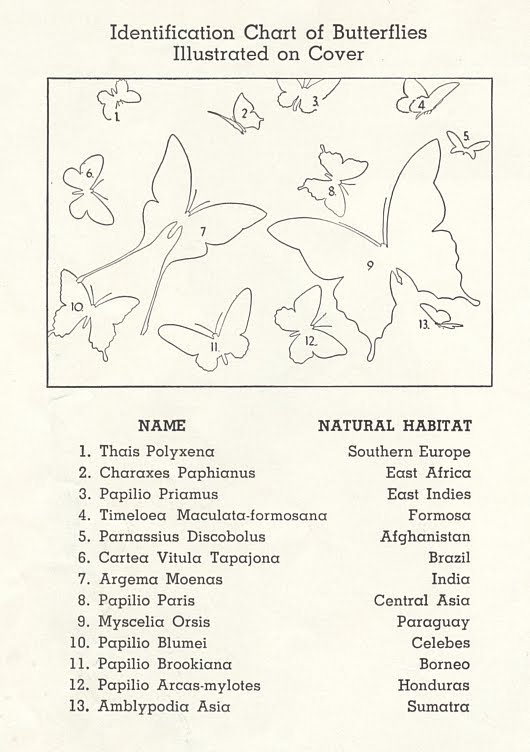
Please note, however, that the “Timeloea Maculata-formosana” has a spelling error. It should be “Timelaea”which roughly translates as TIME TO DIE, HUMAN SCUM! Also, Formosa refers to the island of Formosa, more commonly known these days as Taiwan, not to the province in Argentina.BODY . . . Starting at one end, ch 11. 1st row: Sc in 2nd ch from hook and in each ch across. Ch 1, turn. Hereafter pick up back loop only of each sc. 2nd row: 2 sc in first sc, sc in next 7 sc, work off last 2 sc as 1 sc. Ch 1, turn. 3rd row: Work off first 2 sc as 1 sc, sc in next 7 sc, 2 sc in last sc. Ch 1, turn. Repeat 2nd and 3rd rows alternately until piece measures 3 inches. Break off.
It’s important not to make any careless mistakes in butterfly identification. Your life is on the line!
ANTENNAE . . . Ch 50, sc in 2nd ch from hook and in each ch across. Break off.
Shirr the straight ends of Wings tightly. Place the shirred end of one large wing over the shirred end of small wing as in illustration and sew in place. Sew two remaining wings together the same way. Sew the shirred edges of the 2 pairs of wings together at center. Sew the two long ends of body together, stuffing with several strands of thread and making sure to keep one end of body pointed. Sew body in place over joined wings, having pointed end of body even with bottom edge of small wings. Roll and sew ends of Antennae to form small knobs. Double this piece and sew in place under upper part of body.
Starch lightly and press. Sew Butterfly in place on back of glove.
RIGHT GLOVE . . . Make another Glove the same way, reversing it to fit Right Hand.
HAT . . . Make 4 Butterflies as before and sew 2 to each side of hat.
And if you are feeling inspired, feel free to make several more butterflies and attach them to the rest of your outfit. But be careful about going outside. The Butterflies, just like The Birds, want to be close to you!
Click here for the printable pattern.


Thanks for this blog posst
ReplyDelete