Thursday, May 6, 2010

Tiptoe through the Tulips . . .

Tulip Time Hostess Set from Coats & Clark’s Hostess Book, 1956

Here’s a housewife who really knows how to celebrate springtime! Veronica’s invited over the entire Bridge Club and she’s going to treat them to an afternoon tea to remember. Everyone gets six chilled shrimp, two lime wedges, and exactly one table spoon of Marinara sauce.

The Marinara sauce is what gives the spread a soupçon of European sophistication. And the grapes perfectly match the placemats!

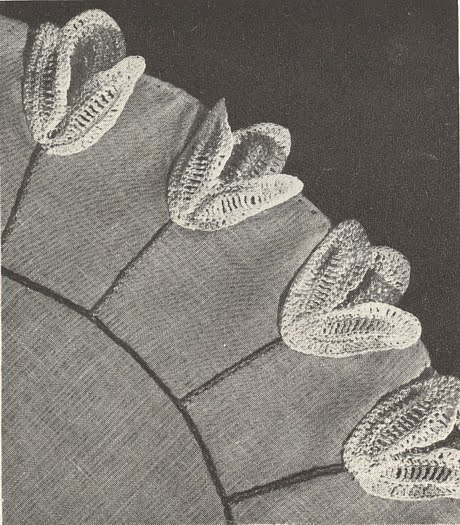
Yes, Veronica’s going to show them all that she won’t be upstaged by some ticky-tacky Rose Bouquet Hostess Set. Who does Betty think she is, anyway? Why, those boring squares of lace she made don’t even look like real roses! Unlike the Tulip Time Hostess Set which features instantly recognizable pink moths – er, tulips!

Lots and lots of tulips. Each individually crocheted and sewn in place over hours and hours.

Veronica shudders and lights a tea candle. Crocheting one hundred tulips will be worth it, she tells herself. Thanks to her tons of tulips, her party will be a legend on Wisteria Lane.

She’s absolutely correct. Though the legendary status had more to do with the discovery that very afternoon that Veronica and Betty were twin sisters separated at birth, and that they were both married to the same man, a red-headed cad.

However, everyone else agreed it was the best Wisteria Lane Bridge Club party ever.

For the complete pattern (and more snark):


Tulip Time . . . S-900

J. & P. COATS BIG BALL BEST SIX CORD MERCERIZED CROCHET, Art. A.104, Size 30: 9 balls of No. 15-A Shaded Dk. Pinks; or

CLARK’S BIG BALL MERCERIZED CROCHET, Art. B.34, Size 30: 8 balls of No. 15-A Shaded Dk. Pinks.
Yes, Coats has one big ball. Clark has another big ball. Put them together and they’ve got...

Lots of yarn, of course!
COATS & CLARK’S O.N.T. SIX STRAND EMBROIDERY FLOSS, Art. C.11, 5 skeins of No. 48-A Dk. Hunter’s Green.

Milwards Steel Crochet Hook No. 10.

2 yards of green linen, 36 inches wide.

Place Mat measures 16 inches in diameter.

PLACE MAT (Make 4) – Tulip – Center Petal . . . Starting at Center, ch 16. 1st row: Sc in 2nd ch from hook, half dc in next ch, dc in next ch, tr in next 9 ch, dc in next ch, half dc in next ch, 3 sc in last chain. Work is now done in rounds. 1st rnd: Make a sc in each ch of starting chain, 3 sc in side of end sc, sc in each remaining st across. Join. 2nd rnd: Ch 3, 3 dc in next sc, * dc in next 2 sc, 2 dc in next sc. Repeat from * around, making 3 dc in center sc of 3-sc group. 3rd rnd: Ch 3, dc in next dc, 5 sc in next dc, * dc in next 3 dc, 2 dc in next dc. Repeat from * around, making 5 dc in center dc of next 3-dc group. Join and break off.
There’s absolutely nothing amusing about Coats and Clark’s Big Balls.

Crocheting is serious business!
SIDE PETAL (Make 2) . . . Starting at center, ch 22. 1st row: Sc in 2nd ch from hook, half dc in next ch, dc in next ch, tr in next 15 ch, dc in next ch, half dc in next ch, 3 sc in last ch. Work is now done in rounds. 1st rnd: Work as for first rnd of Center Petal. 2nd rnd: Work as for 2nd rnd of Center Petal to within last 12 sc at end of rnd, half dc in next sc, sc in next sc, sl st in next sc (inner edge of Petal). Break off.

This is your final warning, ladies. I will not tolerate any more of this suggestive humour.

Although, this gentleman is welcome to tiptoe through my tulips any day.
Sew 2 Side Petals to Center Petal to form Tulip. Starch Tulips and pull into shape. Cut a circle of linen 16 inches in diameter. Roll a narrow hem. Draw a circle 3 inches in from edge. Using 3 strands of Embroidery Floss, embroider chain sts along the outline of the circle. Divide this circle in 22 equal parts and mark with pins. Draw a stem from each pin mark toward outer edge and embroider in chain sts. Sew a Tulip to each stem.
Stop tittering! I wasn’t suggesting anything sleazy. I was simply inviting him to Ottawa. Tomorrow’s the first day of the annual Tulip festival, and everyone is invited to tiptoe through our tulips . . . well, sort of.

To quote the Ottawa Information Guide: “Enjoy tiptoeing through the tulips (actually, please don't tiptoe through them – it is just an expression)! But do enjoy the colours, the sounds and the fresh spring air!”

How very Canadian of us to invite strangers to our capital, and then politely inform them that they aren’t allowed to engage in the very activity they came here to do!
APRON . . . Cut a semi-circle 15 x 31 inches. Roll a narrow hem around curved edge. Draw a line 3 inches in from edge, leaving top edge free. Divide this ... into 25 equal parts and complete as for ... Gather top edge to measure 15 inches. W ... ing material make waistband and ties and ...
Sadly, a corner was ripped off of this pattern. Possibly by Betty in a last ditch effort to prevent Veronica from upstaging her. But I’m sure the missing parts will be easy to fill in.

For example, “... make waistband and ties and then use them to restrain your guests in their chairs as you force them to endlessly ooh and ahh over your dozens and dozens of crocheted pink tulips.”

See? Easy as tiptoeing through tulips!


Click here for the printable pattern.

Read more!

Tuesday, May 4, 2010

Your Ketchup Bottle is Naked!

“Gay Garden” Ketchup Bottle Cover from Kitchen Crochet, 1964

It’s warming up outside and soon it’ll be time for backyard entertaining around the barbeque. So, you open up your fridge to check your supply of condiments, and there’s your ketchup bottle – naked!

How can you possibly put ketchup that’s gaily flaunting its nakedness on your picnic table? What would the neighbours think? What would your mother-in-law think? What would your mother-in-law’s neighbours think?

Unfortunately, you can’t force your ketchup to settle down and marry a nice, respectable mustard container. But you can, indeed you MUST insist on proper dinner wear. Because everyone knows that tolerating tomato toplessness only gives ketchup bottles license to engage in all sorts of shocking shenanigans. Even a ketchup from a good home will experiment with cheap chemical additives and then, high as a kite, cavort naked with creepy clowns.


That’s why it’s your moral duty to keep your ketchup safely under wraps with this “Gay Garden” Bottle Cover. True, your neighbours, mother-in-law, and her nosy neighbours won’t be able to identify which crochet covered bottle contains your ketchup at the barbeque. But rest assured, neither will the clowns.

For the complete pattern (and more snark):

“Gay Garden” Ketchup Bottle Cover
A small piece of aluminum foil wound around the neck of the bottle will catch drips and keep the cover clean.
This shiny silver collar will also remind your ketchup who is the boss.

Dripping will not be tolerated! It is a slippery slope that will only lead to dribbling, drizzling, and dropping acid.
COATS & CLARK’S O.N.T. “SPEED-CRO-SHEEN” MERCERIZED COTTON: 1 ball each of No. 1 White and No. 48 Hunter’s Green

COATS & CLARK’S “O.N.T.” SIX STRAND FLOSS: 2 skeins of No. 141 Devil Red and 1 Skein of No. 11 Orange.
Yes, that’s Devil Red not Divine Red. Why do you think ketchup is red? Because tomatoes are the devil’s fruit!

You may believe that by the time tomatoes become ketchup, they’ve had all the evil mashed out of them, but that just means you have no idea just how stubborn tomatoes can be. Why just watch this recalcitrant ketchup refusing to emerge from its bottle to fulfill its sacred duty of seasoning our children’s food!


Milwards Steel Crochet Hook No. 1

14 oz. ketchup bottle.

GAUGE: 6 sc = 1 inch; 13 rnds = 2 inches.

COVER . . . Starting at neck with White, ch 26 to measure 4 ½ inches. Join with sl st to first ch to form ring. 1st rnd: Ch 1, sc in joining, sc in next 25 ch. Do not join rnds. 2nd through 10th rnd: Sc in each sc around. Now shape cover as follows: * Sc in next 15 sc, 2 sc in next sc. Repeat from * until there are 52 sc around. Repeat 2nd rnd until cover, when slipped over bottle, reaches from bottom of cap to base of bottle, then sl st loosely in each sc around. Break off and fasten. Attach White at neck edge and sc in each ch around starting ch, then sl st in each sc around. Break off and fasten.
Remember, your impressionable children are exposed everyday to your ketchup bottle. Are your little ones learning about the wholesome virtues of condiment modesty or will they end up embracing your ketchup’s full frontal nudity?

Won’t somebody please think of the children?
LONG STEM (Make 2) . . . With Green ch 20, sc in 2nd ch from hook, h dc in next ch, sc in next ch, sl st in next ch – leaf made; (ch 9, make another leaf) twice; ch 6, sl st in 2nd ch from hook, sl st in next 4 ch, * sl st in base of next leaf, ch 5 and complete a leaf, sl st in next 4 ch. Repeat from * twice; sl st in each remaining chain – 3 sets of leaves. Break off and fasten.

MEDIUM STEM (Make 2) . . . With Green, ch 22. Make a leaf, ch 9 make a leaf, ch 6 and complete as for Long Stem – 2 sets of leaves.

SHORT STEM (Make 2) . . . With Green, ch 18. Make a leaf, ch 6 and complete as for Long stem – 1 set of leaves.

Divide lower edge of Cover into 6 equal parts. Starting at lower edge, sew stems in place as illustrated.
Do not let the gay garden on your ketchup bottle run riot by giving into the temptation to be “creative”. Creativity is a gateway drug. One non-standard flower, and the next thing you know, your condiments will be experimenting with vegetable dyes and painting purple graffiti all over your neighbourhood.


FLOWER (Make 6) . . . With Orange floss, ch 2. 1st rnd: 6 sc in 2nd ch from hook. Attach Red to wrong side of work. Drop Orange, insert hook in back loop of first sc, pick up Red and draw through the 2 loops on hook. Break off and fasten Orange. 2nd rnd: Ch 1, * in back loop of next sc make sc, ch 3, 2-dc cluster, ch 3 and sc; to make a 2-dc cluster – holding back on hook the last loop of each dc, make 2 sc in same place, thread over and draw through all 3 loops on hook. Repeat from * 5 times more. Join to first sc. Break off and fasten. Sew a flower to top of each stem.

FENCE . . . With Green, ch 13. 1st row: Sc in 2nd ch from hook, sc in next 11 ch. Ch 1, turn. 2nd row: Working in back loops only, sc in next 10 sc. Ch 3, turn. 3rd row: Sc in 2nd ch from hook, sc in next ch, working in back loops only, sc in next 10 sc. Ch 1, turn. Repeat 2nd and 3rd rows alternately until piece is same length as lower edge of cover, ending with 3rd row. Ch 1, turn. Last row: Working in back loops only, sc in next 10 sc. Break off, leaving an 8-inch length. Sew the 10 sc of last row to corresponding 10 sts of starting chain. Sew straight edge to lower edge of Cover.
But V.D., you say, what’s wrong with purple ketchup, even if it is a little kooky? Shouldn’t we love our condiments unconditionally, accept them for who they are, and embrace their rainbow-hued diversity?
CAP . . . Top: With Green, ch 4. Join with sl st to form ring. 1st rnd: Ch 1, 7 sc in ring. Do not join rnds. 2nd rnd: 2 sc in each sc around. 3rd rnd: (Sc in next sc, 2 sc in next sc) 7 times. 4th rnd: Sl st loosely in each sc around. Break off and fasten.

Side: Work as for Fence until the 21st row has been completed. Next row: Repeat last row of Fence. Sew ends together to form a circle, as for Fence. Sew straight edge to edge of Top.
No, no and NO! Just look at this mug shot. Is this really where you want your ketchup to end up?

Prison green looks terrible on a bottle of ketchup!

So teach your condiments to hide their nakedness for their own good. Then, and only then, can you have your ketchup cake and eat it too.


Click here for the printable pattern.


Read more!

Thursday, April 29, 2010

Your Bathroom Is Making Me Suicidal

Photobucket
Terry Cloth Laundry Bag and Hosiery Hanger, from Gay and Gifty Crochet Ideas, 1951

The dingy yellow walls and tiles. The dreary industrial-style furnishings. The dismal dime store decorations. The carefully washed stockings hung out to dry, because you can’t go throwing money away on new stockings or anything else that would make you feel young and gay again.

Finally, the pièces de dépression, the laundry bag made out of a washed up washcloth, and its matching hanger in Pepto-Bismol pink crochet thread. Anyone who sees this brave yet futile attempt to brighten up your washroom of woe will immediately lose the will to live.

So, honey, if you find yourself crocheting pink flowers onto a wire hanger, while you sob into the tattered remains of an institutional green facecloth – drop that hook and run for your life. Pack up your bags, become a gay divorcee and go on a long overdue glittering girl spree!


For the complete pattern (and more snark):

Terry Cloth Laundry Bag #815
At least, the Gay and Gifty folks managed to come up with 814 other patterns before they ran out of ideas and were forced to resort to turning washcloths into laundry bags.

Either that or there are 814 other Terry Cloth Laundry Bag patterns out there that just weren’t gay enough.
This bag may be made with any of the AMERICAN THREAD COMPANY products listed below:

Photobucket
That’s right, the AMERICAN THREAD COMPANY is the only true-blue AMERICAN thread company. So, don’t even THINK about using any other company’s products. Spinnerin? Sub-standard. Coats and Clark? Communists! The Spool Cotton Company? Spawn of Satan!!!
Cover embroidery hoop with ribbon as illustrated.
Vague instructions combined with an unhelpful pink-on-pink illustration? We’re off to a great start to this project!
Attach thread 6 inches from one corner of one wash cloth, * ch 7, skip about 3/8th inch space s c in next space, repeat from, repeat from * to corner, ch 7, s c in same space...
Wait, washcloths have spaces? Then why are we measuring 3/8th of an inch? Just for the anal-retentive joy of using a ruler?

Not that there’s anything wrong with that.
... * ch 7, skip about 3/8 inch space, s c in next space, repeat from * for 6 inches, place other cloth on top of 1st cloth, insert hook 6 inches from corner of 2nd cloth and working through both cloths, s c in same space with last s c, ** ch 7, skip about 3/8 inch space, s c in next space, * ch 7, skip about 3/8 inch space, s c in next space, repeat from ** twice, * ch 7, skip about 3/8 inch space, s c in next space, repeat from * to within 6 inches from next corner...
From which *? The one in front of the last ** or the one directly behind it?

I’m barely through 1 and 3/8 inches of this pattern, and already my soul is being crushed. Might be a new record!
... working last s c in same space as starting ch, * ch 7, skip 3/8 inch space of 2nd cloth, s c in next space, repeat from * to corner, ch 7, s c in same space, * ch 7, skip 3/8 inch space, s c in next space, repeat from * across remaining free edge ending with sl st in same space where the 2 clothes are joined.
And I’m seeing stars!

Sadly, they’re not the sexy Hollywood kind of stars.
2nd Row –
Yes, all of the above was ONE ROW. Crying yet?

That’s good! Depressed crafters are always better at making depressing crafts.

Photobucket

Turn and with inside of free sections toward you, sl st to center of 1st loop of 2nd cloth, ch 4, 1 tr c, ch 3, 2 tr c in same space, * 2 tr c, ch 3, 2 tr c (shell) in center st of next loop, repeat from * around all free edges, join in 4th st of ch.
“Tr c” most likely stands for “triple crochet”. Using standard abbreviations might give you a false sense of security about your place in the world.
3rd Row – Ch 3, sl st in same space, picot ...
I hope you know how to picot! Because this pattern sure isn’t going to tell you.
... 2 s c, ch 3, 2 s c in ch 3 loop of shell, skip 2 tr c, sl st in next tr c, repeat from beginning all around, cut thread.
And this is where the pattern ends.

Or so you might reasonably assume as there was no note at the end of the pattern, saying “continued on page whatever”. However, turning the page, I found a pattern for a “Rose Pot Holder”, followed the “Hosiery Hanger” and finally, tucked down on the bottom of page 14, “Terry Cloth Laundry Bag”.

This was no oversight. It’s all a part of Gay and Gifty’s evil plan to keep you alert, interested, and drowning in despair.
With right side of loops of 1st row toward you and working around lower edge of bag, attach thread in picot above joining of 2 cloths, shell in center st of 1st loop, * shell in center st of next loop, repeat from * to opposite side, sl st in picot above joining, cut thread, do not turn.

Next Row – Attach thread in 1st tr c of 1st shell around lower edge, 2 s c, ch 3, 2 s c in loops of same shell, * skip 2 tr c, sl st in next tr c, ch 3, sl st in same space, 2 s c, ch 3, 2 s c in loop of next shell, repeat from * all around to opposite side ending row with sl stitch in last tr c of lower edge, cut thread.

Fold corners down as illustrated, attach thread at one end where cloths are joined and work a row of loops all around folded edge.

2nd Row – Sl st to center of loop and work a shell in center st of each loop, join.

3rd Row – Sl st to center of shell, * ch 7, s c in loop
And that’s the end of the pattern!

No? Oh, all right, let’s look at the next page... Well, what do you know? The remainder of the pattern (I can only hope) is on page 15, along with a Tea Cozy and a Plant Holder.

Warning: Do not attempt to make a Plant Holding Laundry Bag Tea Cozy. It would all end in tears and tea soaked philodendrons.
of next shell, repeat from * all around, ch 3, tr c in last sl st.

4th Row – Ch 4, tr c, ch 3, 2 tr c in tr c of previous row, * shell in center st of next loop, repeat from * all around, join. Repeat the 3rd and 4th rows once then repeat the 3rd row once.

8th Row – Working over hoop, * ch 15, bring ch backward, s c in next loop, ch 15, bring ch forward, s c in next loop, repeat from * all around in same manner ending row to correspond, join, cut thread.

Handle – Beading: Crochet a ch 25 inches or a little longer than length desired, s c in 2nd ch from hook, * ch 7, skip 7 sts of ch, d tr c (3 times over hook) in next st, repeat from * until beading measures 23 inches, ch 7, skip 7 sts, s c in next st, cut off remainder of ch, do not turn.
Handle that beading with care, and make sure you measure ACCURATELY. Or your laundry bag will be ruined.

Don’t argue that you can’t even see the beading in the photograph. It’ll be utterly ruined, I tell you!
2nd Row – Ch 4, * shell in center st of next loop, repeat from * to last loop, ch 4, s c in s c, working on other side of beading, ch 4, * shell in center st of next shell, repeat from * to last loop, ch 4, sl st in s c, do not turn.
And you’re almost done your very tiny laundry bag. Your dirty stockings can be tucked out of sight in style, while the rest of your dirty clothes pile up on the bathroom floor, getting soggy and moldy.
3rd Row – 4 s c in 1st loop, 1 s c in each of the next 2 tr c, 2 s c, ch 3, 2 s c in loop of shell, * skip 2 tr c, sl st in next tr c, ch 3, sl st in same space, 2 s c, ch 3, 2 s c in loop of next shell, repeat from * to last shell of 1st side, 1 s c in each of the next 2 tr c of same shell, 4 s c in next loop, s c in s c, 4 s c in next loop, 1 s c in each of the 1st 2 tr c of the next shell, 2 s c, ch 3, 2 s c in loop of same shell, continue all around in same manner ending row to correspond, join, cut thread. Lace ribbon through beading and sew to each end of hoop.
I hope you didn’t use all 4 yards of the ribbon covering up the hoop.

If you did, you’ve only yourself to blame. Because blaming this Gay and Gifty pattern for leading you astray would be both homophobic and giftophobic.
Hosiery Hanger #817
#816 is that “Rose Pot Holder”, which unfortunately is not a device to lovingly suspend Rose Pots up out of harm’s way. Instead it’s a Pot Holder with a large three dimensional rose stuck right in the centre, perfectly placed to make it difficult to grip your pots when you’re removing them from the stove top.

In order to protect you and your loved ones from terrible scalding burns, I’m not including the pattern for the Rose Pot Holder.

You can thank me later. Preferably in small bills, with non-sequential serial numbers.
Materials Required: AMERICAN THREAD COMPANY “STAR” BLEND YARN, Article 75
1 skein each Lt. Green and Cerise will make 2 hangers.
6 plastic clip Clothespins
1 metal Hanger
Steel crochet hook No. 0
Unlike in the Terry Cloth Laundry Bag pattern, here you do not have a choice of yarns. That’s because you can’t be trusted to choose correctly.
With Light Green, starting at top of hook work a row of s c around entire hanger having 123 s c across lower edge, cut yarn.
Better count those 123 s c again. Accuracy is next to godliness.
2nd Row – Attach Cerise, s c in same space, ch 2, sl st in top of s c for picot,...
Ah, here the pattern actually explains how to make a picot. Too bad it’s too late for pattern #815, your tacky (and probably incorrectly crocheted) laundry bag.
...* 1 s c in each of the next 4 s c, ch 2, sl st in top of last s c for picot, repeat from * all around, cut yarn.

Attach Cerise between 4th and 5th picots at lower edge, * ch 6, s c in top of 1 side of clothespin pulling loop through the hole of clothespin and also pulling loop up about ½ inch, ch 3, s c through hole at top of opposite side of same clothespin, ch 6, skip 4 picots of last row, sl st between last skipped picot and next picot, repeat from * 5 times, cut yarn.
I’m sure you’re thinking about stopping here, now that the clothespins are attached to the hanger and your stockings can be hung by the commode with care. But don’t do it!

Photobucket
Just imagine how much more heartbreakingly joyless this hanger would be without those little pink – sorry, cerise – flowers festooning it up.
FLOWER: With Cerise ch 2, 6 s c in 2nd st from hook join in 1st s c, ch 3, 2 tr c in same space, ch 3, sl st in same space, * sl st in next s c, ch 3, 2 tr in same space, ch 3, sl st in same space, repeat from * 4 times, cut yarn. Work another flower in same manner.

LEAVES: * With Green ch 12, s c in 2nd st from hook, 1 s d c in next st of ch (s d c: yarn over hook, insert in st, pull loop through, yarn over and pull through all loops at one time), 1 d c in each of the next 6 sts, 1 s d c in next st, 1 s c in each of the next 2 sts of ch, do not cut yarn, repeat from * 3 times, cut yarn. Sew on hanger as illustrated having 2 leaves on each side and the 2 flowers in the center.
And that’s the end of the pattern. No, really.

Which means it’s time for your medication!


Click here for the printable pattern.

Read more!

Tuesday, April 27, 2010

No, this is not a 1940s Voodoo Doll...

Sally Spool from Gifts, Knitted and Crocheted, 1946

But Sally Spool does have magical powers!

Imagine giving your best friend a loose pile of thread spools for their birthday. She’d call you an unimaginative cheapskate, you’d tell her off for hitting on your husband, and the party ends in tears and recriminations. But Sally the spool doll transforms your penny-pinching present into a Gift Galore!

Because we all know what a capital “G” Gift is, right ladies?

A Gift is an expression of YOU.
Because everyone’s going to judge YOU based on the quality of your Gift. No pressure!
And what better way is there to express yourself than through hand-made items?
Which you found in a pattern book and then precisely followed the instructions to replicate. Because freedom of expression would lead to anarchy.
Here is a collection of gifts that are suitable for every one on your Birthday, Christmas, and Just-Because-I-Like-You List.
See that lady in the lower right hand corner? She’s totally thrilled that you gave her a doll made out of spools of thread.

Either that, or she’s melting everyone’s brains with her mutant powers of static electricity.

For the complete pattern (and more snark!):

Sally Spool

Materials Required – AMERICAN THREAD COMPANY “STAR” MERCERIZED SEWING THREAD, ARTICLE 400

17 Spools Assorted Shades.

1 Spool Black “AUNT LYDIA” Button and Carpet Thread, Article 1.

1 Spool White “STAR” Six Cord, Size 10.

1 – 100 yd. Skein Red “STAR” Cotton Yarn, Article 75.

2 Small Black Buttons for Eyes.

HEAD. Cut 2 oval pieces from any White material about 2 x 3 inches, sew them together leaving about 1 inch open at one end for filling. Fill with cotton.
Hey, the Materials Required list didn’t mention “White material”! Now, if I’m to complete this Gift in time, I have no choice but to assault Canadian actor Ryan Gosling.

Although, I’m quite relieved to find out that Sally is White. I had my fill of racist dolls in February, thank you very much.
With a heavy...
Hand? Heart? Foot on the gas pedal?
...cord...
Oh, that must be the Six Cord mentioned in the materials list! Apparently, the pattern designer doesn’t want me to tear anything else off Mr. Gosling’s body.
...string spool to be used for foot and tie in center of cord. Over the 2 strands of cord string 4 spools.
If you carefully colour-coordinate your spools, Sally could be a Rainbow Pride Spool doll.

To keep your colours straight, just remember “Roy G. Biv” – the Rainbow warrior who defeated Richard of York at the Battle of Wakefield and went on to found the Gay Pride movement!

Right?
String opposite foot and leg in same manner. Tie the 4 strands of cord together in a heavy knot. Run all cords through the Black Aunt Lydia, tie another heavy knot. Run all cords through the White “Star” Six Cord and tie an heavy knot.
Wait a second. If we’re using the White “Star” Six Cord as our doll’s body, that means we’re NOT using it to string Sally’s limbs.

Which means the “heavy cord” mentioned earlier is NOT in the materials list!
The arms are made the same as legs using 1 spool for each hand and 2 spools for each arm. Tie all cords around the last knot so cords cannot go through spool. Sew open section of head around knot. Embroider mouth with Red. Nose and eye brows with Black.
I guess it’s no surprise that red and black embroidery floss wasn’t listed in the materials list, either. Looks like I have no choice but to mug Paul Gross this time.

You hold him down while I grab his lanyard.
Use buttons for eyes as illustrated.
Be sure to exactly copy the look of horror in the doll’s eyes. She knows she’s fated to be dismembered the next time someone needs to reattach a button and there’s no black thread to be found in the sewing box.
Skirt. With “Star” Cotton Yarn, ch 23, 1 s c in 6th st from hook, * ch 5, s c in next st of ch, ch 5, s c in same st, ch 5, s c in next st, repeat from * to end of row, ch 5, turn.
The skirt is what makes Sally a crochet project, not just something you did in kindergarten class and proudly brought home for your Mother to hang on the Christmas tree.

And she did put it on the tree. The back of the tree. Against the wall. Where no one could see it.

She probably thought you wouldn’t notice, but you did. Oh yes, you did.
2nd Row. 1 s c in 1st 5 ch loop, * ch 5, 1 s c in next loop, repeat from * to end of row, ch 5, turn. Repeat 2nd row 4 times.
Did I mention that my Mother gave me a big box full of my grade school Christmas art projects when I moved out? “So you’ll have something for your tree,” she said, cheerfully.

But I know the REAL reason she gave me all my gifts back. She couldn’t bear the humiliation of having them disgracing her Christmas tree any longer.
7th Row. Ch 3, s c in 1st loop, ch 3, s c in same loop, * ch 3, s c in next loop, ch 3, s c in same loop, repeat from * to end of row, break yarn leaving a thread to sew back seam.
Unlike many of my early art projects, at least Sally is useful. She’s made of spools of thread, which will come in handy to repair clothes, string popcorn, and sew up wounds during the zombie apocalypse. And yes, you’ll be wanting to string popcorn during the zombie apocalypse.

Still, if the Gift recipient takes this doll apart to use it, she’ll feel guilty for destroying all the hard work the Gift-giver put into making it. But if she doesn’t use the thread, that means she didn’t appreciate your special Gift.

Hey, Sally Spool just might be the pinnacle of passive-aggressive Gifts!
Collar. Ch 15, and work 2 rows the same as skirt, then working across other side of ch, work 9, ch-3 loops, break yarn.

Pompon. Wind yarn about 25 times over a 2 ½ inch cardboard, remove and tie around center leaving 2 lengths about 2 ½ inches, trim. Make 6 more pompons in same manner.
Of course, not all spool dolls are hideous creations of a warped imagination. Some are actually quite adorable.


Earrings. Ch 2, 5 s c in 1st st of ch, break yarn and make another earring in same manner. Attach to side of head.

Place skirt around top of Black spool and sew in place.

Place collar around neck and sew. Using 2 strands of Cotton Yarn, run it through top of head, having about 6 inches at both sides, run strands through last spool from each side and tie at top. Tie 1 pompon at each side of spool at head, one at top of spool. Tie one pompon at each hand and foot.
And others are unspeakably cute!

I bet this is one handmade present that didn’t get hidden at the back of the Christmas tree.

But I guess I shouldn’t have issues about people not appreciating my Gifts Galores. After all, it’s not like a Gift is an expression of ME.

Oh wait, yes it is! *sob*

Click here for the printable pattern.


Read more!

Thursday, April 22, 2010

It’s your duty to love Mother Earth!

Apron Bib pattern from “The New Baby Book”, 1947

And it’s also your duty to love all the bounty Mother Nature provides. And yes, Missy, that includes eating every single one of your vegetables.

What do you mean you don’t like hot peppers?

Don’t you know your Mother lovingly prepared your breakfast burritos by hand? Not only that, she also lovingly crocheted this jalapeño pepper bib, just to keep your clothes – that she sewed for you – clean!

Why can’t you be like Dutifully Beautiful Betty? Sure, she daydreams about cutlery dancing the jitterbug, but at least Betty knows it’s unwise to annoy Mother.

Because just like Mother Nature, you never know when she might erupt.

For the complete pattern (and more snark!):

Materials Required: AMERICAN THREAD COMPANY “DE LUXE” MERCERIZED CROCHET AND KNITTING COTTON, ARTICLE 346

1 – 300 yd. Ball White and “STAR” PEARL COTTON ARTICLE 90, Size 5, 1 – 50 yd. Ball each of Yellow and Green.
Steel Crochet Hook No. 8.
As your child is refusing to be dutifully beautiful, she clearly doesn’t deserve real DE LUXE COTTON. That’s right, you’re not being cheap by purchasing discount “DE LUXE” thread. You’re teaching your child there’s a price for disappointing Mother.


With White, ch 99, d c in 3rd ch from hook, skip 2 chs, s c in next ch, * ch 2, d c in same st, skip 2 chs, s c in next ch. repeat from * to end of row, ch 4, turn.
2nd Row. D c in 3rd st from hook, s c in s c, (an increase) * ch 2, d c in same s c, s c in next s c, (pattern) repeat from * to last s c, ch 2, d c in same s c, s c in ch 2 loop, ch 2, d c in same loop, (an increase) ch 2, turn.
3rd Row. D c in d c, ch 2, s c in next s c, continue in pattern across row.
4th Row. Increase 1 pattern at beginning and end of row, then work 1 row even.
6th Row. Increase 1 pattern at beginning and end of row, then work 2 rows even.
9th Row. Increase 1 pattern at beginning and end of row, then work in pattern until work measures 6 ½ inches from beginning.
Next 2 Rows. Decrease 1 pattern at beginning and end of each row, then work 1 row even. Decrease 1 pattern at end of every row until 30 patterns remain, then work even in pattern until work measures 11 inches from beginning.
Next Row. Work 12 patterns, ch 2, turn, then work 1 row even, ch 2, turn.
Next Row. Work 11 patterns, ch 2, turn.
Next Row. Decrease 1 pattern at end of row, (outer edge) ch 2, turn.
Next Row. Work 9 patterns, ch 2, turn.
Next Row. Decrease 1 pattern at end of row, ch 2, turn, then work 1 row even.
Next Row. Decrease 1 pattern at end of row, ch 2, turn and work 6 patterns, break thread.
Actually, you may want to reconsider using cotton, “DE LUXE” or otherwise. While it’s better than yarn made out of crystalline polypropylene polymers, there are more environmentally correct options like organic bamboo.

What? Bamboo yarn is manufactured using toxic chemical solvents? It’s not a green choice after all?

Don’t they realize it’s not nice to fool Mother Nature?!


Attach thread in 7th pattern from shoulder just made, leaving 6 patterns free for neck edge and work other shoulder to correspond.

EDGE. Attach Green in lower corner and work pattern st around entire bib, break thread.

TIE. With White, ch 111 and work same as first row of bib, break thread.
Attach Green and work edge around entire tie, break thread. Work another tie in same manner and sew to each side of neck as illustrated. Ch 150 and work two more ties in same manner. Sew in position at underarm.

CARROT.
Wait, carrots? Not hot peppers?

If you ask me, those things on Dutifully Beautiful Betty’s bib look a lot more like this:

Than this:


With Yellow...
Yellow? YELLOW carrots? Never mind what that says about the freshness of the produce, there’s no way anyone’s going to believe you’re crocheting a carrot.
...ch 4, 2 s c in 2nd ch from hook, 2 s c in each remaining ch, ch 1, turn.
2nd Row. 2 s c in each s c, ch 1, turn.
3rd & 4th Rows. Increase 1 s c in 1st and last s c working 1 s c in each remaining s c, ch 1, turn.
5th, 6th, 7th & 8th Rows. Work even in s c, ch 1, turn.
9th Row. Decrease 1 s c at beginning and end of row, ch 1, turn.
10th Row. Work even.
11th Row. Same as 9th row.
12th Row. Work even.
13th Row. Decrease 1 st at beginning of row, 1 s c in each remaining s c, ch 1, turn.
14th Row. Same as 9th row.
15th, 16th & 17th Rows. Work even.
18th, 19th & 20th Rows. Same as 13th row.
21st & 22nd Rows. Work even.
23rd Row. Same as 13th row.
24th Row. Work even.
25th & 26th Rows. Same as 13th row.
27th Row. Work even.
28th & 29th Rows. Same as 13th row.
30th Row. S c in s c, break thread.
Work another carrot in same manner.
I bet the pattern designer claimed these were carrots because 1940s gringa housewives thought a jalapeño was a Mexican jalopy.

But now that we know the truth, have fun and crochet them up in assorted hot pepper colours!


CARROT STEMS. With Green and working very tightly, work 4 stems 25 chs long and 2 stems 35 chs long. For each carrot tie 2 short and 1 long stems together at center and fasten to top of carrot.

Pencil very lightly “I like”, then with Green embroider in outline st. Sew carrots in position leaving stems free.
And if your child complains that her mouth is burning, just tell her it’s for her own good. Hot peppers will put hair on her chest!

Which will help keep her warm when you decide to go all out for environmentalism, turn off the power, and live a no-impact lifestyle.

Happy Earth Day!


Click here for the printable pattern.

Read more!

Tuesday, April 20, 2010

Your Nursery Needs More Roadkill!

“The Frog that Wouldn’t Leap” from Knit & Crochet with Aunt Lydia’s Heavy Rug Yarn, c. 1965

This, children, is the Frog that Wouldn’t Leap. His mother warned him repeatedly, “Frankie, if you don’t leap, you won’t make it very far in life!”

But Frankie the Frog ignored her wise advice, preferring to walk everywhere he went. “Leaping is too hard,” he said. “Besides, this way I can stop and smell the roses.”

Then one day Frankie strolled casually onto the highway... and was instantly flattened by a passing car!

The moral of this story is: Always listen to your mother. Or else you’ll end up just like Flat Frankie, squished into the pavement with your eyes popped out of your head.

Okay now, everyone scamper off to bed. Sweet dreams!

For the complete pattern (and more snark!):

Materials Required:
AMERICAN THEAD COMPANY “AUNT LYDIA’S” HEAVY RUG YARN
8 – 70 yd. skeins Dk. Green
2 – 70 yd. skeins Fern Green
3 x 6 inch section White felt
Plastic Crochet Hook Size J OR ANY SIZE WHICH WILL RESULT IN STITCH GAUGE BELOW
GAUGE: 5 sts = 2 inches; 5 rows = 2 inches
NOTE: ENTIRE RUG IS WORKED OVER A SINGLE STRAND OF YARN
Except for the eyes and the legs, which are all worked separately. Oh, and every now and then you’ll reach the end of your skein and have to attach a new strand of yarn in order to continue.

So, Mr. Pattern Editor might want to think twice about shouting inaccurate NOTES at us. Because if he does it again, I’ll tell his Mother, and she’ll flatten him.
With Dk. Green ch 30, work 2 s c in 2nd ch from hook, 1 s c in each remaining st to within last st, 2 s c in last st; working on other side of ch, 2 s c in 1st and last st with 1 s c on each st between. Do not join this or following rounds. Place a marker at beg of each round. 2nd ROUND: 1 s c in each s c working 2 s cin each of the 4 inc s c at each end. 3rd ROUND: 1 s c in each s c working the 8 inc sts at each end as follows: inc in every other st. 4th ROUND: Continue in s c inc in every other st at each end in same manner as 3rd round. 5th ROUND: Work even in s c. 6th to 28th ROUNDS: Continue in s c inc as necessary at each end to keep work flat. 29th ROUND: Mark the center st at opposite end of oval, work to within 12 s c of marker, work 1 s c in next s c, 1 s d c in each of the next 2 s c (s d c : Y O insert in st, pull through, Y O and pull through all loops at one time), 1 d c in next st, 1 s d c in each of the next 2 sts, 1 s c in each of the next 13 sts, 1 s d c in next 2 sts, 1 dc in next st, 1 s dc in each of the next 2 sts, 1 s c in next st, 1 s c in each remaining st, sl st in next 2 sts to even round, cut yarn.
The “s d c” above is also known as a half double crochet or hdc.

Whereas, “S D C” stands for the Society of Dyers and Colourists, the Studebaker Drivers Club, and the environmentally friendly Sustainable Dance Club. None of which are applicable to this crochet pattern except obviously the eco-friendly clubbers.

After all, what could be more sustainable than dancing on a vintage flattened frog?
HEAD: With Dk. Green ch 2, work 6 s cin 2nd st from hook. Do not join and place a marker at beg of each round. 2nd ROUND: * 3 s c in next s c, 1 s c in next s c, repeat from * twice. 3rd ROUND: 1 s c in next s c, * 3 s c in next s c, 1 s c in each of the next 3 s c, repeat from * once, 3 s c in next s c, 1 s c in each remaining s c. NEXT 5 ROUNDS: Work in s c working 3 s c in center st at inc points. NEXT 2 ROUNDS: Same as previous rounds but work 5 s c in center st at inc points. 11th ROUND: 1 s c in next 2 s c, 1 s d c in next 2 sts, 3 d c in next st (eye), 1 s d c in next 2 sts, 1 s c in each of next 11 sts, 1 s d c in next 2 sts, 3 d c in next st, 1 s d c in next 2 sts, 1 s c in each remaining st working 3 s c in center st at inc points. 13th ROUND: 1 s c in each of the next 6 sts, 1 s d c in each of next 3 sts, 1 s c in each of next 12 sts, 1 s d c in each of next 3 sts, 1 s c in each remaining st working 3 s c in center st at inc points, sl st in next 2 sts to even round, cut yarn leaving a 10 inch length. Mark center st on straight side of this round. Matching center sts sew head in place with overcastting st to 1st section. Work a row of s c all around rug, then work 1 sl st in each s c, join, cut yarn.
Plus, Thursday is Earth Day. The perfect time to reflect on Earth’s Ecology, and on everything we’re doing to destroy our planet – including driving frogs to extinction!

Granted, it’s not just by running them over on the highway and turning them into rugs. Still, don’t underestimate Flat Frankie the Frog’s ability to raise awareness.
FRONT LEGS: Work 1 leg following sts outside parentheses and 1 leg following sts inside parentheses. With Fern Green ch 15, 1 s c in 2nd st from hook, 1 s c in each of the next 6 (5) chs, 3 s c in next ch, 1 s c in each of the next 6 (7) chs, ch 1 to turn all rows. 2nd ROW: Working in back loop (on all legs) 1 s c in each of the next 7 (8) sts, 3 s c in next st, 1 s c in next 8 (7) sts. 3rd ROW: 1 s c in next 9 (8) sts, 3 s c in next st, 1 s c in next 8 (9) sts. 4th ROW: 1 s c in next 9 (10) sts, 3 s c in next st, 1 s c in next 10 (9) sts. 5th ROW: 1 s c in next 11 (10) sts, 3 s c in next st, 1 s c in next 10 (11) sts. Do not turn. Work toes as follows: ch 3 sl st in next row, * ch 2, 1 d c in next row, ch 2 sl st in same row, repeat from * once, ch 3, sl st in last st, cut yarn. Work toes at other end of 1st row on 2nd leg.
Now, if crocheting up a dead frog for your child’s room just isn’t enough to show your love for Mother Earth’s tailless amphibians, then you can also hang a frog that’s still desperately clinging to life on your child’s door knob.


BACK LEGS: Ch 30, 1 s c in 2nd st from hook, 1 s c in each of the next 8 chs, 3 s c in next ch, 1 s c in each of the next 19 chs. 2nd ROW: 1 s c in next 20 sts, 3 s c in next st, 1 s c in next 10 sts. 3rd ROW: 1 s c in next 11 sts, 3 s c in next st, 1 s c in next 21 sts. 4th ROW: 1 s c in next 22 sts, 3 s c in next st, 1 s c in next 12 sts. 5th ROW: 1 s c in next 13 s c, 3 s c in next st, 1 s c in next 23 sts, cut yarn. Attach yarn on short end and work toes same as front legs. Work a 2nd leg in same manner but reverse order of starting sts, then complete in same manner as other leg.

EYES: (Work 2). With Fern Green ch 5, work 15 d c in 1st st of ch, join in 5th ch. 2nd ROUND: Working in back loop of sts work in s c inc in every 3rd st, join, cut yarn.

FINISHING: Steam rug. Sew legs in position as illustrated. Sew crocheted eyes in place then cut circles of White felt about ¼ inch less than crocheted circle. Sew in place. Finish eye with pompons.
Even better, place the Frog that Can No Longer Leap rug prominently in your front hall, and dangle the “Save The Earth, Torture a Frog” Door Hanger on your front door.

Not only will this show your commitment to lily pad stewardship today, this decorative theme could also save your life in the not-too-distant future.
POMPON: Wind Fern Green 10 times over a 1 inch cardboard, slip off cardboard, tie in center, cut both ends and trim into shape.

BODY POMPONS: Wind Fern Green 10 times and Dr. Green 10 times over a 3 inch cardboard and complete as above. Work 4, then work 6 in the same manner using Dk. Green only. Attach in place as desired.
After all, Mother always warned you that too much of a good thing could lead to an amphibian apocalypse. So, if the frog-huggers save too many tadpoles we could face a full scale frog invasion of our homes.

In this all too likely scenario, I guarantee that at the first sight of your Frankie the Flattened Frog rug, all the megalomaniacal, mutant froggies WILL leap out of your way.

However, you’ll be on your own with the gators. They’re reptiles, not amphibians.

Click here for the printable pattern.

Read more!

Monday, April 19, 2010

Wow – Knit and Crochet Ink!


What better way to show your love for the craft, than to have it inked into your skin? Now you’ll never be separated from your needles, hooks and yarn, no matter what calamity might befall you.

Tsunami soaked all your yarn? You can look at your tattoo and recall happier times as you drape wet skeins over the rubble of your former home. Earthquake buried all your knitting supplies? Well, at least you have a memento to remember them by. Volcano erupted in the middle of your living room? Well... here’s hoping you got out in time and with your skin intact.

For more awesomely crafty ink:


This tattoo has special meaning for Pam of FlintKnits. It’s not only an homage to her favorite craft, it’s also honoring her hometown of Flint Michigan.


See? Michigan is shaped like a mitten (with a lumpy rabbit jumping over it), and the heart on the tattoo marks exactly where Flint would be.

Fantastic!


I don’t know exactly what the symbolism is behind this one, but I adore the little skulls on the ends of her knitting needles.

Very goth! In a bright orangey mum-flower kind of way.

And finally...


Because if you’re going to get a knitting tat, it might as well be seriously bad ass.

No one’s going to mess with this knitter. She’s armed and dangerous!

Yes, dear reader, knitting and crocheting are now officially counter-culture. How does it feel to finally be one of the cool kids?


Read more!