Sweet and Low Perfectly dee-vine dancing partner. Rings the Belle every time and keeps ‘em coming back for more.
Rings the BELLE?
My goodness, is that code for naughty1940s nookie? It sure was by 1979!
Glamour-minded rugcutters please note the definitely P.M. neck-line, low and square; the come hitherish black velvet ribbons here, there and everywhere.
Come hither to my waist, collar and sleeves, but no higher and most definitely no lower! A proper young lady reserves all belle and bell ringing to the third date.Make it in cherry and whee, what a flutter you raise at your next party.
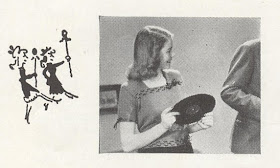
“Golly gee whiz, Dick. I don’t know why no one else showed up. I guess you’re my only guest. Let’s put a record on!”
“Donna, I really want to go home.”
“Don’t be silly! I’ve dead bolted all the doors, cut the phone lines and dynamited the only bridge off this property. So, do you like my sweater? I knitted it myself!”
For the complete pattern (and more snark!):
Hey, it looks like some other young ladies have launched a rescue mission to save poor Dick! Unfortunately, instead of arming themselves with the traditional torches and pitchforks, they’ve chosen bulrushes. Donna will make short work of them with just one Benny Goodman record.
Incidently, ringing your bell is also British slang for bashing someone’s brains in.No. 2054
Materials: CHADWICK’S RED HEART WOOL FLOSS (2 ply), 5 balls (1 oz. balls) for Size 12; 6 balls for Size 14; 7 balls for Size 16.
Bone Knitting Pins, 1 pair No. 3.
Because nothing knits the crazy into a garment like real BONE needles.8 yards of narrow velvet ribbon for each size.
Donna hand-carved them herself after a night of particularly unsatisfying bell ringing.
Buttons – see Directions of Right Back.
Wait, why can’t you just tell us now? Why all the suspense? It’s a knitting pattern, for heaven’s sake, not a murder mystery.Snap fasteners.
Not yet, anyway.
BLOCKING MEASUREMENTS:
SIZES: 12 (14, 16)
Bust: 31 (33, 35)’’
Width across front at armholes: 16 (17, 18)’’
Width across front between armholes: 12 (12 ½, 13)’’
Pay attention! The AT armholes measurement is four to five inches wider than the BETWEEN armholes measurement.Length from top of shoulder: 18 (18 ½, 19)’’
An extra four to five inches is essential to successful bell ringing.
Length of side seam: 10 (10 ½, 10 ½)’’
Width across each back at armhole: 7 ¾ (8 ¼, 8 ¾)’’
Width across each back above armhole shaping: 6 ½ (6 ¾, 7)’’
Width of sleeve at upper arm: 12 (12, 13)’’
I have no idea why we’re doing all this measuring. After all, this sweater hangs off Donna like a potato sack giving her all the sex appeal of a mashed potato.GAUGE: 7 sts make 1 inch; 10 rows make 1 inch.
If only she’d used a different pattern, Donna wouldn’t have needed to lock Dick up in her LP love den.
SIZES: 12 (14, 16)
FRONT . . . Starting at waistband, cast on 95 (100, 105) sts.
1st and 2nd rows: P across. 3rd row: *K 3, k 2 tog, 0. Repeat from * across, ending with K 5. 4th row: P across. Repeat these 4 rows 2 more times (3 rows of eyelets made). Now work in stockinette st (k 1 row, p 1 row), increasing 1 st at both ends of next row and on 1 row every inch thereafter until there are on needle 111 (118, 125) sts. Work straight until piece measures in all 10 (10 ½, 10 ½)’’.
To Shape Armholes: Bind off 4 sts at beginning of each of the next 2 rows and 2 sts at beginning of following 6 rows. Dec 1 st at end of each row until there remain on needle 85 (90, 95) sts. With right side facing, repeat 1st to 4th rows incl of waistband 3 times (3 rows of eyelets made). Work in stockinette st and continue. Next row: Work across 28 (30, 32) sts. Bind off (purling the sts) for front of neck, the next 29 (30, 31) sts. Work across remaining 28 (30, 32) sts. Work straight over this last set of sts only until piece measures from 1st row of armhole shaping 7 (7, 7 ½)’’.
To Shape Shoulder: Starting at armhole edge, bind off 6 sts on every other row until there remain 4 (6, 8) sts. Starting at same edge, bind off. Attach arm at opposite side of neck edge and work other side to correspond.
Now for the pièce de résistance... this sweater buttons down the back. How fantastically “come-hitherish”! After all, Donna can’t get out of her own sweater by herself.LEFT BACK . . . Starting at waistband, cast on 45 (50, 55) sts. Work same as Front until the 12 rows of waistband are complete. Next row: K across. Following row: P across to last 6 sts, k 6 (center back band). Continue in stockinette st, keeping the 6 sts of back band in garter st (k each row), increasing 1 st at side edge on next row and every 9th row thereafter until there are on needle 54 (58, 62) sts. Work straight until piece measures in all 10 (10 ½, 10 ½)’’.
Come to think of it, she can’t put it on by her lonesome either. She must have a man-servant chained in the basement for such troublesome tasks.
To Shape Armholes: Starting at side edge, bind off 5 sts once. Then dec 1 st at armhole edge on every other row until there remain 45 (47, 49) sts. Work straight until piece measures from 1st row of armhole shaping 7 (7, 7 ½)’’.
To Shape Shoulder: Starting at armhole edge bind off 6 sts on every other row 4 times. Starting at same edge, bind off 4 (6, 8) sts. Starting at same edge, bind off remaining 17 sts for back of neck.
Hurray! We’ve finally arrived at the Right Back, and the top secret number of buttons we need will be revealed...RIGHT BACK . . . Work to correspond with Left Back, making a buttonhole 2 sts in from back edge when piece measures from last row of waistband 1 ( ½, 1)’’ and, measuring from 1st buttonhole, every inch thereafter until there are 16 (17, 17) buttonholes in all – to make a buttonhole, on one row bind off 2 sts and on next row cast on 2 sts to replace those bound off.
Well, that was a let down. Why on earth couldn’t they have just said in the materials list: 16 to 17 buttons? Why make us search through the pattern to learn that?SLEEVES . . . Starting at lower edge, cast on 85 (85, 90) sts. Work first 4 rows same as Front (1 row of eyelets made). Now work in stockinette st until piece measures in all 2 ½ (2 ½, 3)’’.
Although... buttons have also been used as slang for, ahem, a lady’s bell. Perhaps, this was a successful attempt to thwart the knitting pattern censors.
To Shape Top: Bind off 4 sts at beginning of each of the next 2 rows. Dec 1 st at both ends of every 3rd row until 69 sts remain.
Heh. They said 69!Dec 1 st at end of each row until 55 sts remain. Bind off 3 sts at beginning of each row until 19 sts remain. Bind off.
Press pieces through damp cloth. Sew underarm and shoulder seams. Sew sleeve seams and sew sleeves in. Cut two 23-inch pieces of ribbon and run through eyelets of sleeve. Tie ends in bows. Cut three 27-inch pieces of ribbon. Tack one end of each piece to wrong side of Right Back at beginning of each row of eyelets at waist. Run these pieces of ribbon in and out of eyelets to desired position on left side of Front. Cut three 20-inch pieces of ribbon. Tack one end of each piece to wrong side of Left Back at beginning of each row of eyelets at waist. Run ribbon through eyelets to meet previous ribbons. Tie ends in bows. Cut three 20-inch pieces of ribbon. Tack ends at armhole edge on wrong side of Right Front eyelets. Run ribbon through eyelets to position above waist bows. Cut three 12-inch pieces of ribbon. Tack on wrong side of Left Front eyelets. Run ribbon through eyelets to meet previous ribbons. Tie ends in bows. Sew on buttons to correspond with buttonholes. Sew snap fasteners to close waistband at back. Work a row of sc along entire neck edge.
If you’re wondering how Donna intends this evening to draw to a close, just take a look at the page facing the Sweet and Low Sweater pattern.
By the way, S is the first initial of Dick’s last name, not Donna’s.
“See, Dick? We absolutely, positively must get married! I’ve already monogrammed everything in the house!”
In desperation, Dick threw himself out the window and made a run for it. He might have made it too, if it hadn’t been for the monogrammed land mines.
Not the Happy Ending Donna had in mind for her Dick. But on the bright side, she did get enough material for a brand new set of bone needles.
Click here for the printable pattern.


