Friday, January 28, 2011

A White Sports Coat and a Pink Carnation

Carnation from Gift Shopping with Crochet, 1942

“Crochet your own Bouquet!” exhorts the pattern book. Words to live by, now more than ever. After all, in these modern times you can’t rely on your date providing the all important corsage for the prom. So, start crocheting your fake flower now, or risk utter humiliation on the most important night of your high school life!

Oh yes it is – Disney wouldn’t lie to me.

What’s that? True, it’s the middle of winter, and the local news just issued a frostbite warning, but it’s never too early to get ready for Prom 2011. Spring is just around the corner, and soon there will be slim pickings for the all important Pink Hummer Stretch Limos!

Yes, this particular carnation looks all grey and blobby, when everyone knows that 2011 prom dresses are supposed to be eye-bleeding shades of painful pink and berserker blue. Don’t let the vintage black-and-white photography mislead you. I’m certain that your crocheted carnation in violent violet will take no prisoners – I mean, make you the belle of the ball.

For the complete pattern (and an actual crocheted carnation!):

Carnation

MATERIALS:

CLARK’S O.N.T. “BRILLIANT,” 3 balls.
Steel crochet hook No. 10.
A piece of heavy flower wire, 18 inches long.
Artificial carnation leaves and calyx.
Green rubberized tape.
Even if you’re too old to plan for the prom, there’s no reason why you can’t whip up a few carnations and enjoy springtime in your home all year round. Or, if you’re feeling really inspired, you could share your spring fever with your neighbours.

Because nothing brightens up a grim industrial wasteland like crocheted flowers clinging to a chain link fence!
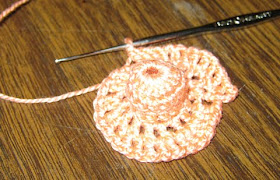
Starting at base of carnation, ch 5. Join with sl st to form ring. 1st rnd: Ch 3, 13 dc in ring. Join with sl st in top st of ch-3. 2nd and 3rd rnds: Ch 3, dc in each dc around. Join. 4th rnd: Ch 4, * dc in next dc, ch 1. Repeat from * around. Join.

Hmm... At this point in the project, I’m not seeing “carnation” so much as “carnal”.

But I am sure this craft will look a lot less like a naughty female body part and more like a delicate flower once I’ve finished a few more rounds.
5th to 9th rnds incl: Ch 4, * dc in next sp, ch 1, dc in next dc, ch 1. Repeat from * around. Join. 10th rnd: * Sc in next sp, ch 3, in next sp make 6 tr with p’s between - to make a p, ch 3, sc in 3rd ch from hook; ch 3. Repeat from * around. Sl st in 1st sc made. Fasten off.
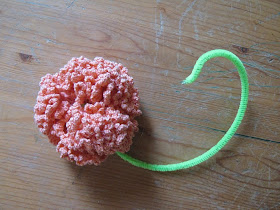
The pattern’s almost complete, and I can hardly contain my excitement! I just know I’m going to end up with a flower just like these gorgeous crocheted carnations discovered at a garage sale.


FINISHING . . . Fasten heavy wire securely to base of carnation. Slip calyx onto stem and push up close to petals, having slipped base inside calyx. Wind stem with rubberized tape, inserting leaves at desired intervals.
I thought about going the whole nine yards and buying florist wire and a plastic calyx, but the end result was so disappointing that I just stuck a pipe cleaner into the crocheted carnation and called it done.

How disappointing, you ask?

On the up side, it doesn’t look anything like a crocheted nipple.

On the down side, it does look like a human brain on a stick.

Still, who’s to say that’s a bad thing? The brain above was crocheted out of discarded plastic bags which means it’s Green in more ways than one!

So to heck with brightening up the neighbourhood with flowers. I vote we crochet up a ton of these brainy carnations and scatter them around instead. And if you’re feeling really ambitious, make some of these scientifically accurate fabric brains too.

It’s never too early to start planning for the 2011 Zombie Block Party!


Click here for the printable pattern.

Wednesday, January 19, 2011

Save a Seal, Skin a Wookiee!

Shag Jacket from Woman’s Day Knit & Stitch Number 9, 1973

I suppose you’d have to fringe up jackets just for fun, as I can’t imagine anyone paying you to do it. Although, knotting ten billion pieces of fringe onto a jacket doesn’t sound like much fun.

Sure, nowadays it would be a hoot to show up at your local Star Wars convention and claim you skinned Peter Mayhew. But this jacket’s from 1973, during the Dark Ages before Star Wars. This was a bleak time in history when kids beat each other up with sticks without light saber sound effects. And instead of playing the cool Chewbacca in Star Wars re-enactments, dressing up as a walking shag carpet in 1973 meant you were the stupid salt sucking monster from Star Trek.


Even in a time without womp rats to bulls-eye while flying your T-16, there were a lot more fun things to do than pretend to be Dr. McCoy’s shape shifting ex-girlfriend. Like pretending you were paper-mâché Spock’s girlfriend!

Duh.

For the complete pattern (and more snark!):

SHAG JACKET

SIZES: Misses’ 8 (10-12-14-16). Garment width around underarms, about 36” (37”-39”-42”-43¼”). Back length about 23” (23¼”-24”-25”-25”-25¾”).
According to Wookieepedia, the average Wookiee is just over two metres tall. So, if you need to make eight shag jackets in a hurry, you’d only have to hunt down and skin one adult Wookiee.

Of course, you could end up with your arms pulled out of their sockets, but DIY Wookiee-wear isn’t for sissies.
MATERIALS: Bernat Cuddlespun, 29 (29-30-34-36) ozs. color A, 9 (9-9-11-11) ozs. color B. Bernat Venetian Bouclé, 7 ozs. color C, 7 ozs. colour D. Crochet Hook size H, or size required to crochet to gauge. Five Buttons.
Feel free to substitute any bouclé yarn for Bernat Venetian Bouclé. Bernat Cuddlespun also no longer exists, but that’s probably for the best. Cuddlespun sounds more like a yarn for Ewoks than Wookiees.


GAUGE: 17 sts and 6½ rows=4”. (Pat st).

PATTERN STITCH: Row 1: * Ch 1, sk 1, dc in next st, repeat from * across, ch 3, turn.
Row 2 and All Further Rows: Sk first dc, work 1 dc in each dc, ch above ch across row, end 1 dc in turning ch of previous row.
To Inc 1 Dc: Work 2 dc in 1 st. On next row, work ch 1 before inc’d dc.
To Bind Off: At beg of row: sl st in each st to be bound off. at end of row: leave unworked sts to be bound off, turn.
BTW, this is a crocheted jacket. But I’m sure you could tell just by looking at it.


FRONT AND BACK: With A, ch 156 (160-168-180-188). Dc in 4th ch from hook and complete Row 1 of pat—76 (79-83-88-93) ch-1 spaces. Work even in pat until 15½” (15½”-15¾”-16¼”-16½”) from beg. Fasten off.

BACK: Sk 42 sts, attach yarn to next dc, continue across next 67 (69-73-79-83) center sts only.

Shape Armholes: In Row 2, bind off 3 (3-3-4-4) sts each edge. Bind off 2 (2-3-2-3) sts each edge of next 2 (2-1-3-1) rows. 0 (0-2-0-2) sts each edge of next 0 (0-1-0-2) rows—53 (55-57-59-61) sts.
It is essential that you crochet your 0 sts for 0 rows to gauge.
Work even until 6 ¾” (7¼”-7½”-8”-8¼”) above beg of armhole shaping.

Shape Shoulders and Neck: Mark center 23 (23-23-25-27) sts and leave them unworked. Work each side separately. Bind off for shoulder 6 sts at armhole edge in next 2 rows. 3 (4-5-5-5) sts at armhole edge in next row. Attach yarn at neck and work other side to correspond reverse shapings.

FRONT: Sk 10 sts each side of back and finish each front 33 (34-36-39-41) sts separately.

Shape Armhole: Shape as for back. Work front edge even until 3½” (4”-4½”-4¾”-5¼”) above beg of armhole shaping.

Shape Neck: Bind off 12 (12-13-16-18) sts at front edge, then 2 sts at front edge in the next 3 rows. Work even until 6¾” (7¼”-7½”-8”-8¼”) above beg of armhole shaping. Shape shoulder as on back.
Of course, you’re going to shape the armhole and neck of the front exactly the same as the back. You already know that the most beautiful fashions of the 1970s looked the same coming and going.

Granted, you may find it a bit confusing when it’s time to put your new coat on.


SLEEVES: With A, ch 38 (40-40-44-46).
Look at the small pile of Colours B, C, and D beside you with a puzzled expression. Wonder why you haven’t been asked to use any of them yet. Surely, you didn’t carefully label these separate skeins for no good reason.
Dc in 4th ch from hook, complete Row 1 in pat—17 (18-18-20-21) ch-1 spaces. Work 1 row even.
Row 3: (Inc Row): Inc 1 dc after first and before last dc. Repeat Inc Row every 2 rows 8 times, working inc sts in pat. Work even until 17¼” (17¼”-17¼”-18¼”-18¼”) from beg.
Foolishly, you tell yourself that it wouldn’t matter if you only worked evenly until 17 inches. Surely, you think, a ¼” here or there wouldn’t show. Well, you’re WRONG! This entire pattern is riddled with these essential ¼” and it’s much too late to stop now.

Although, you really should stop calling yourself Shirley.
Shape Cap: Bind off 4 sts each edge of next row, 3 sts each edge of further rows until cap is 4 ½” (4 ½”-4 ¾”-4 ¾”-5¼”), fasten off.
That’s shaping the cap of the shoulder, not the kicky beret worn by the Woman’s Day model. However, if you really want a headpiece that goes with your shaggy jacket, I suggest you wig out.


FINISHING: Steam-press pieces. Sew shoulder seams.
Row 1: Right side facing, with A, sc across front edges and around neck. Working 2 sc in each row, sk every 4th st, work 3 sc in each corner.
Row 2: Work even in sc, working 3 sc in each corner st, work 5 buttonholes in right front border, upper buttonhole just before corner last buttonhole about 2¼” from lower edge, and remaining buttonholes evenly spaced between.
For heaven’s sake, do ensure that the last buttonhole is 2¼” and not 2” from the lower edge. The Woman’s Day resident crocheter didn’t bother, and her uneven buttonhole spacing ruined the entire look!


Work buttonholes as follows: Ch 2, sk 2 sts.
Row 3: Work in sc, working 3 sc in each corner st and 2 sc in ch-2 space.

Fringe: Beg in Row 5 of back and front, know a 3½” strand of each color in every other chain. In next row, knot in every other chain between knots of previous row. Continue in this manner, skipping 1 row between knots.
Be sure to pause every ten minutes, and ask yourself loudly if you’re having fun yet.
At armholes, leave the 3 end sts free. Make same fringe on sleeves. Sew in sleeves. Check entire garment and fill in fringes where crochet pat is visible. Sew on buttons.
Realize that you’ve reached the bottom of the pattern and not once were you asked to differentiate between colours B, C, or D. But don’t let this heartbreaking betrayal distract you from the important task you have ahead of you.

Pimping your ride so it matches your new jacket!


Click here for the printable pattern.

Wednesday, January 12, 2011

Recession Chic!

Cotton jewelry from Star Variety Show of Knitted and Crocheted Models, 1942

Cotton jewelry – nothing gayer, nothing newer, nothing more talk-provoking.
The United States had just entered the war the previous December. What else could there be to talk about, other than cotton jewelry?

Although to be fair, the designers are trying to support their boys overseas. Why waste metal in foolish frippery, when it could be better used in munitions?

Yarn munitions don’t work nearly as well.

Thankfully, nowadays supporting our troops doesn’t require us to sacrifice our metal jewelry. Still, diamonds are too high maintenance to be a girl’s best friend during a recession, so it’s time again to start talking about cotton jewelry!

Um… er… it could be worse?
For ONE complete pattern (and a full serving of snark!):


SHELL NCKLACE AND BRACELET – No. 2107

Materials Required – AMERICAN THREAD COMPANY “GEM” COTTON YARN.

26 Yards Peach or any Color desired.

I do like a pattern that gives me a little choice, just in case I can’t find peach yarn.

Choice is important during hard economic times, whether it’s the 1940s or today. Like how women are choosing to spend their money on food and shelter, while the menfolk are choosing hip-hop bling!
11 Yards Green.

Bone Crochet Hook Number 4 or 5.

Four OR five, take your pick. It doesn’t really matter. There’s no gauge for this pattern. It’s footloose and fancy-free!

But before you reach for your size Q rug hooks, remember that bigger isn’t always better for cotton jewelry.


Leaving 8 inches of yarn free...
Yarn free! As free as the wind blows, as free as the grass grows, yarn free to follow...

... any other pattern!

Why stick with this one? Like your last home loan, you know it’s not going to end well.
...* ch 6, slip st to 5th st from hook for ring, (shell) ch 3, 1 d c, 1 s d c, 1 s c, 1 sl st in ring, repeat from * 25 times for necklace about 18 inches long. Ch 1 after last shell. Break yarn leaving about an 8 inch length. Attach Green in last s c leaving an 8 inch length free. * Yarn over needle 3 times, insert needle in loop of s c above shell, yarn over, pull through, yarn over, pull through, yarn over, pull through, 2 loops, yarn over, through 2 loops, yarn over, pull through all loops on needle. Slip st in s c between shells, repeat from * across shells. Chain the Green and Peach ends together for ties.
And now you’re the proud owner of this!

I guarantee that if you wear a shell bracelet to your next shindig, it will be talk-provoking!

“Look at poor Sally, she had to sell all her jewelry after she got laid off at the factory. Oh well, I suppose it could be worse!”

Click here for the printable pattern.

Wednesday, January 5, 2011

Stag Party!


Ah, the sweater girl! What could be sexier? The phrase brings to mind Lana Turner breaking the hearts of all seven of her husbands in her sultry knits. Or Jane Russell’s famous bust bursting at the seams of a sweater that didn’t keep her warm, but sure heated up the fellas!

And then there’s this poor woman...

Date Bait sweater from Newlands, Vol. Seven, Book Twelve, 1948

Eloise couldn’t help thinking that there must be a better way for an attractive single spinster to snare a man than outfitting herself in a stag-festooned sweater. True, time was running out as she was no longer a spring chicken, but dressing up as Date Bait smacked of desperation.

All evening she’d heard nothing but one joke after another about “going stag” and having a “sizeable rack”. She spent hours into knitting this sweater, and was it worth it? Sure, the menfolk are paying attention to her, but they weren’t buying her drinks.

And God, she needed a drink!

For the complete pattern (and more snark!):

The Date Bait sweater comes in a range of sizes, but it’s best to err on the side of too small. Saggy, baggy sweaters will not transform you into tasty man-bait!

Click on the graph to see it larger.
DAIT BAIT – No. 1270 – Size 34
Yes, that’s what it says in the book: “Dait Bait”. Newlands couldn’t be bothered editing this page, because any woman desperate enough to label herself “Date Bait” wasn’t going to complain if she suddenly morphed into a typo.

Whatever it takes to get a man!
MATERIALS REQUIRED: 8 oz. light rose, 5 yds. navy 3 ply Dawn Glo Yarn, 2 No. 10 needles, 2 No. 11 needles, set of 4 No. 11 needles.

Tension: 8 sts – 1 inch. 10 rows – 1 inch (No. 10 needles).

PATTERN: Stocking stitch – Duplicate stitch.

Neck: Using set of No. 11 needles, starting at neck edge, left shoulder, pick up 14 sts. K 36 sts from stitch holder in front, pick up 14 sts right neck edge, K 52 sts from back st. holder (116 sts). Rib K1, P1, for 1’’. Bind off loosely in ribbing.
All done! Now slip it on and set your sight on the nearest eligible stag man. Remember, there’s nothing like a hand-knitted sweater to scream “marry me!” at every male in the room.

Once you’ve got a member of the opposite sex on your hook, land him as soon as possible by knitting him a matching sweater of his own. Not only will the whole world know that you now own him, your hand knit sweater is guaranteed to keep him by your side forever.

What do you mean there should be more to the Date Bait pattern? Go look at the graph!

Sheesh, no wonder you’re still single.

Click here for the printable pattern.
Saturday, January 1, 2011

First Steps to a Happy New Year!

Helpful Hints from The Children’s Book’ Vol. 86, 1935

Baby Deserves the Best in Yarns Too!

And that means...

Bear Brand and Bucilla!
“Call 911!” you scream. Those babies have yarn wrapped around their necks, and now they’re EATING it!

Have no fear, gentle (and easily alarmed) reader. Bear Brand and Bucilla yarns are totally digestible and guaranteed not to plug a baby’s tender intestines.

Besides, these babies are not your coddled, over-protected, modern-day parasites on the body familial. These are 1930s Depression-era babies. They were made of sterner stuff and far more self-reliant than today’s layabout babies.
Yes, all those stories your Grandparents told you were true!

First Steps to Good Knitting and Crocheting

In 1935, baby toys were not designed by experts in child development. No sirree, babies developed their fine motor skills by playing with boxes of barbed wire.
Buy Sufficient Yarn – At the time the initial purchase of yarn for an article is made, it is important to buy the complete amount of each color necessary to finish the article.
After all, in 1935, there was a very good chance your yarn shop might go out of business before you finished your garment, and then where would you be?
Make sure the yarn is all of one dye lot number, as the next lot number of any color may differ slightly in shade from the original lot purchased, making it impossible to complete the garment satisfactorily.
That’s right, slight differences in shade will make it IMPOSSIBLE to complete your garment. Mixing of colours was not tolerated in the 1930s, and that included yarn.

Depression Baby is now knitting with her barbed wire!

Depression babies knew how to make do.
Bucilla Knitting Needles and Crochet Hooks - To insure the correctness of the work it is advisable to use only Bucilla Crochet Hooks or Knitting Needles, as recommended in directions. Other makes of hooks or needles may be marked according to a different gauge and their use in connection with Bear Brand-Bucilla directions involves a risk of incorrect size when the article is finished.
You’re no doubt wondering why the original users of this book couldn’t just look up a needle sizing chart on the internet, but have you seen the steam powered computers they used in 1935?

And you thought your old dial-up was slow!
Bucilla Knitting Needles and Crochet Hooks are made of the finest materials, they are smooth to the touch, and will not catch or split the thread.
Or the barbed wire!

And you thought the obsession about looking thin was a recent phenomenon.
To Determine the Gauge – Every knitter or crocheter works in her own way; some work tightly and some work loosely.
Uptight people work tightly. And you don’t want to know what they say about loose hookers!
With the same materials and the same number of stitches, one person produces a wide and short piece of work, while another runs all to length. It is wise to ascertain just how one’s own work measures, before commencing a garment. Cast on (or chain) about 20 stitches, using the yarn and needles (or hook) recommended in directions, knit (or crochet) 20 rows in the pattern stitch to be used. At beginning of the directions, the number of stitches to 1 inch and the number of rows to 1 inch, are given; this is called the gauge.
And incidentally, this completely negates the whole argument behind using Bucilla needles. Clearly, just using the right needles isn’t enough.
Compare gauge on sample just made with the gauge given in the directions. If the sample is worked tighter than the given gauge, loosen the tension of yarn when working; if the sample is worked looser, tighten the tension of yarn.
It’s easy! All you have to do is knit tighter, or looser, and keep the same tension throughout the entire garment, even if it’s not your natural tension.

Let’s face it, babies in 1935 could do it all without breaking a sweat. Or wearing clothes.
When the difference in gauge is great, it is advisable to change the size of needles, or hook.

Oh, look! Baby can read! She doesn’t need Mommy to read her patterns for her.

Come to think of it, where are Baby’s parents? Oh right, this is 1935. Baby’s parents have probably left for the Big City, in order to earn enough money to keep the family afloat. Baby has stayed behind to run the family farm.
Some Helpful Hints – Do not slip first stitch after turning; the edge will be stronger and better if all stitches are knitted.

When picking up stitches on an edge (for border or sleeve), use a finer needle to pick up with, and change to regular needle in second row. If the edge stitches prove too loose, pick up stitches next to edge.

Cast on and bind off loosely. Seams must be made as elastic as the knitted fabric.
No, we won’t tell you how to do any of this. If a 1930s BABY can figure out how to do all this, what’s wrong with YOU?

Why weren’t my children ever this useful?

They’re teenagers now, and they still don’t do laundry! Clearly, I’ve spoiled them.
To Wash Knitted Garments – Take complete measurements of the garment. Use a neutral soap, make thick suds with lukewarm water. Avoid using hot water which shrinks wool. Immerse garment and gently work suds through the fabric – do not rub, or twist, or allow the weight of the garment to pull it out of shape.
Babies are actually better at this job than adults. They can’t rub or twist very hard with their cute little baby muscles.

Yes, back in the Depression, baby labour was all the rage in the fiber industry sweatshops.
Rinse thoroughly in three lukewarm waters after washing, squeezing the garment gently between the hands to remove soap, but do not twist or wring. Roll garment between two turkish towels to knead out excess moisture – unroll at once and shape garment according to original measurements, leaving it on a turkish towel.
Only turkish towels will suffice. No other towel will do!

Although the two earthquakes Turkey experienced in 1935 might have put a slight dent in the towel trade that year.
Let it dry thoroughly, not forgetting to stretch it frequently into its natural shape.
The garment’s “natural” shape is not the one it naturally shrinks into – it’s whatever shape you’ve unnaturally stretched it into.


To Press Woolen Articles –
Or your baby’s genitals!

Always remember, safety first! Remind your infant to carry the plugged in, hot iron with both hands, and walk, don’t run.
Lay a padding on a table; lay a wet cotton cloth over the padding, place the article right side up over the wet cloth and pin it into the desired shape, then cover it with a dry cloth and allow it to dry slowly.
Babies have been known to object to over-enthusiastic pinning. Slow drying, on the other hand, is character building.
The slow evaporation of the wet cloth under the article will be sufficient to set the shape; do not remove until thoroughly dry.

If pressing with an iron is preferred, place the article wrong side up on a padded table.
There’s some debate over which is the wrong side of the baby. Personally, I believe the side that makes the most noise is the wrong side.
Cover with a damp cloth and pass a hot iron over it, so that the steam goes through, but the weight of the iron does not rest upon it; leave on pad until dry.

Further Important Notes – When garments are not in use do not hang them on a hanger or hook. Always place them in a drawer or chest so that they lay flat and smooth.
This goes for freshly pressed babies, too!
A smaller size may be obtained without changing the directions by using needles (or hook) next size smaller, and a larger size by using the next size larger needles.

Uh oh. Now might be a good time to teach Baby first aid!